Altcraft Docs LogoAltcraft Docs Logo
User guide iconUser guide
Developer guide iconDeveloper guide
Admin guide iconAdmin guide
English
  • Русский
  • English
Login
    User documentationGetting StartedFAQAltcraft glossary
      Profiles and databasesarrow
    • Subscription resourcesManaging databasesSubscriber profileProfiles import and data updateCommon Errors When Importing ProfilesScheduled customer data importManaging Data TablesAutomatic data collectionBulk customers profiles updateDouble opt-in subscriptionSuppression listsProfile relationsProfile history exportProfile exportCreating a static segment based on import resultsHow to open a CSV fileMatchingTypes of fields in the databaseGlobal control groupsSubscription Manager
      Communication channelsarrow
      • Email channelarrow
      • Email: ISP interactions best practices
          First mailingarrow
        • Quick StartEmail
        Email: sending domain configurationEmail: setting up and using postmasters
        Push Channelarrow
        • Mobile Pusharrow
        • First Mobile Push MailingSetup and Connection
            Mobile Push Providersarrow
          • Firebase Cloud MessagingApple Push Notification ServiceHuawei Mobile ServicesRuStoreYandex.AppMetrica
            Integrate your app with Altcraftarrow
          • Обработка и добавление подпискиРегистрация событийПровайдеры: структура push-сообщения
          Web Pusharrow
        • First Web Push MailingResource and Website Setup
            Web Push Providersarrow
          • Firebase Cloud messagingApple SafariMozilla Services
          Transferring Data to the PlatformWeb Push SDK MethodsPWA and Push Notifications
            Migration and Subscription Transferarrow
          • Migrating push subscriptions from third-party servicesHow to transfer push subscriptions configured for Safari?Migration from OneSignal
        SMS channelarrow
      • SMS
      WhatsAppViber*™
        Telegramarrow
      • Telegram BotTelegram Group
        Maxarrow
      • MAX BotMAX Group
      NotifyCommunication Channels WorkflowРуководство: SMS-рассылка через VK NotifyРуководство: SMS-рассылка через УТШРуководство: push-рассылка через сервис от "Согласие"
      Segmentationarrow
    • Static SegmentsDynamic SegmentsUpdatable Segments
        Segmentation Conditionsarrow
      • Segmentation by Profile dataSegmentation by Interactions with EntitiesSegmentation by Activity of the channelSegmentation by external dataSegmentation by external SQL tablesSegmentation by Profile structure
      Best Send Time (BST)Logical operators "AND" and "OR"Recommendations for working with segments
      Message templatesarrow
      • Working with message templatesarrow
      • Working in the editorEmail templateSMS templatePush templateMAX templateTelegram templateWhatsApp templateViber templateNotify template
        Visual editor for email-templatearrow
      • Visual editor interfaceAdding blocksElements and their settingsCustom blocksStyle managerLayer manager
      Template fragmentsImage galleryContent personalizationCreating tables based on array elementsBlock editor for email template
        Altcraft Variables and Functionsarrow
      • Logical expressions in messagesLoops in messagesMarket variables in templatesUsing the JSONPath functionality
        Dynamic content in messagesarrow
      • Dynamic HTML contentDynamic JSON contentContent from SQL database in templatesDynamic API content
      Importing and exporting a message templateImporting a template from a third-party serviceExporting a template from Pixcraft
      Mailingsarrow
    • Broadcast mailingsTrigger mailingRegular mailingMultivariate testingPlacement mailingMailing testingMailing scheduleMailings calendarManaging the Sender Queue
      Automation scenariosarrow
    • Managing scenariosNodes of the scenarioClassic marketing scenariosStep-by-step welcome scenario guideScenario for automatic notification of the managerAbandoned cart scenario
      Marketarrow
    • Market settings
        Productsarrow
      • How to create a product manuallyHow to import a product from a fileScheduled product importProduct and SKU SegmentsPreparing the YML file
      OrdersMarket variables in message templateGuide: how to send an order confirmation email
      Loyalty programsarrow
    • Loyalty programsLoyalty integration with external systemsCreating a loyalty program from scratchBasic loyalty program use casesOrder SegmentsPromotion codes
      Reports and analyticsarrow
    • Channel reportTraffic report
        Summary reportarrow
      • Summary report metrics
      Cohorts reportLifetime reportFunnels reportGoals reportAudience growth reportClick map reportLoyalty programs reportBounces reportUndeliveries reportReport on global control groups
      Integrationsarrow
      • Action hooksarrow
      • Altcraft Action HooksAction hooks event typesAction Hook Message StructureJSON batch request (HTTP POST action hook)Message to RabbitMQ brokerMessage to RabbitMQ exchangerMessage to Kafka brokerTest event
        Integration of third-party services using Albatoarrow
      • Connecting Altcraft to Albato Launching the welcome scenario using AlbatoTransmitting event dataSetting up a trigger mailingEvent registrationGoogle Sheets and Altcraft integration AmoCRM and Altcraft integration
      Facebook Ads Manager™Google Ads AudiencesMAXYandex.Audience™VK AdsStatic segment synchronizationYandex AppMetrica™Tilda™Lpgenerator™WhatsAppViber integrationIntegration scopeData Transmitted During SynchronizationNotify
      Weblayersarrow
      • Formsarrow
        • Create a formarrow
        • General settingsForm customization with custom codeForm constructorAppearanceActions and form publicationConditional logic in forms and surveys
        Data analyticsBinding data channel and formsNPS testing
        Pixelsarrow
      • Goal customer actions and scoring
        Pop-upsarrow
      • Creating and publishing a pop-upSetting up a popup in the code editorManaging pop-ups manually via scriptPopup analyticsGuide: pop-up for push subscriptionsCase: Creating a pop-up with the "Wheel of Fortune" widgetBasic cases of placing a popup via the Tag Manager
        Tag Managerarrow
      • Configuring and installing Tag ManagerTrigger typesVariable typesLinking a pixel and the Tag manager
      Settingsarrow
    • Account settingsCustom linksVirtual sendersSending policiesAudit journalTags FAQ
        Users, groups and accessarrow
      • Two-Factor Authentication (2FA)
        Connectionsarrow
      • Connection to Facebook Ads ManagerConnection to Google AdsConnecting to Yandex.Audience™Connection to 360dialogConnection to EdnaConnection to Devino TelecomConnection to SMSTrafficConnection to VK Ads™Connection to MTS OmniChannelCustom Authentication ConnectionOAuth2 connectionBasic Authentication connectionToken Authentication connectionConnection to RapportoMAX connectionConnection to Notify
      Attribute settings
      API requests: where to startarrow
    • Import or update a profileTrigger mailing launchEngage profile in scenario
      Changelogarrow
    • v2026.2.77v2026.1.76v2025.4.75v2025.4.74v2025.3.73v2025.2.72v2025.1.71v2024.4.70v2024.3.69v2024.2.68.2v2024.1.68
    Documentation archiveEmail Marketer's Library
      Campaignsarrow
    • Working with CampaignsLocal control groups (LCG)Stratification Violation ErrorAudience expansionAudience building
  • Communication channels
  • Push Channel
  • Mobile Push
  • Mobile Push Providers
  • Apple Push Notification Service

Apple Push Notification Service

To send Mobile Push to iOS devices, you need to set up Apple Push Notification Service in advance.

caution

All actions are performed on a macOS device. An Apple Developer account is required for setup.

APNs supports two types of authentication: authentication key (recommended) and certificate.

Option 1: authentication key​

Step 1. Creating an Auth Key​

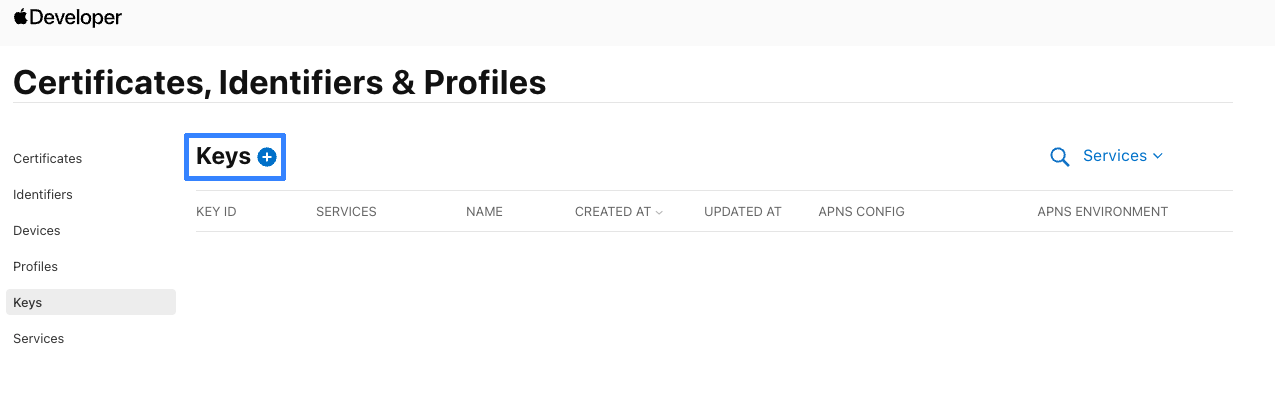
Go to the Apple Developer website to the Account section. Navigate to Certificates, Identifiers & Profiles — Keys and create a new Key.


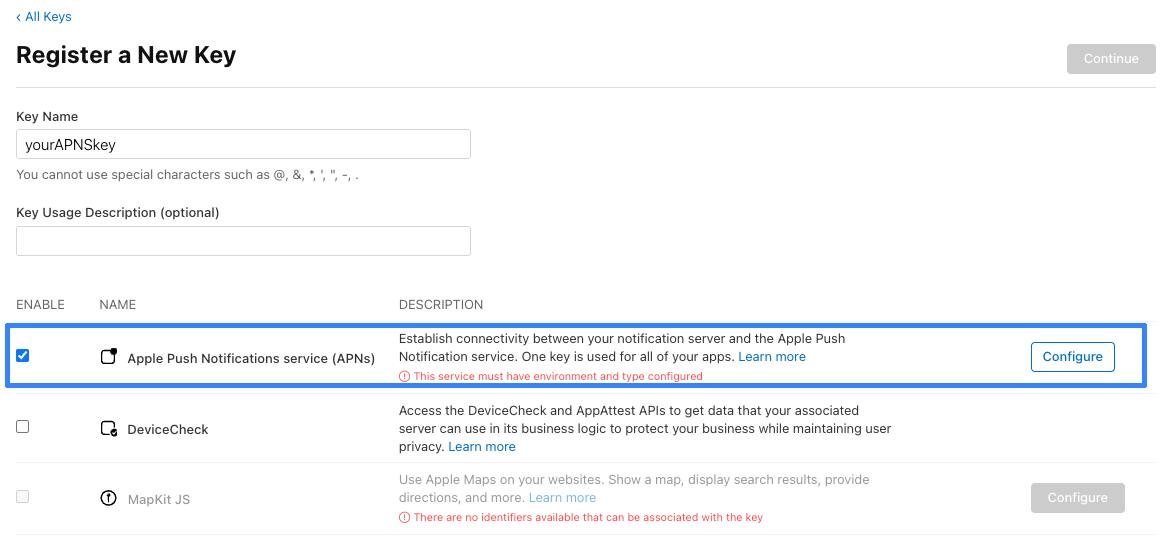
Select Apple Push Notification service.


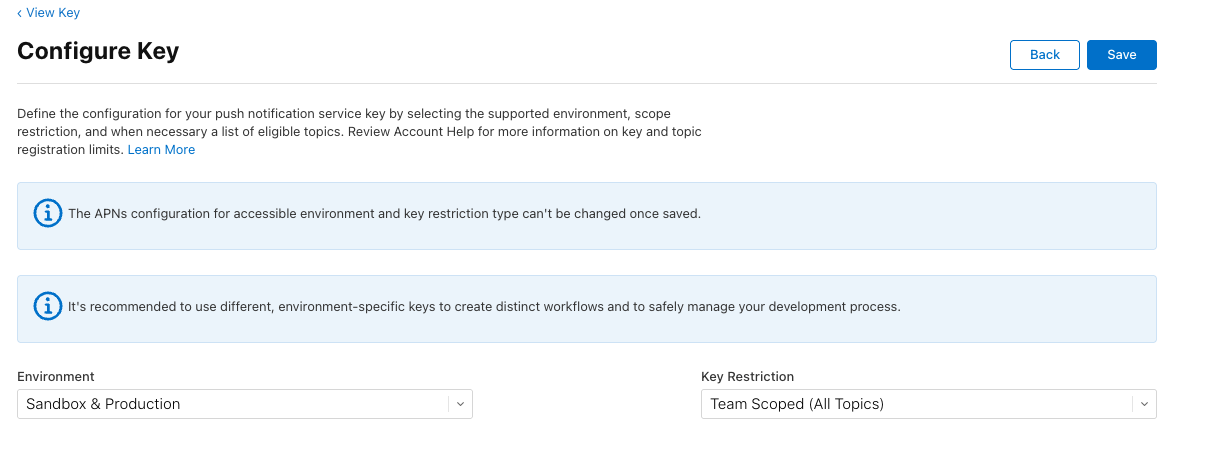
Configure APNs. Click Configure and select the Environment depending on your environment.


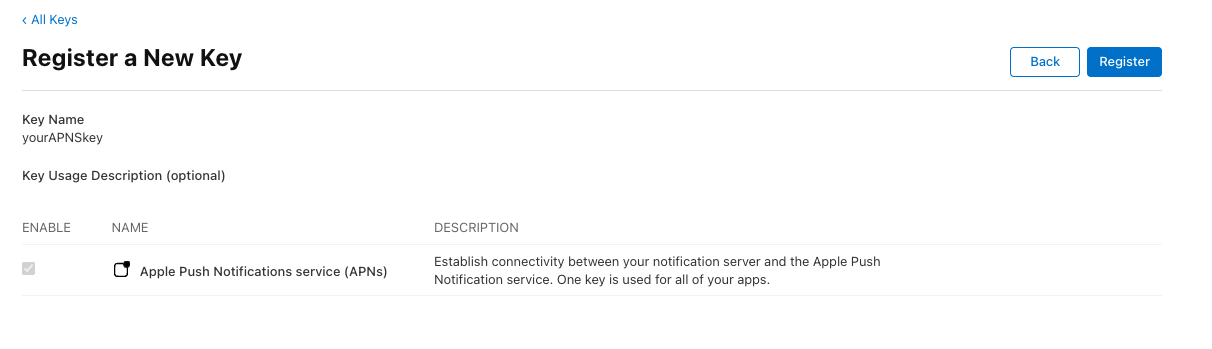
Register the key by clicking Register.


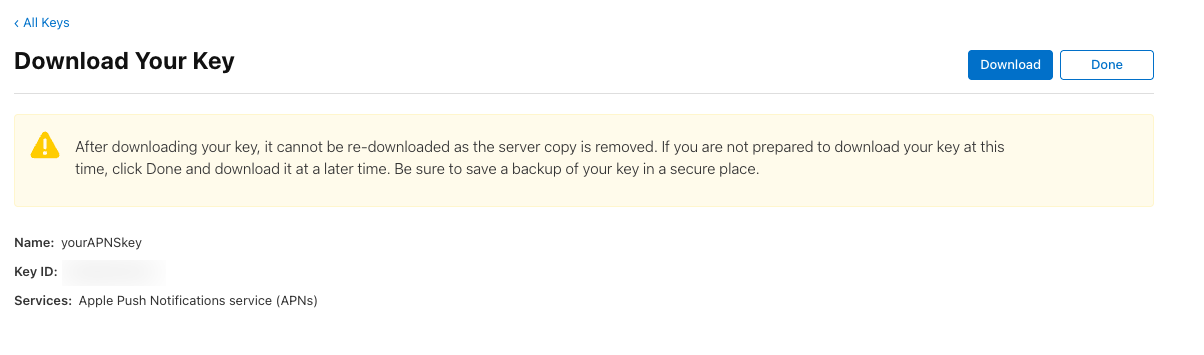
Apple Developer allows you to save the created key only once. Make sure to save it in a secure location — it cannot be retrieved again after download.

Step 2. Configuring in the Altcraft platform​

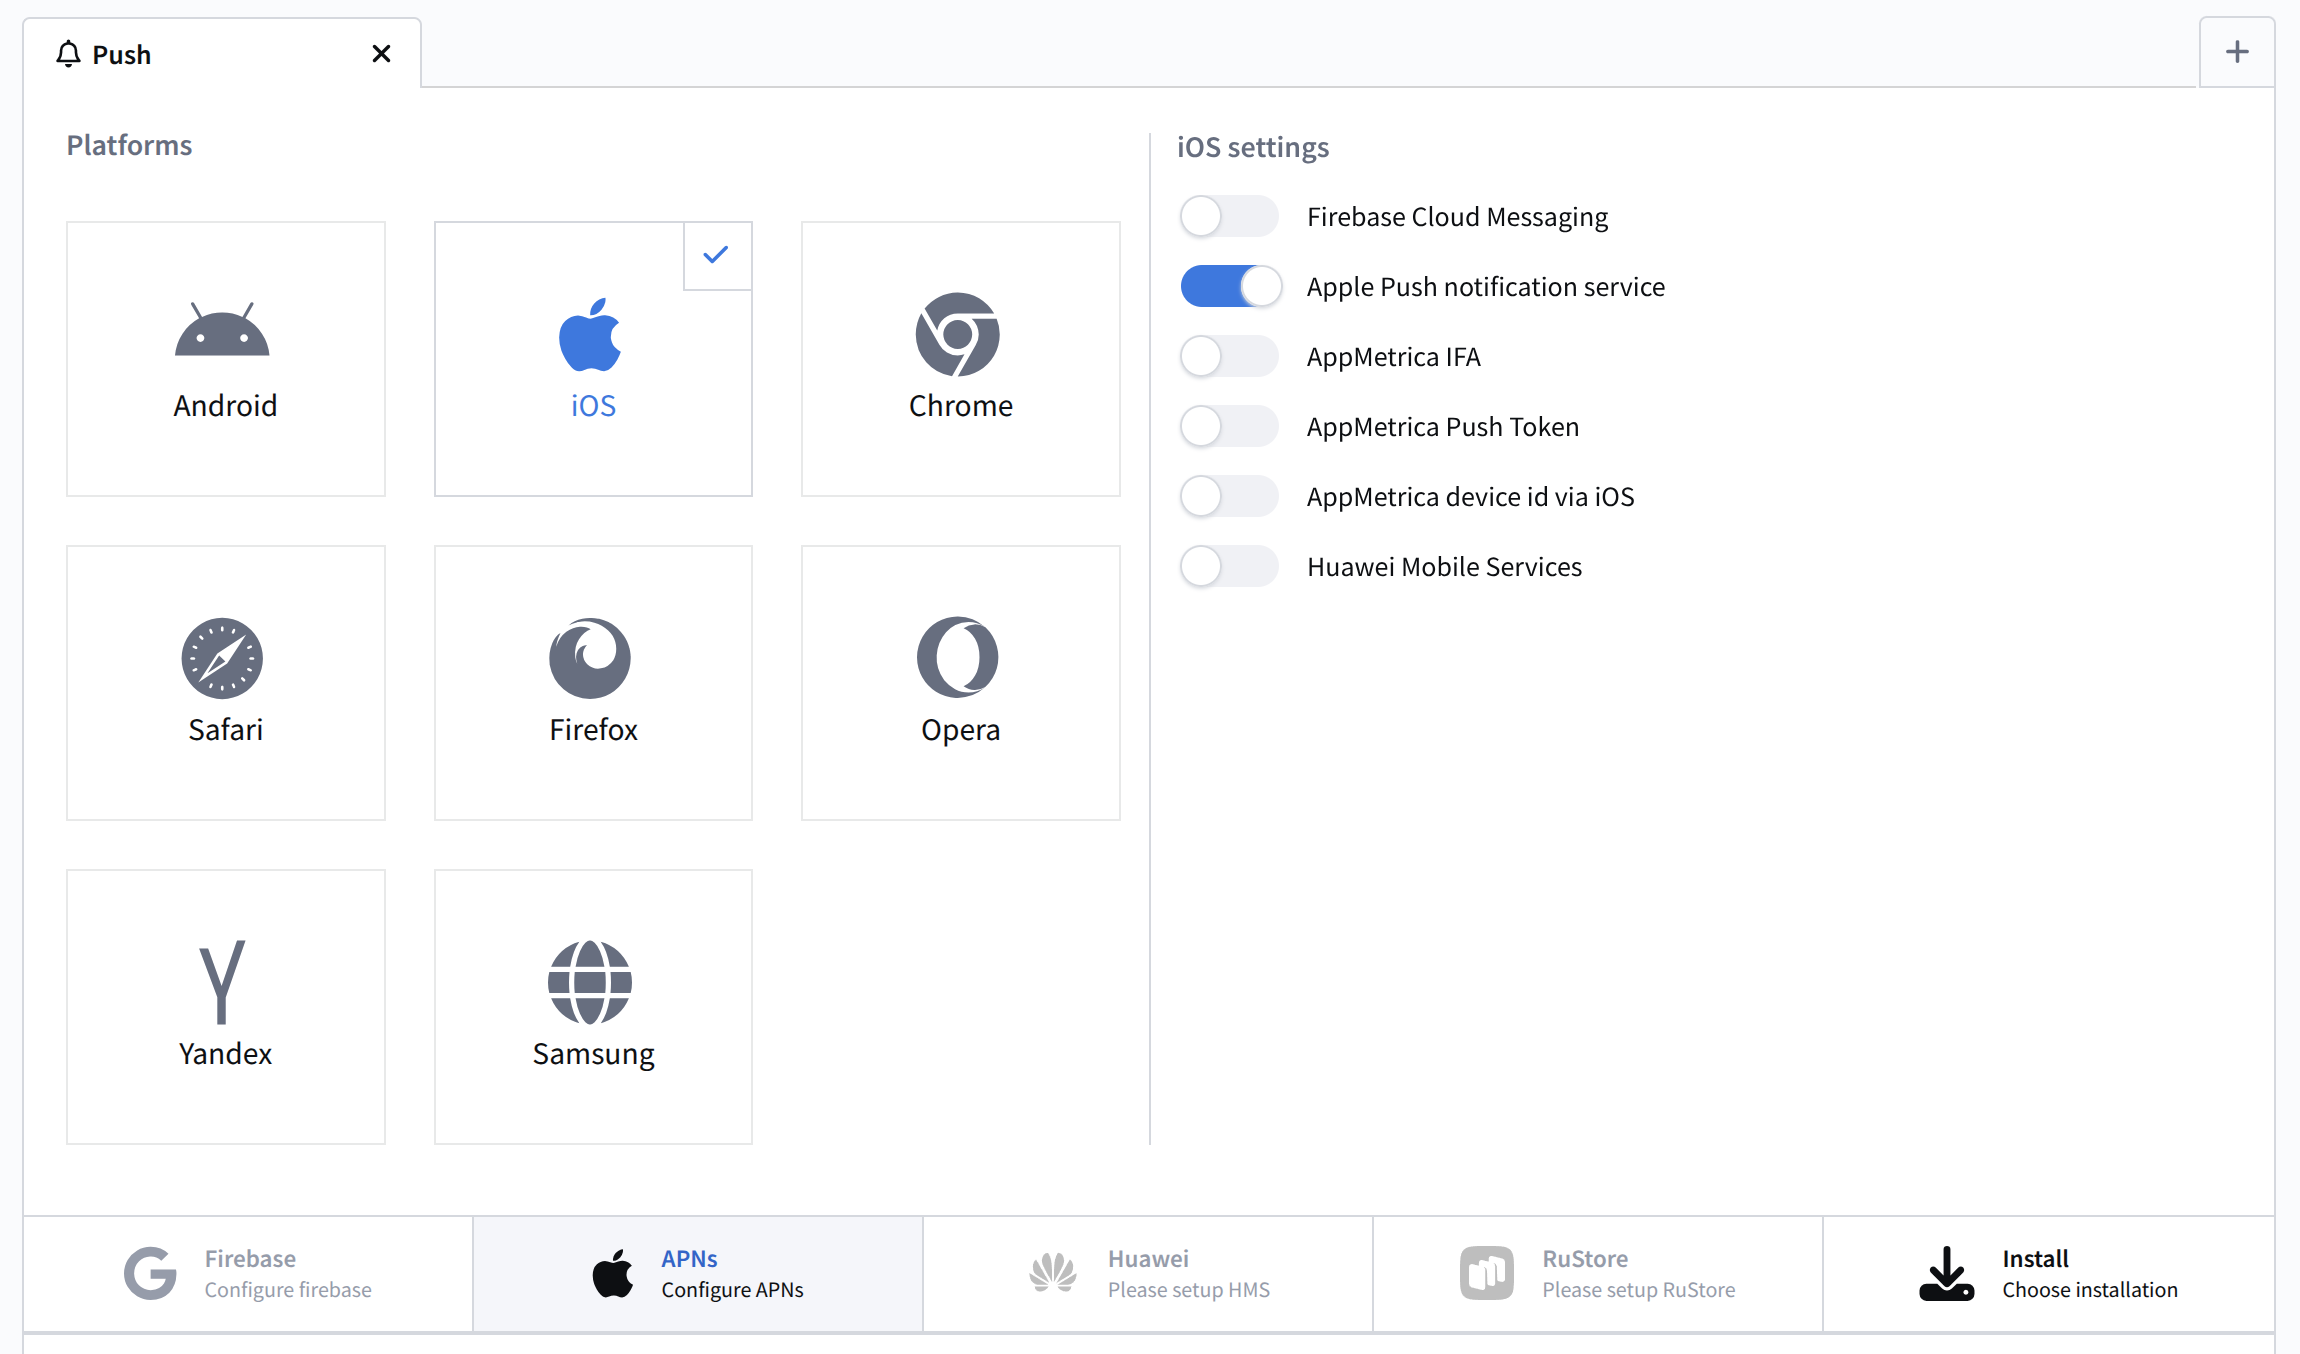
In the Altcraft platform, open the resource settings. Add the Push channel and activate the Apple Push Notification service toggle.


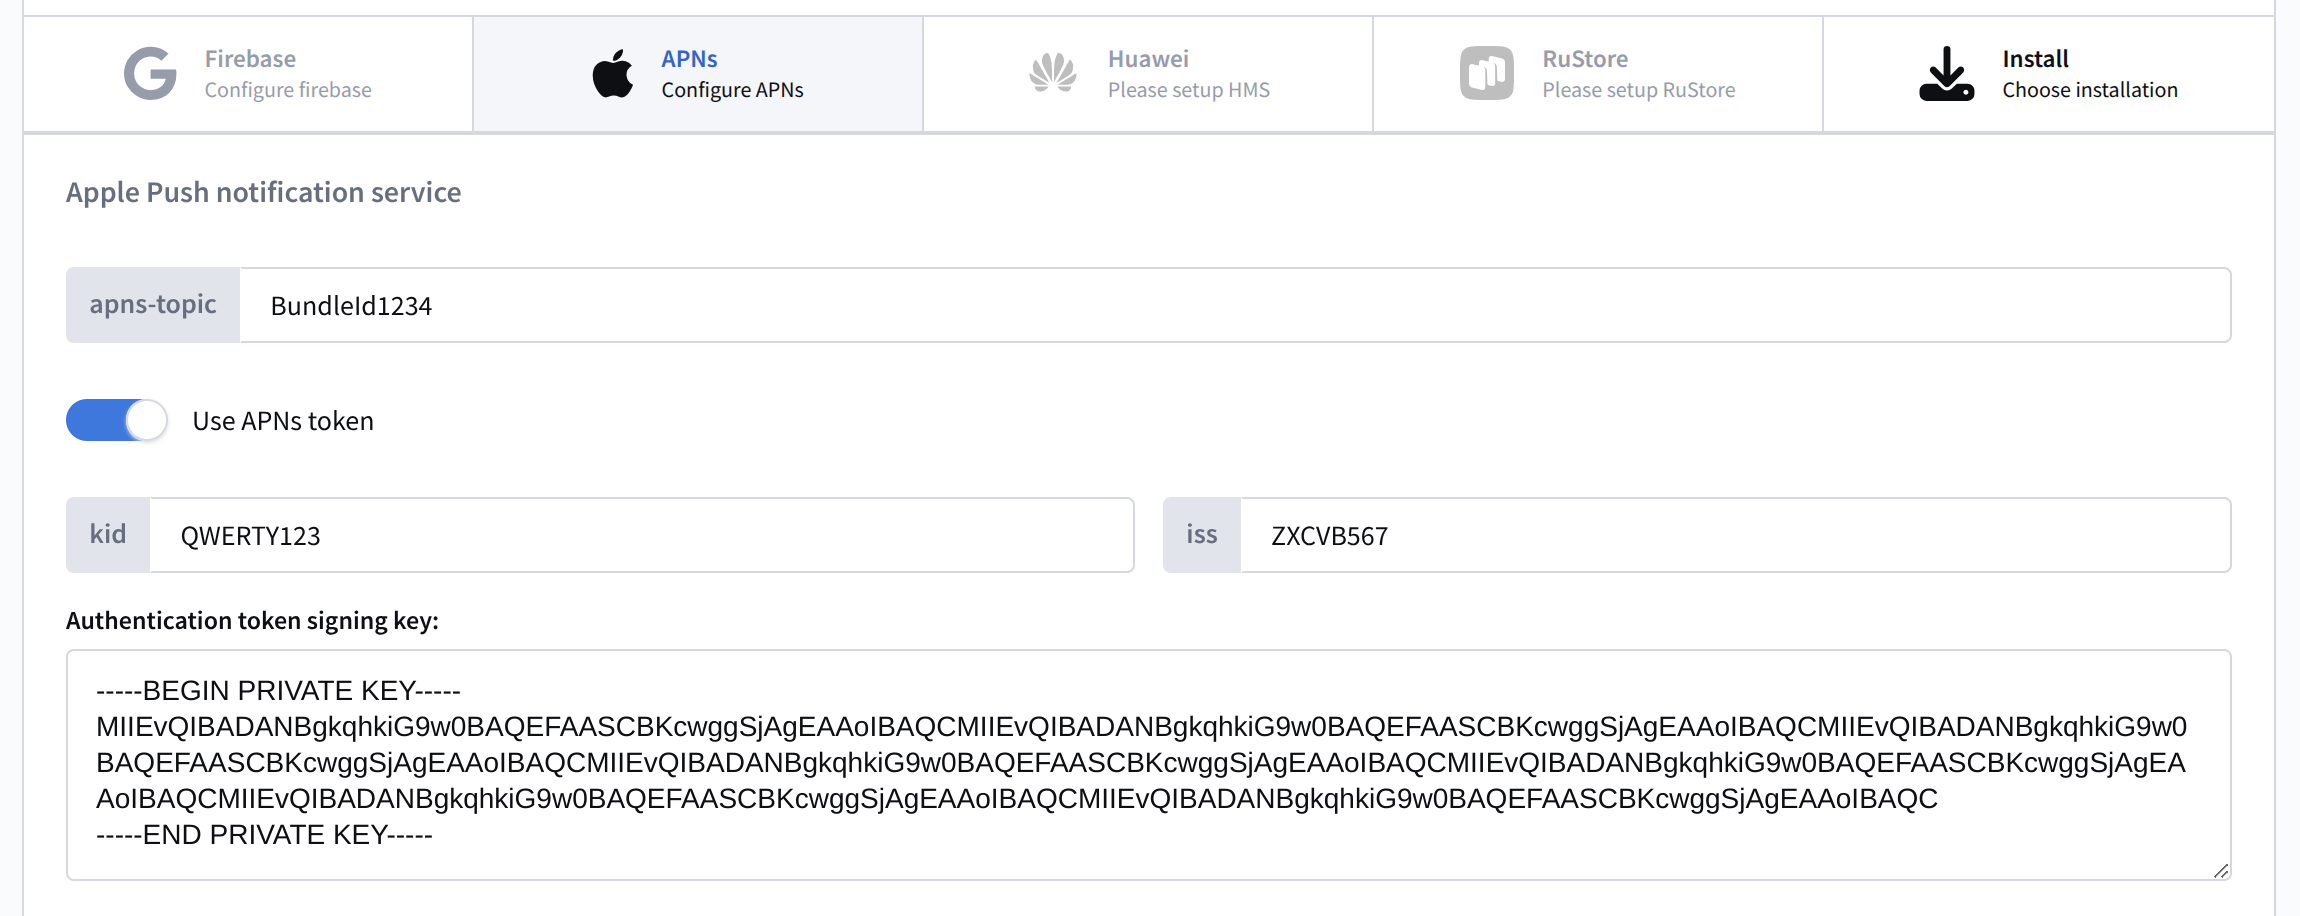
Activate the Use APNs token toggle and specify:


  • apns-topic — app Bundle ID
  • kid — key ID (stored in Certificates, Identifiers & Profiles — Keys)
  • iss — Team ID from Apple Developer
  • Signing key — contents of the downloaded p8 file (open in a text editor and copy)

Save the resource using the buttons in the upper right corner of the screen.

Option 2: certificate​

Step 1. Creating a certificate​

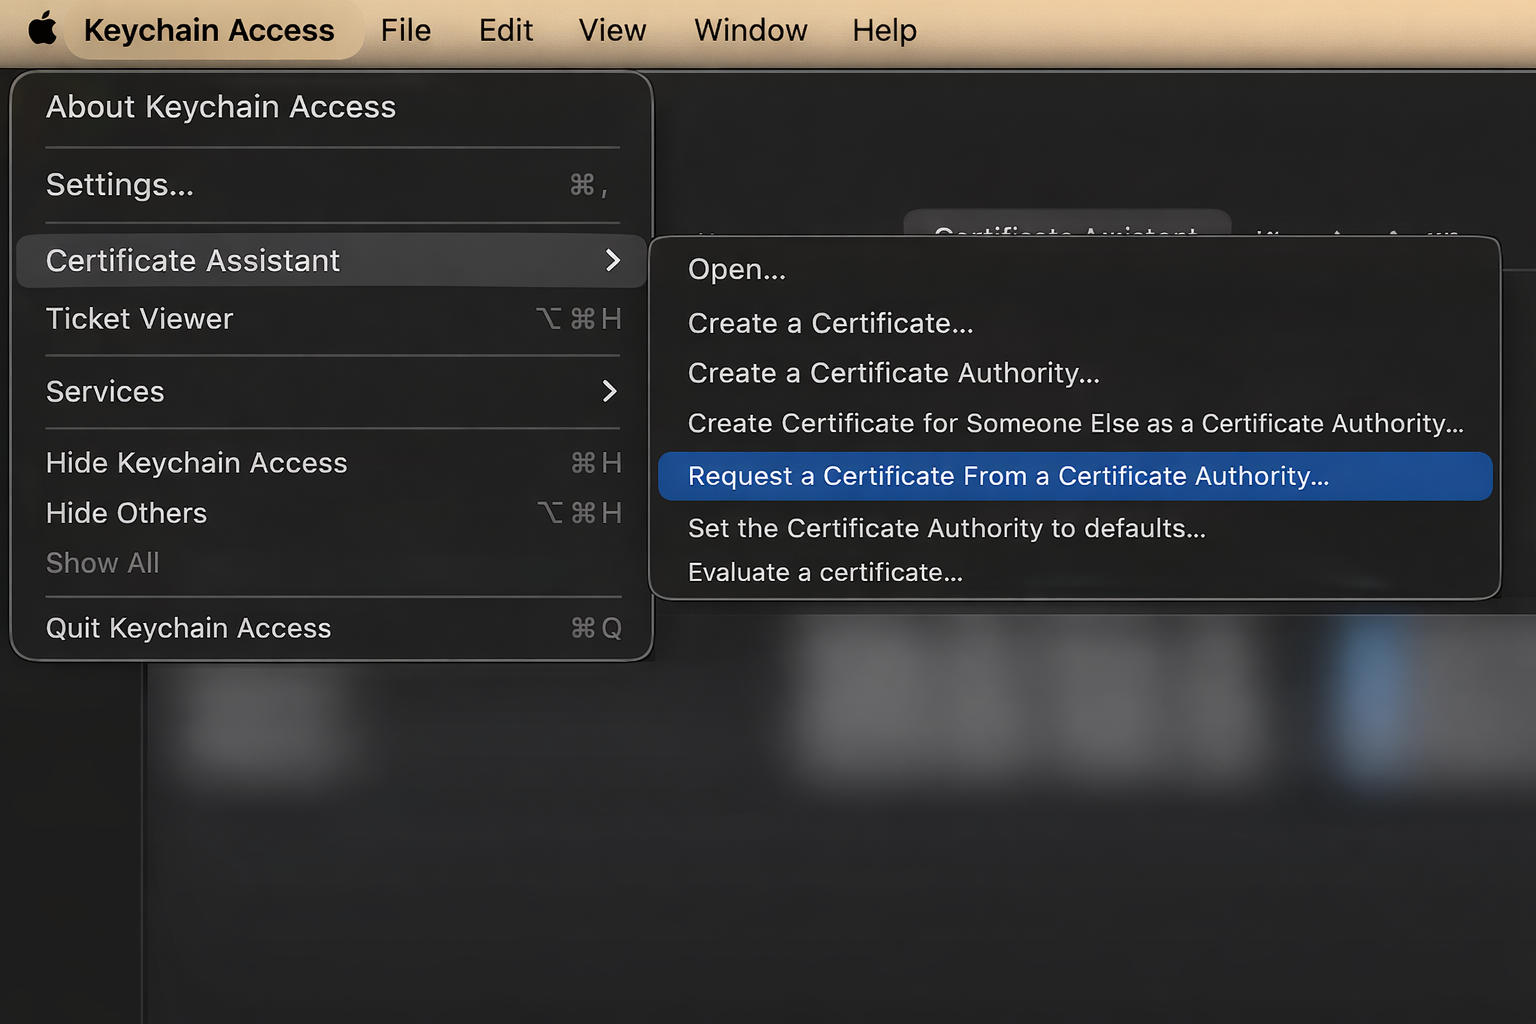
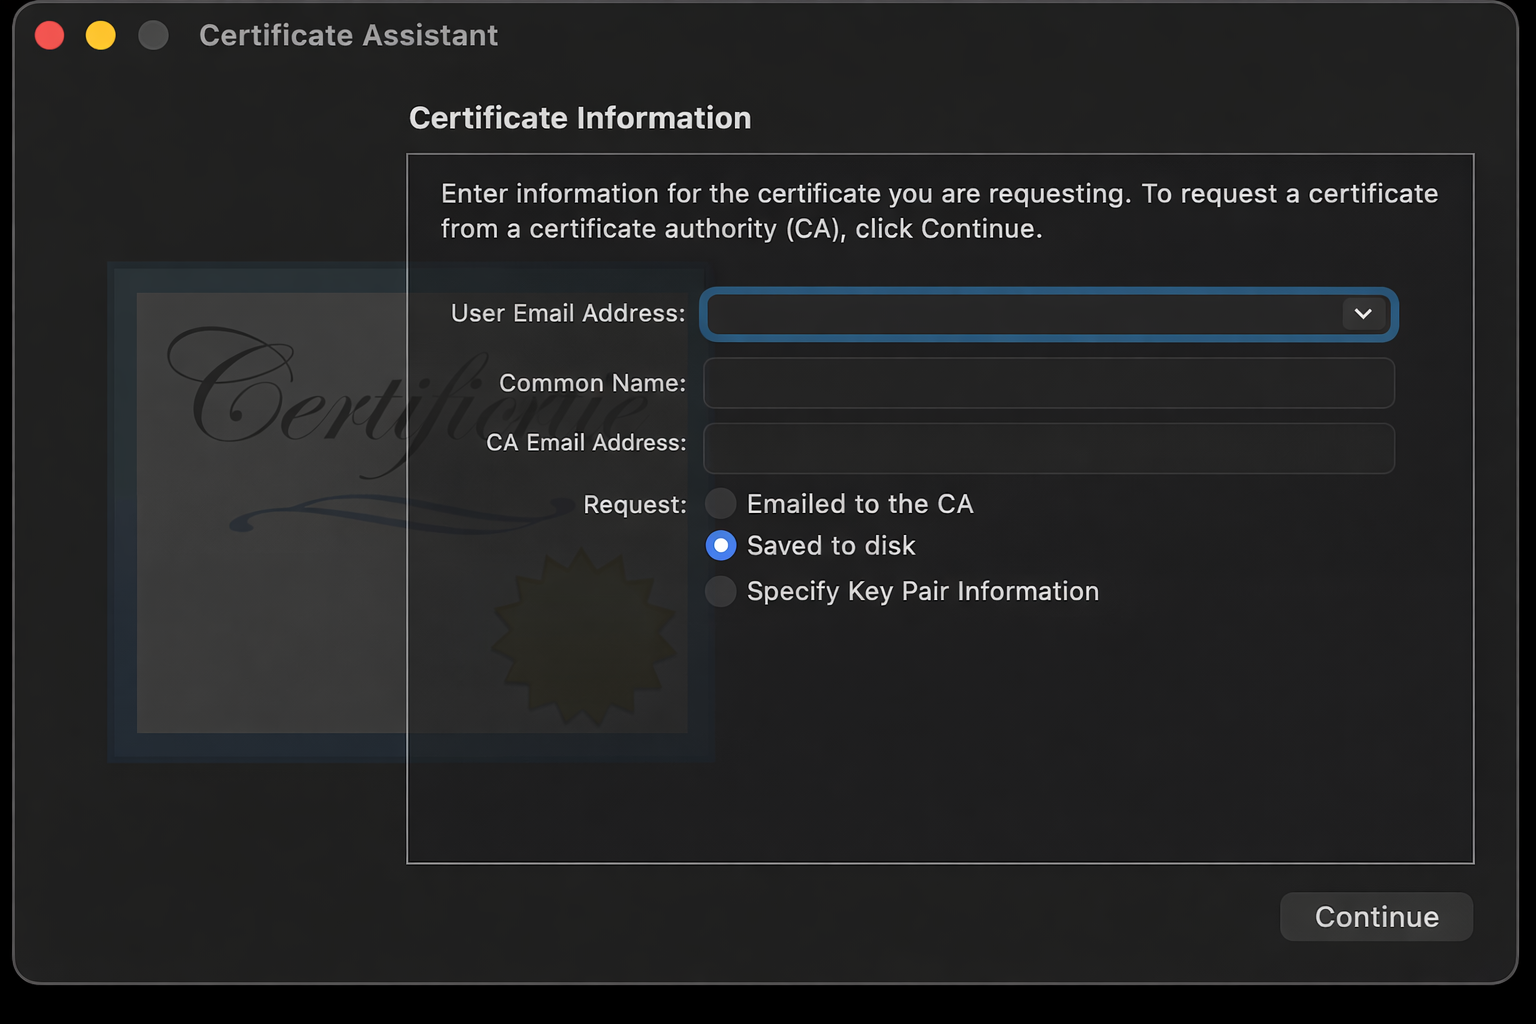
Open the Keychain Access app on macOS. Navigate to Keychain Access — Certificate Assistant — Request a Certificate from a Certificate Authority.


Fill in the required information and make sure to select the Save to disk option.


The saved .certSigningRequest file will be needed in the next step.


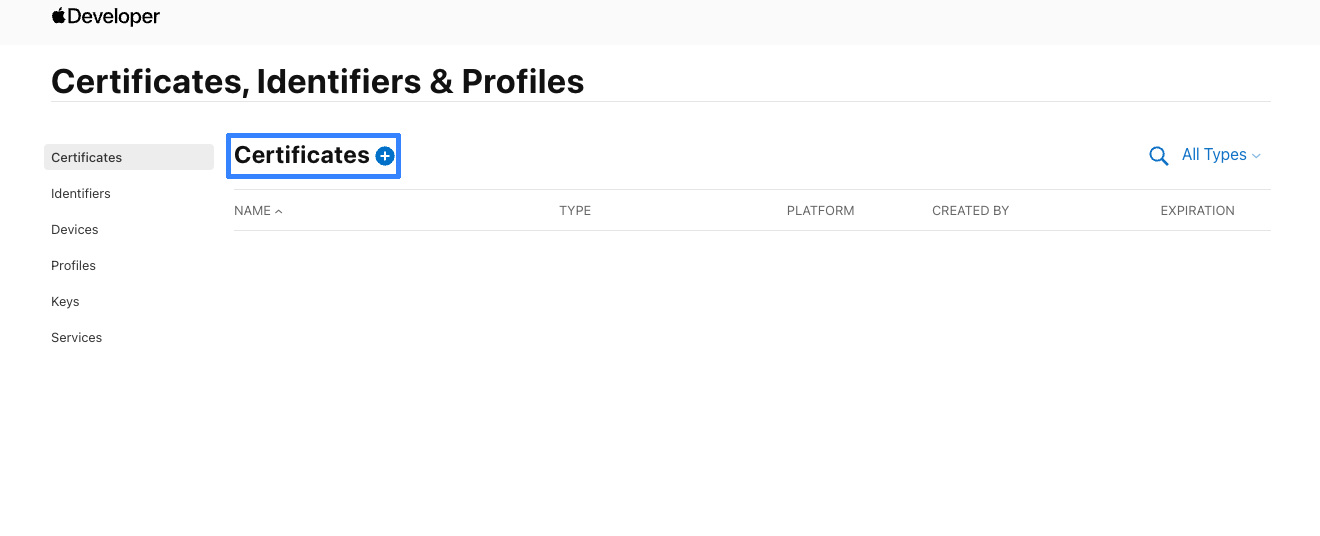
Go to the Apple Developer website to the Account section. Navigate to Certificates, Identifiers & Profiles — Certificates and create a new certificate.


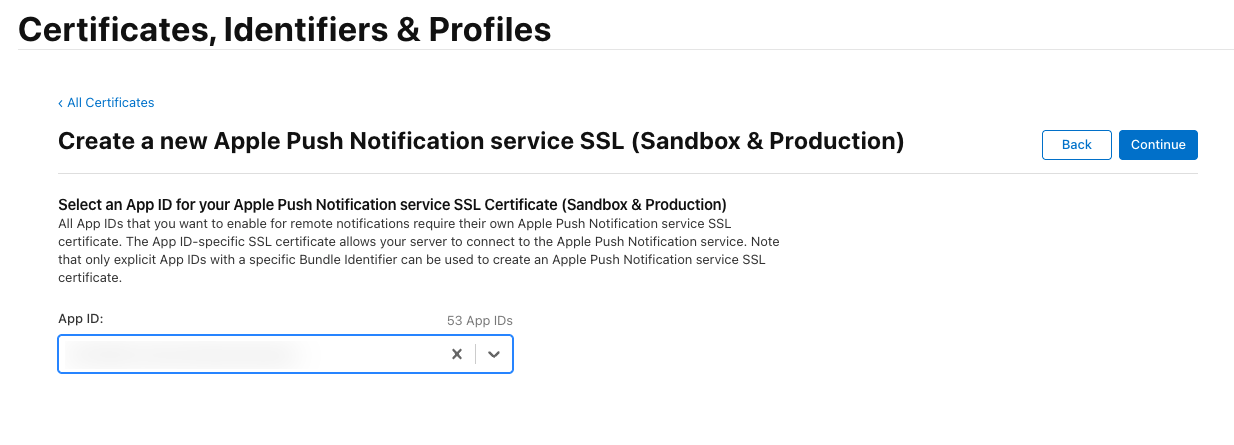
For Services, specify Apple Push Notification service SSL (Sandbox) or (Sandbox and Production) depending on your environment. Select your app from the list.


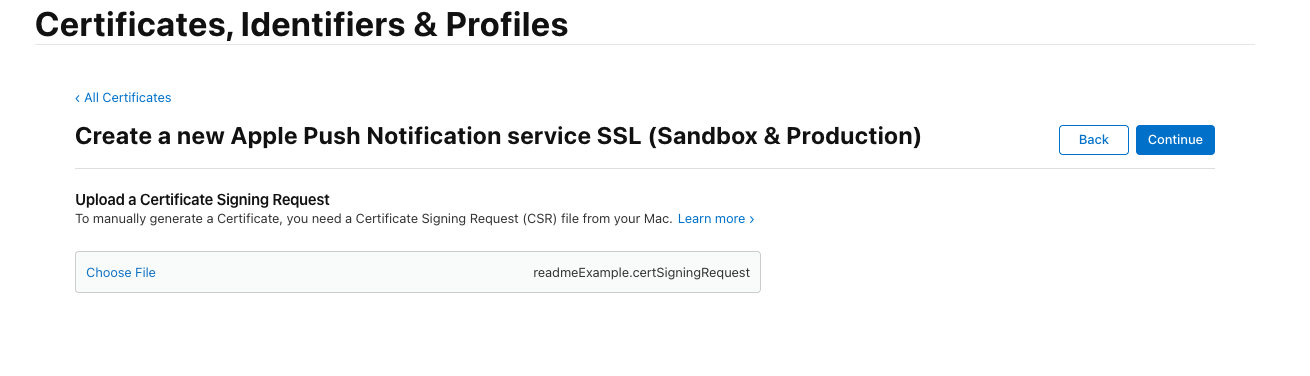
Upload the created Certificate Signing Request (.certSigningRequest file).


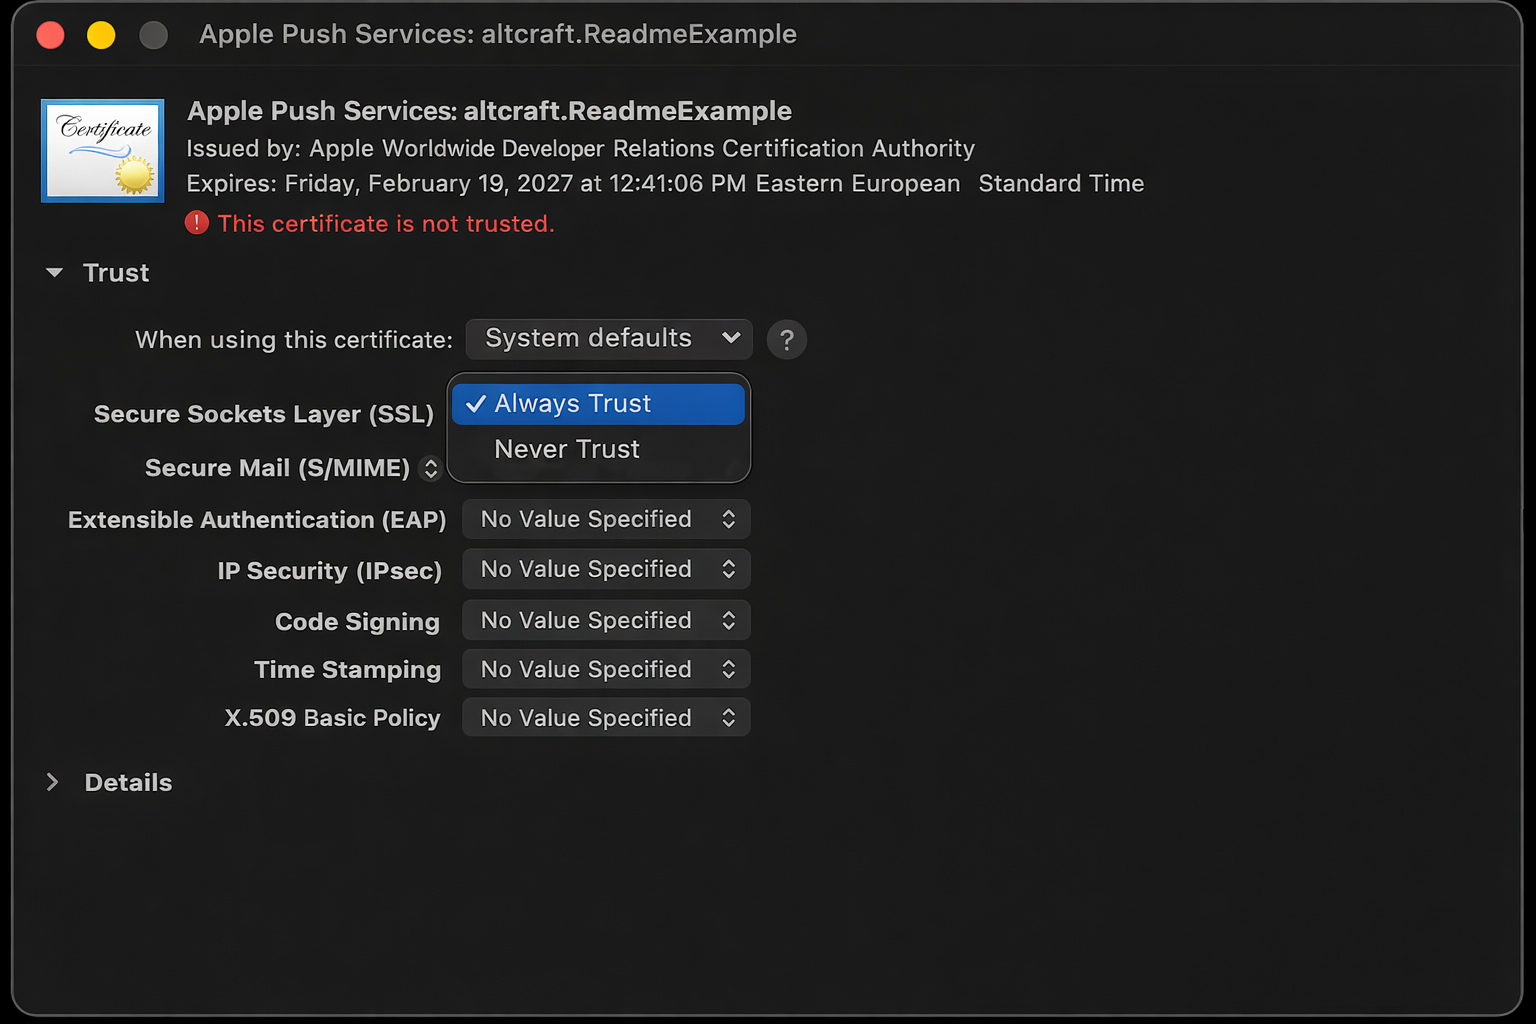
Download the created certificate. Open it in Keychain Access, double-click the certificate, and set the trust level to Always Trust.


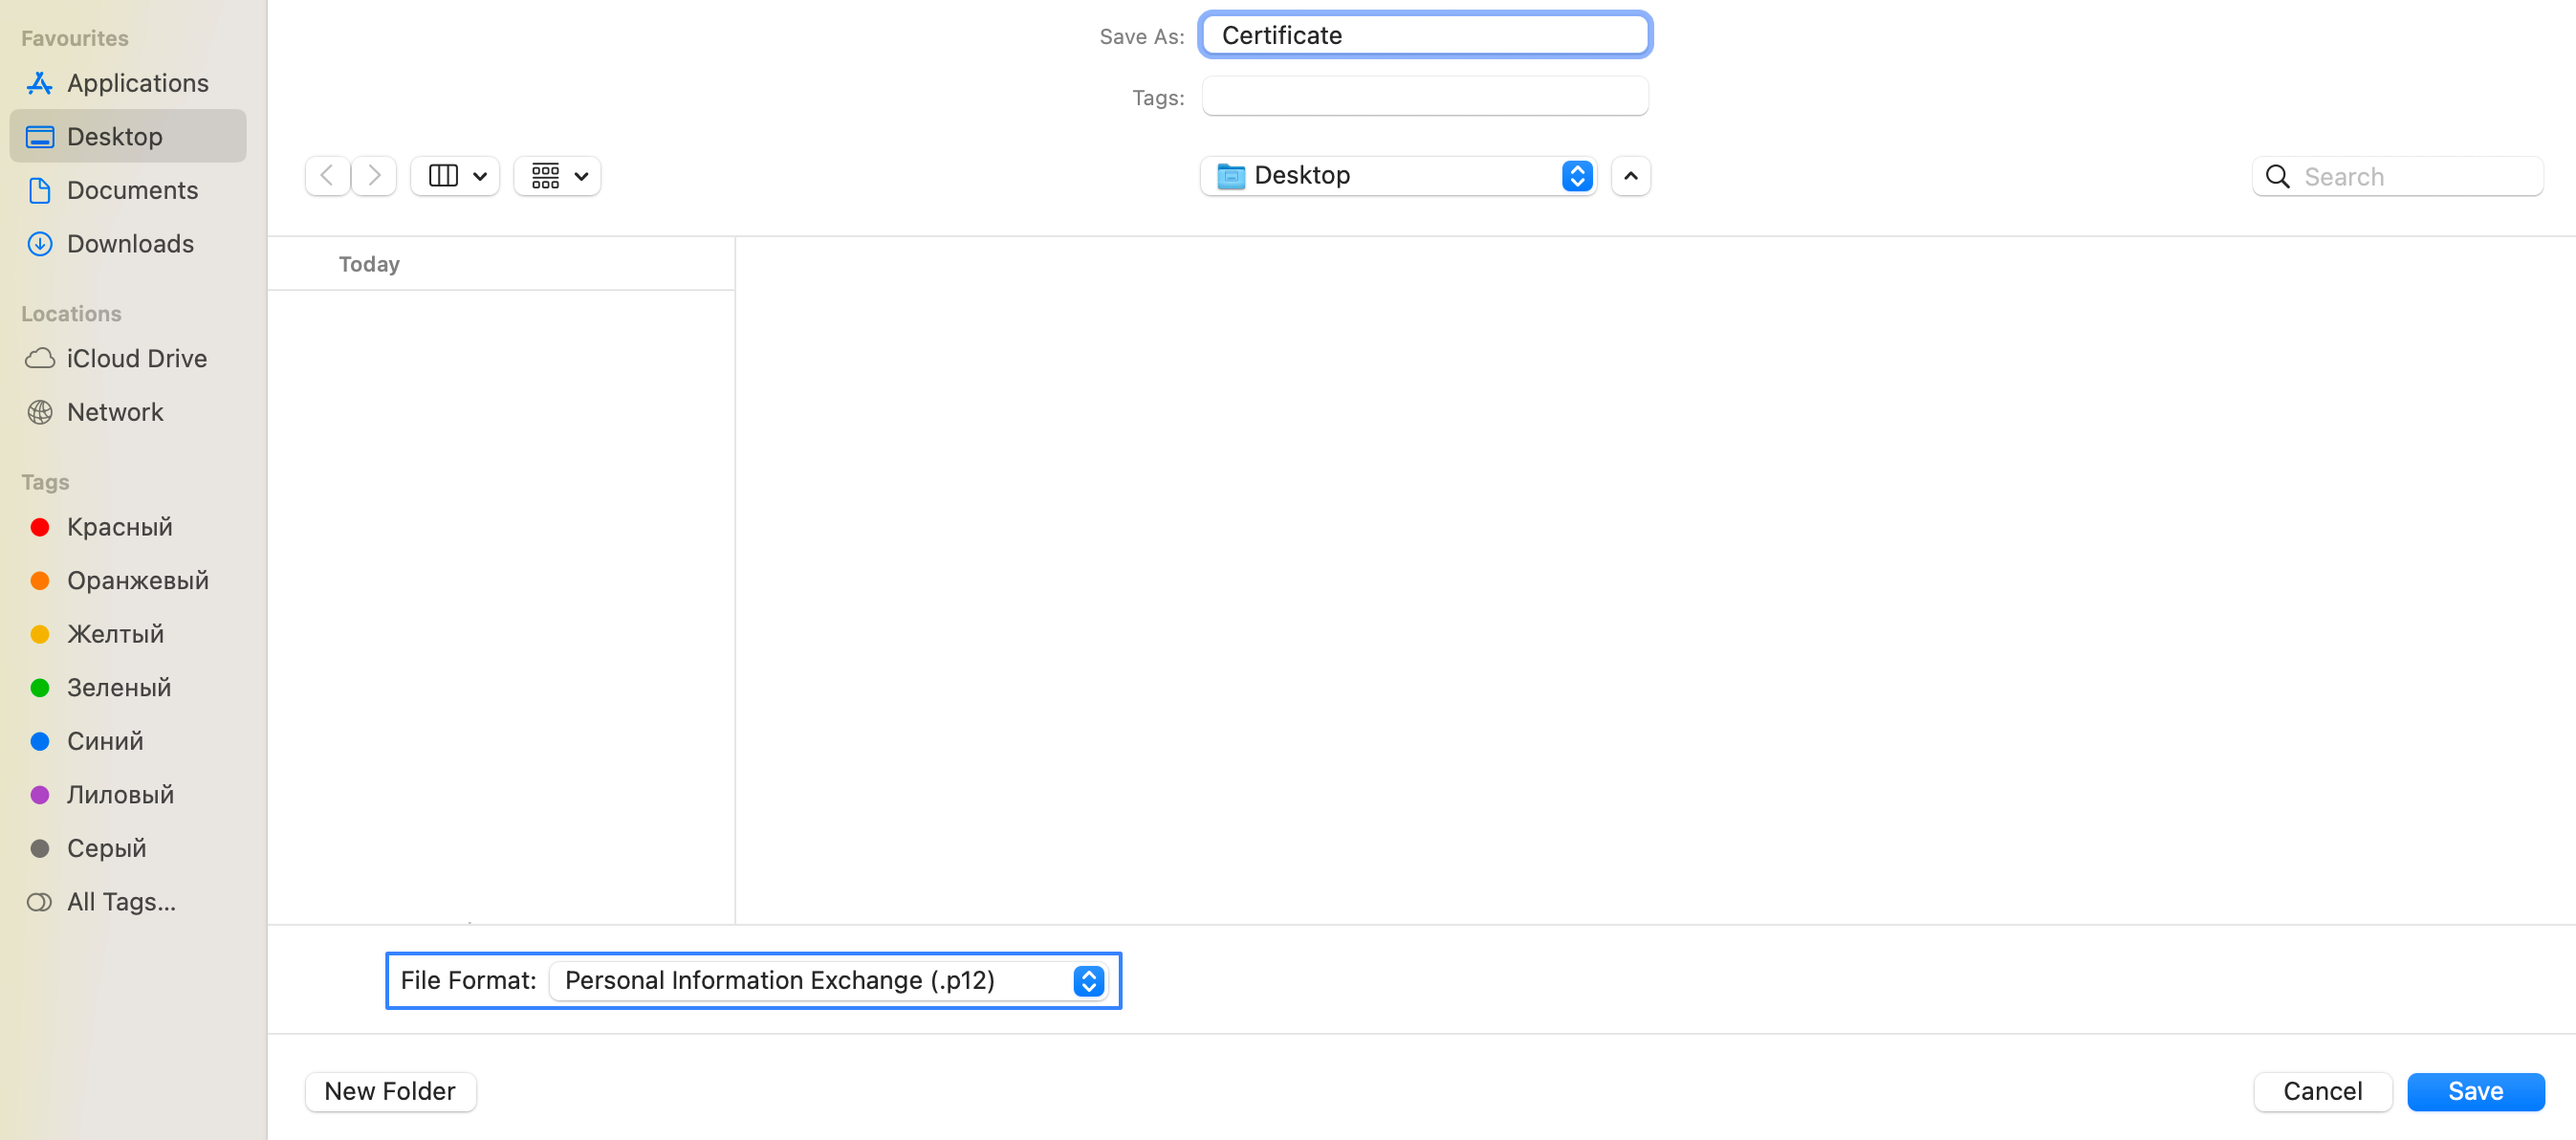
Right-click the certificate and select Export to save it in .p12 format. Set a password if needed.

Step 2. Creating pem files​

Navigate to the folder with the exported certificate via terminal.

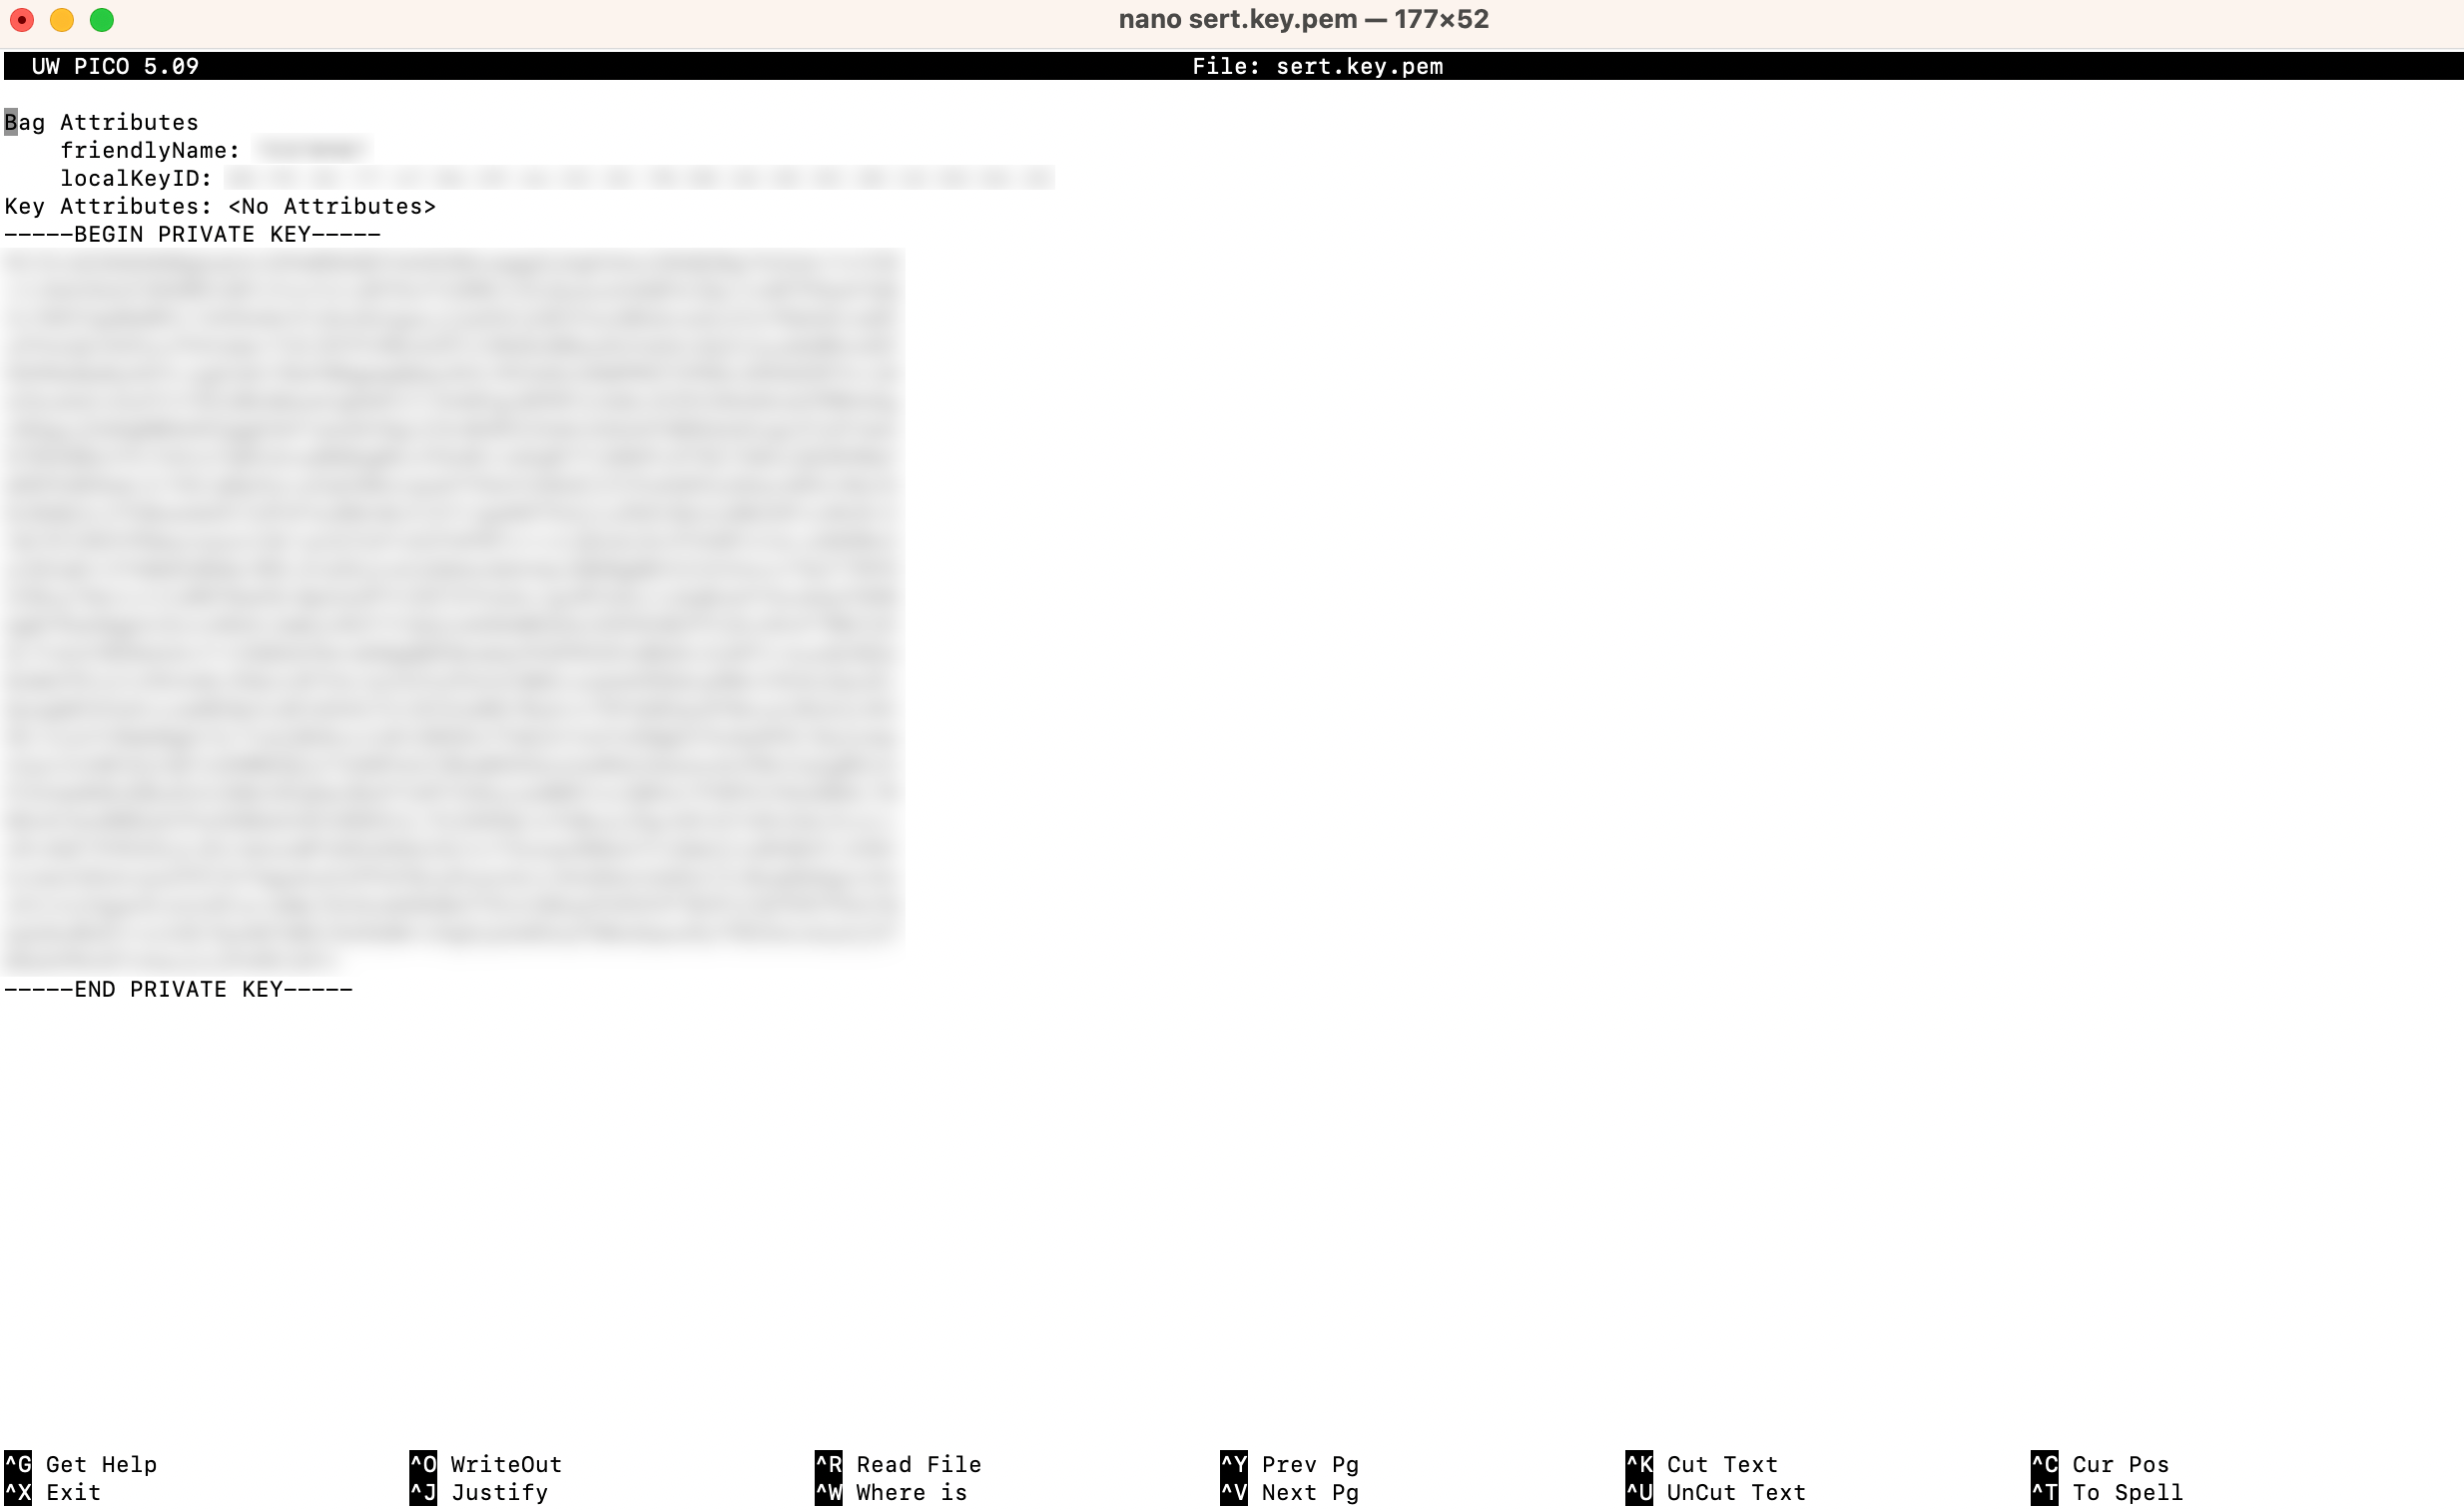
Create the pem key:

openssl pkcs12 -legacy -in filename.p12 -out filename.key.pem -nocerts -nodes

Create the pem certificate:

openssl pkcs12 -legacy -in filename.p12 -out filename.crt.pem -clcerts -nokeys

Open both files in a text editor — you will need to paste their contents into the platform fields:
Step 3. Configuring in the Altcraft platform​

In the Altcraft platform, open the resource settings. Add the Push channel and activate the Apple Push Notification service toggle.


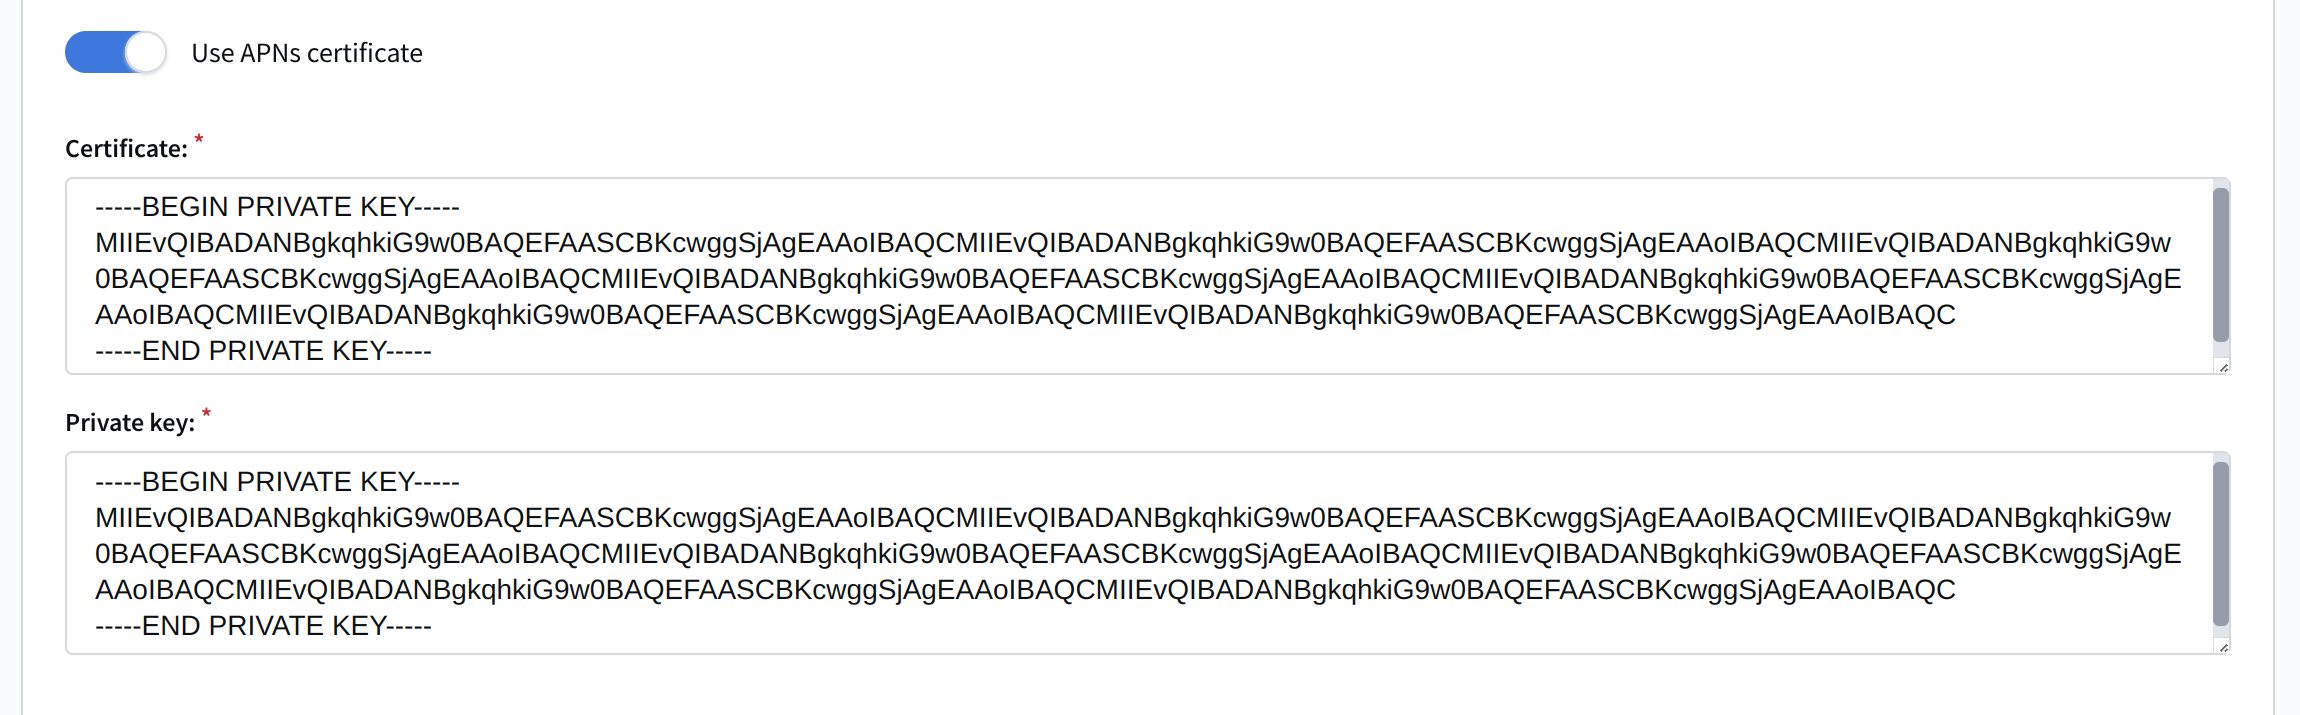
Activate the Use APNs certificate toggle and specify:


  • Certificate — contents of the pem certificate
  • Private key — contents of the pem key

Save the resource using the buttons in the upper right corner of the screen.

What's next​

  • App integration with Altcraft
  • APNs push message structure
Last updated on Jul 6, 2026
Previous
Firebase Cloud Messaging
Next
Huawei Mobile Services
  • Option 1: authentication key
    • Step 1. Creating an Auth Key
    • Step 2. Configuring in the Altcraft platform
  • Option 2: certificate
    • Step 1. Creating a certificate
    • Step 2. Creating pem files
    • Step 3. Configuring in the Altcraft platform
  • What's next
© 2015 - 2026 Altcraft, LLC. All rights reserved.