Multivariate testing
 | Multivariate testing, also known as MVT, or A/B/n
testing, is a mailing that allows you to send multiple message
templates (up to 8) to a part of the audience to compare their
effectiveness. After that, the winning template is selected and sent to
the rest of the audience. When the message is sent to each of the
recipients, the mailing will end in the same way as a
broadcast. To create a new multivariate test mailing, select Mailings → Multivariate testing and press the + Create button. Also, you can use the mailings calendar to create a new multivariate testing mailing. |
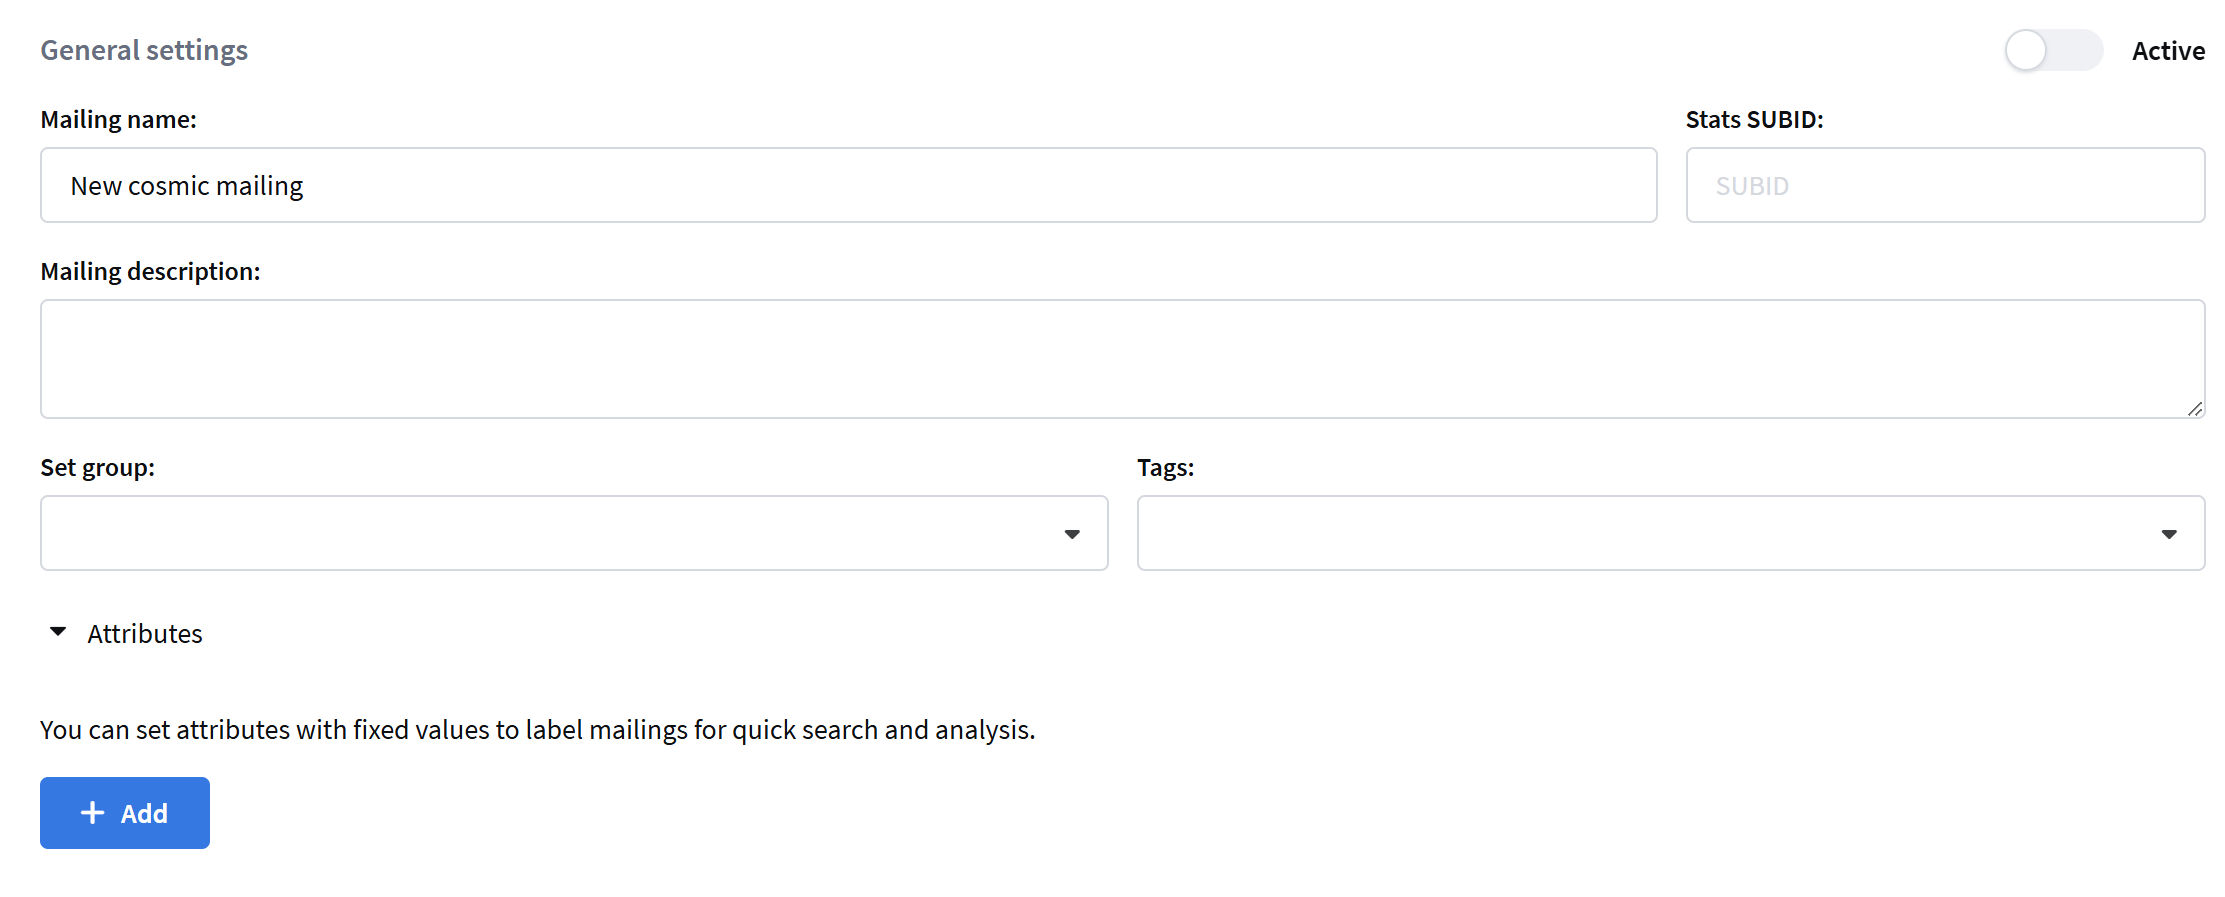
General settings
In the main settings, specify the name and description of the new segment, and if needed, set the access group, add tags and attributes for additional grouping:
Mailing settings
The following information is defined in mailing settings:
- communication channels (Email, SMS or Push),
- subscribers,
- several templates with content,
- audience size for testing,
- selection of winner template.
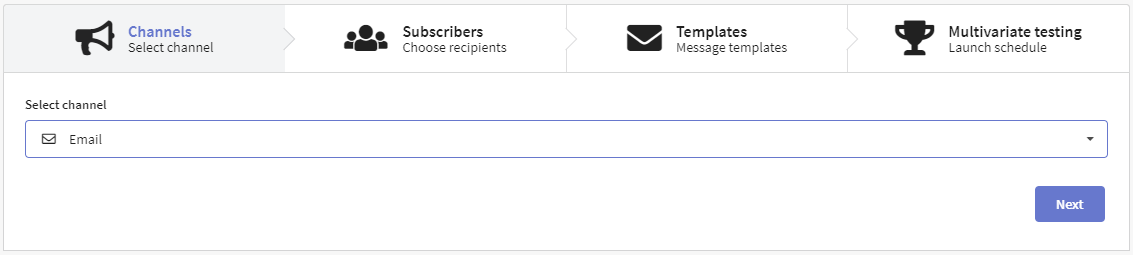
Channels
On the first tab, you can select the communication channel you want to use. This channel must be available in at least one subscription resource. The resource is selected on the next tab.
For Email sending, you can use the field with the main subscriber contact information — Email field.
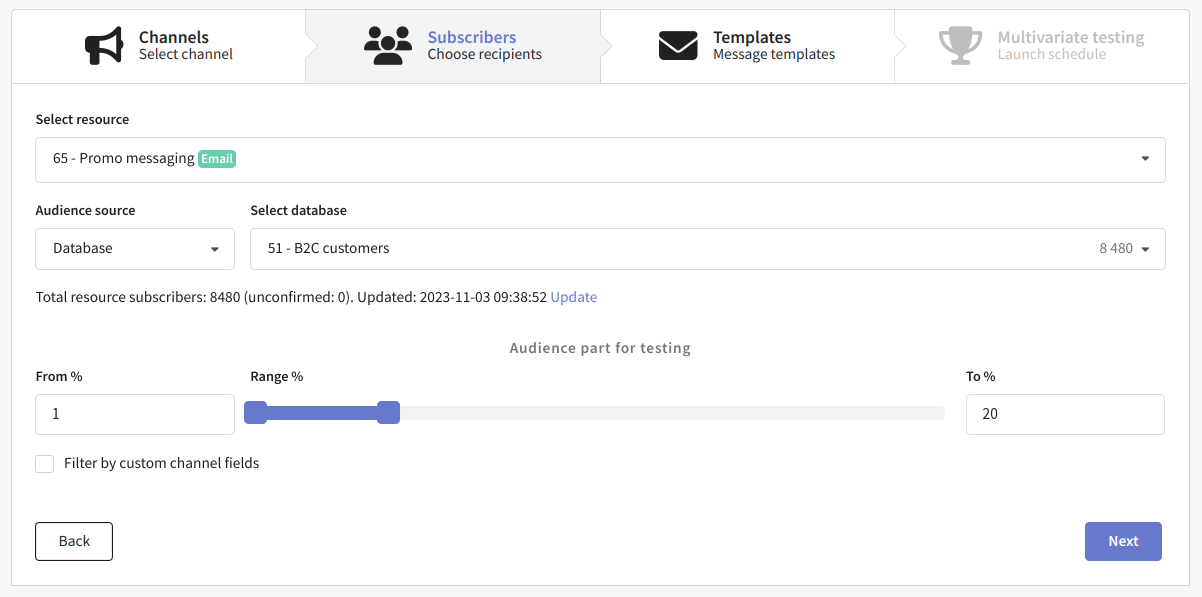
Subscribers
On the Subscribers tab you can choose a resource to send messages from and an audience you want to communicate to. It can be a database or a segment.
Mailings are sent to customers who subscribe to a certain resource. Please, make sure that message recipients are subscribed to the resource before mailing.
In the Audience part for testing block, you set an audience part, that will receive several content kinds for comparing templates efficiency.
Templates
On this tab, you can select the content that you want to use in the mailing. In Altcraft, messages templates combine content for mailing by all available channels.
Please, make sure, that the template has content for the selected channel.
Press Add button  and select the template. Any mailing type can use up to 8 templates. A/B testing mailing will send one message to each customer using selected templates in random order in equal parts.
Click on the template miniature to see a preview, or click on the template name to open the template editor:

Test settings
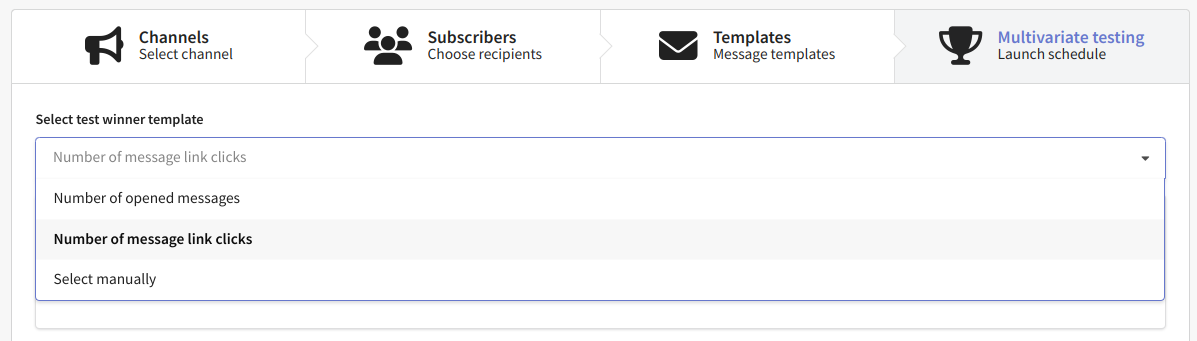
On this tab, you can configure how the winning template will be selected. The following options are available:
- Number of opened messages
- Number of message link clicks
- Select manually
Selection winner by openings/clicks
If you want to select the winning template automatically, set the mailing Start time. This is the time and date for the mailing test launch.
After launch, the mailing will automatically collect statistics by the total number of messages openings or link clicks. You can set a time for collecting statistics using Time to select the winner parameter.
After the mailing collects statistics on opens or clicks, the message template that is most effective based on the selected indicator will be sent to the main part of the audience according to the specified schedule:
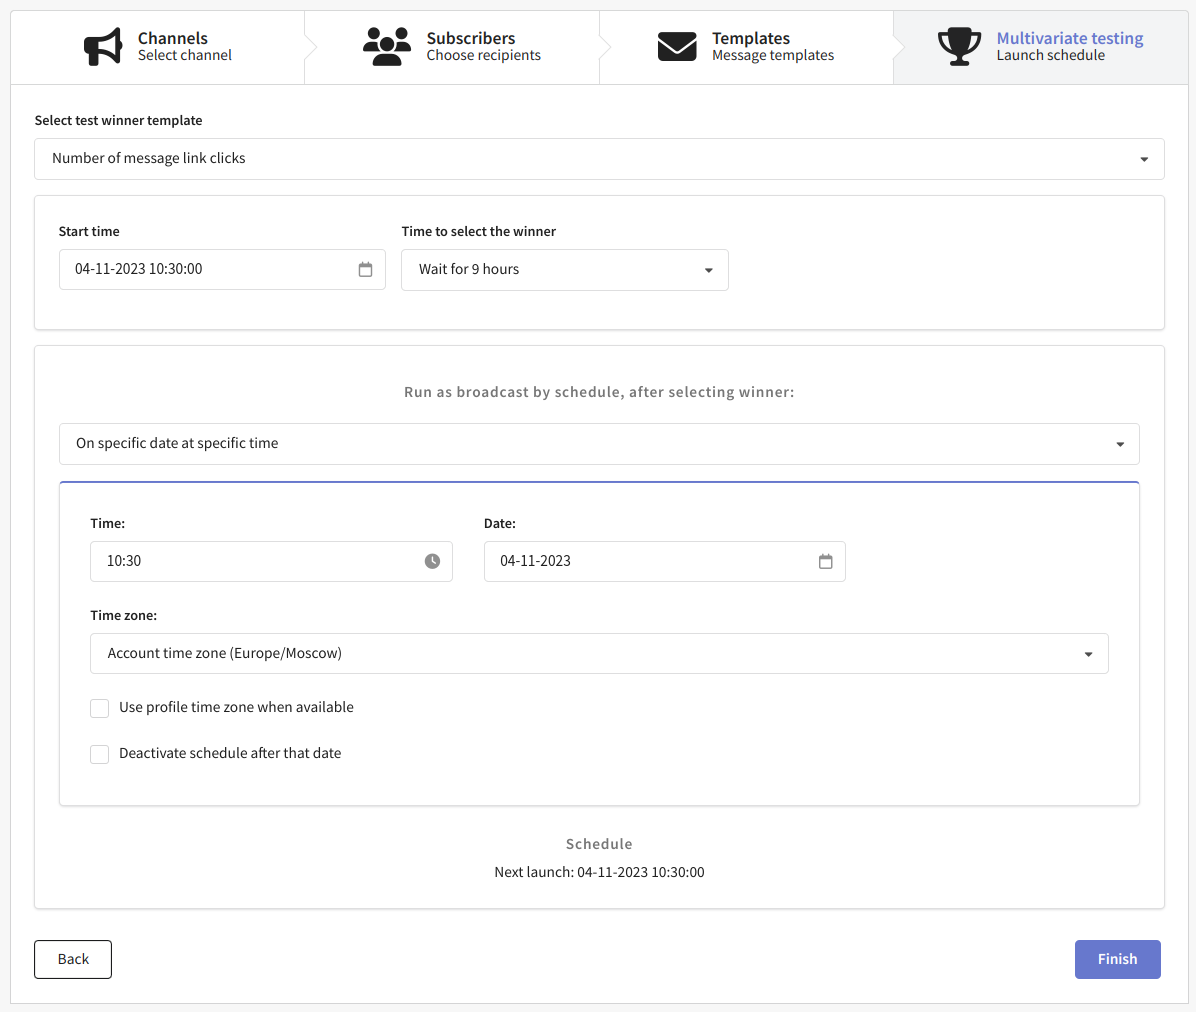
The mailing schedule is described in detail on this page.
If you select a time zone other than your account zone in the schedule settings, only the winner template will be sent according to that time zone. Test messages will be sent according to the account's time zone.
To complete the setup, click Finish. The options you select will be displayed in the Mailing settings block. Using the button in the upper right corner of the block you can edit the settings:
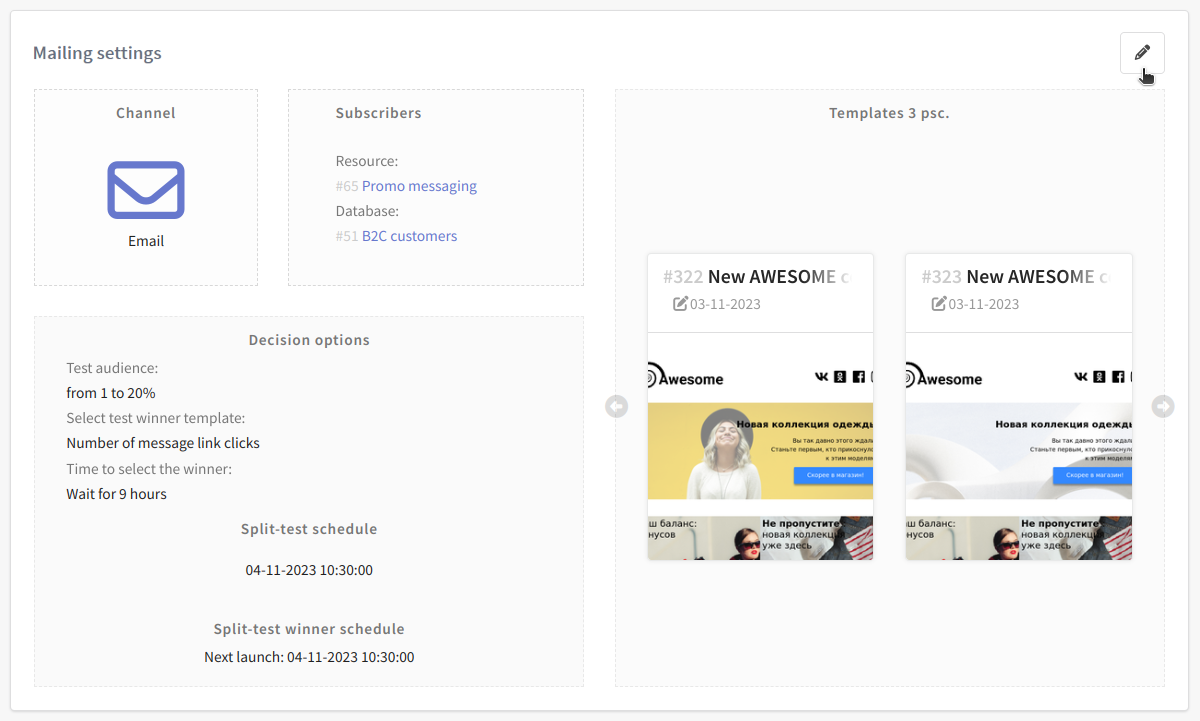
Save the mailing to activate it.
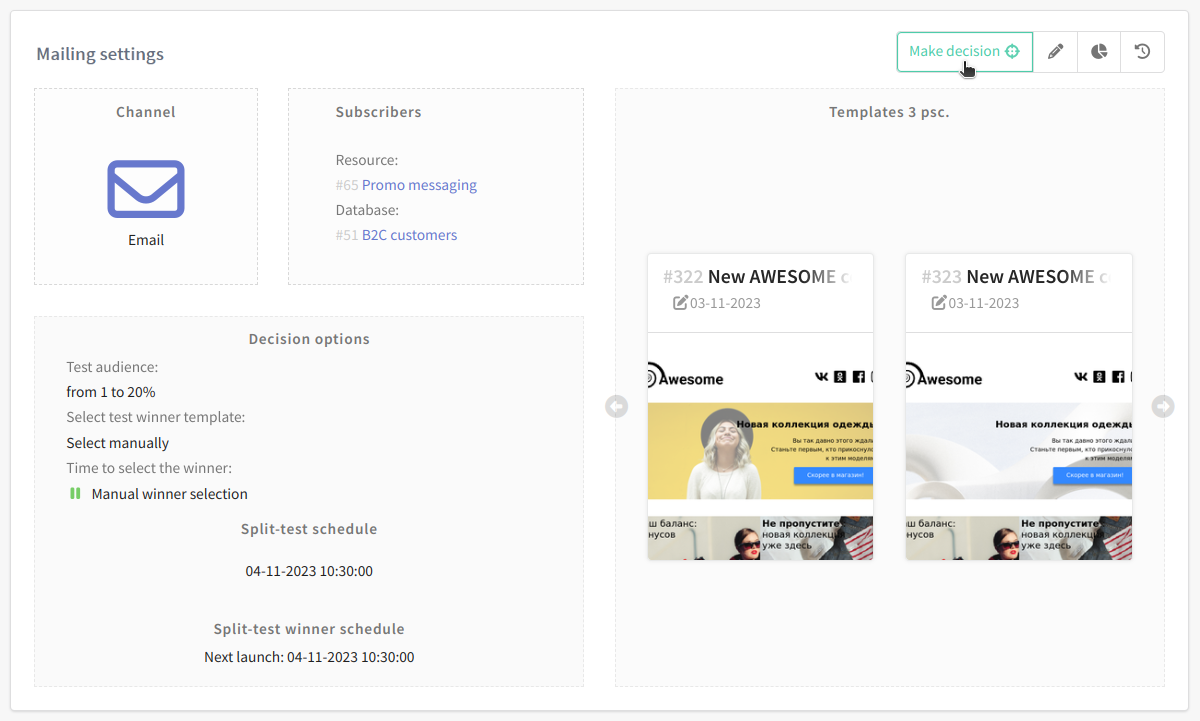
Manual winner selection
If you want to use the Select manually option, set the Start time. Mailing start is the time and date of launch of the test part of the mailing.
Next, set the mailing schedule. According to this schedule, the winner template will be sent to the main part of the audience.
Save the mailing to activate it. After the mailing sends test messages, it will switch to Active (Waiting for you) status.

At this step, you need to analyze the performance of each template and choose the winner template. To do this, click on the Make a decision button in the mailing editing window:
You can also select the winning template in the window with the list of mailings by clicking on the corresponding button in the context menu:
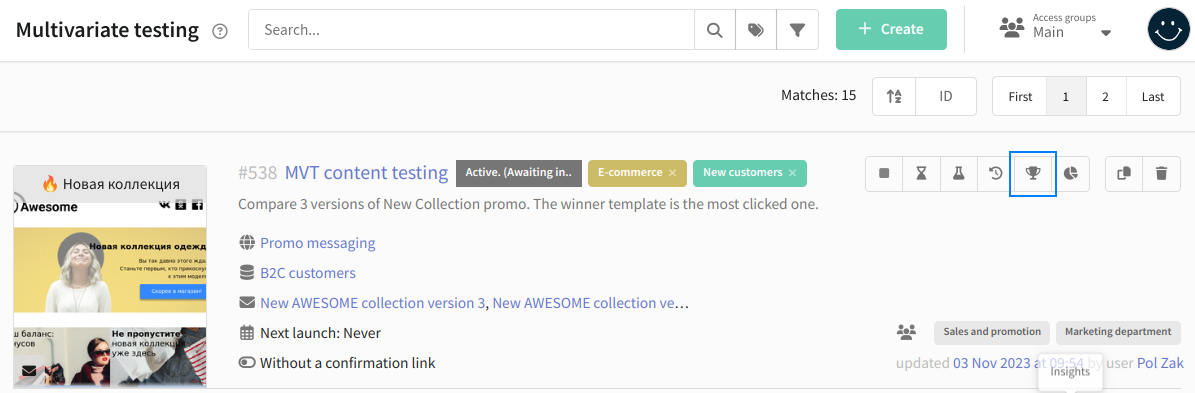
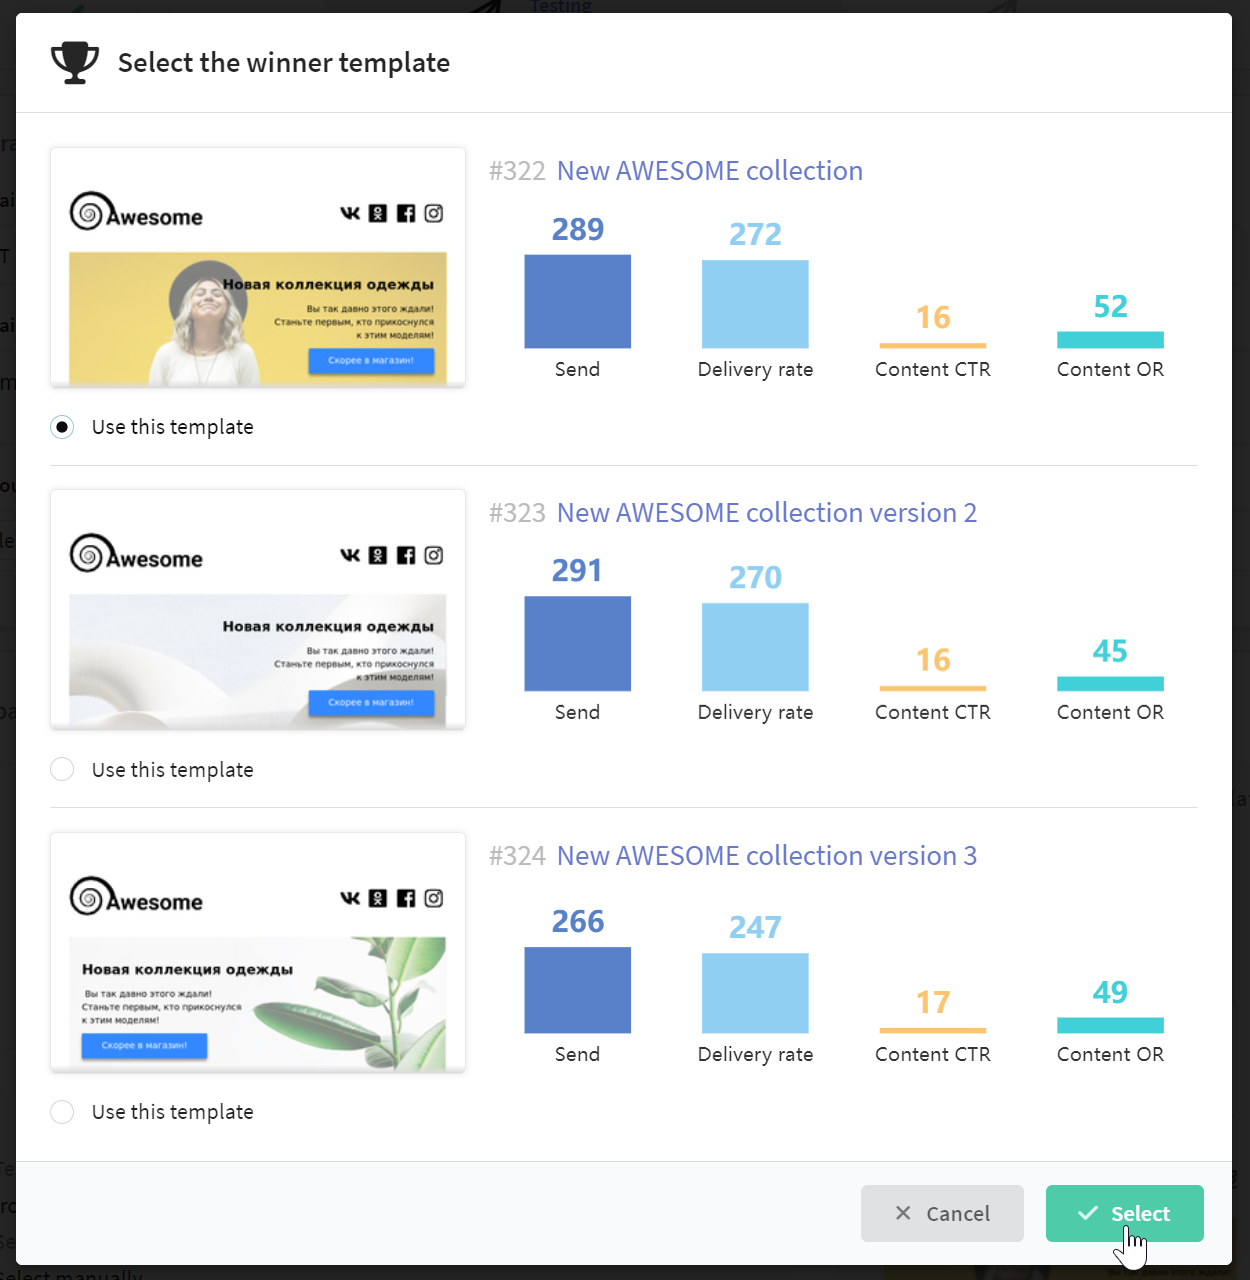
You will see a window with statistics for each template:
-
Send is the number of messages sent.
-
Delivery rate is the number of messages delivered.
-
Content CTR is the percentage of clicks in a message. Calculated using the formula: (Number of clicks / Number of messages delivered) * 100%.
-
Content OR is the percentage of openings in a a message. Calculated using the formula: (Number of messages opened / Number of messages delivered) * 100%.
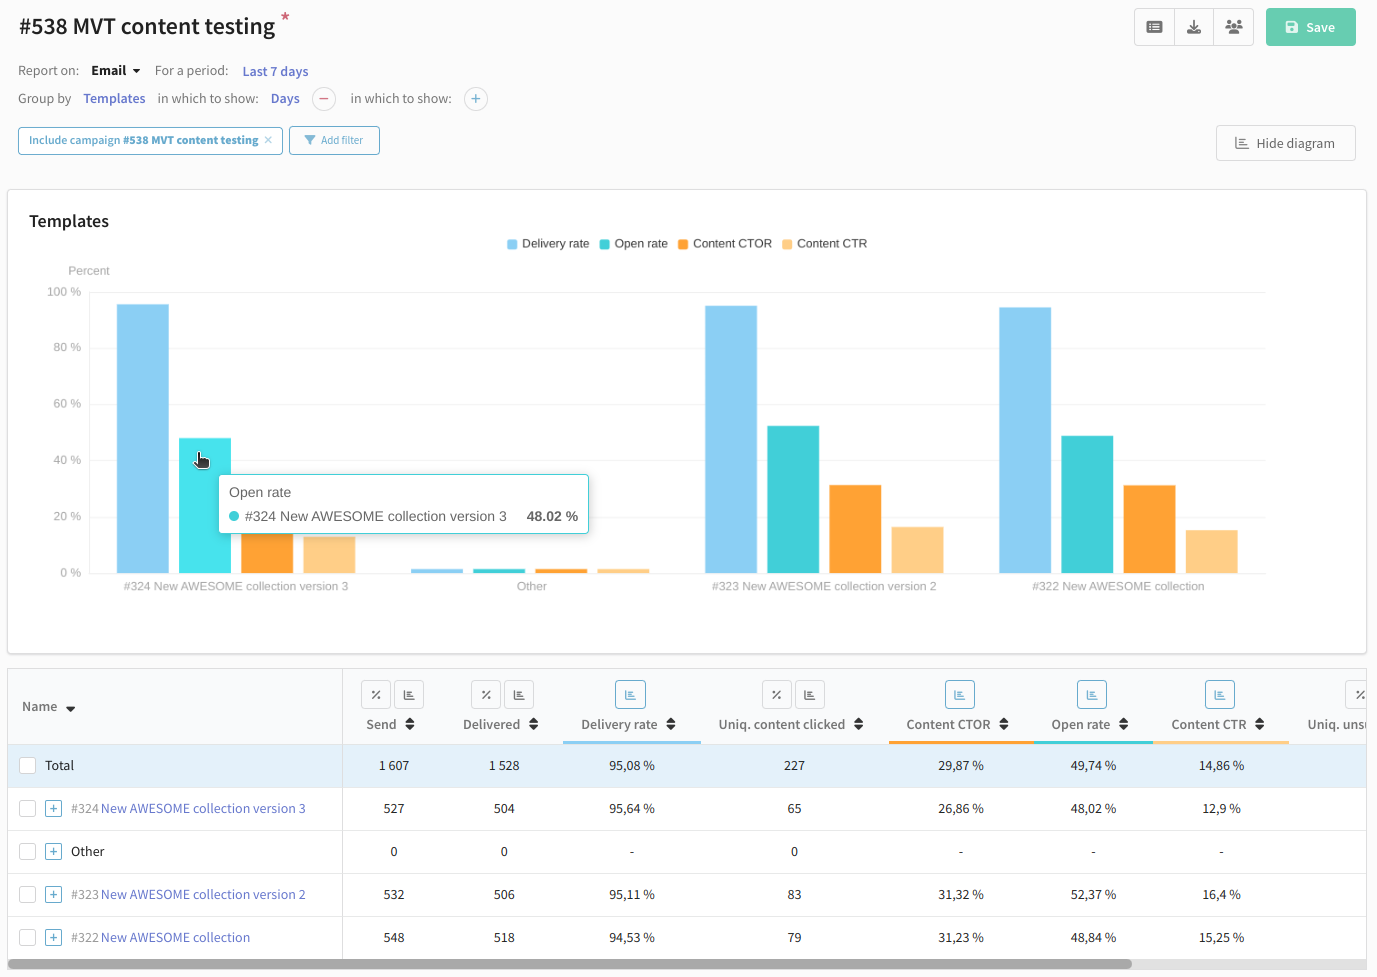
If you don't have enough data to choose the winning template, you can use the Channel report. Click on the analytics icon to open it:

In the report, select the parameters necessary to evaluate performance. These can be absolute or relative values (such as Open Rate or CTR/CTOR). You can also check negative reactions by the number of complaints and unsubscriptions.
Instant mailing launch
If you want to launch a mailing right after its creation, toggle the appropriate option at the bottom part of the page.
If the limits were not configured, messages will be sent to all customers.
If limits were configured, the mailing will be launched besides schedule.

Communication policy
Communication policy sets limits for communication with one subscriber. It is configured in the Limitations block. By default, the mailing will use account policy or resource policy.
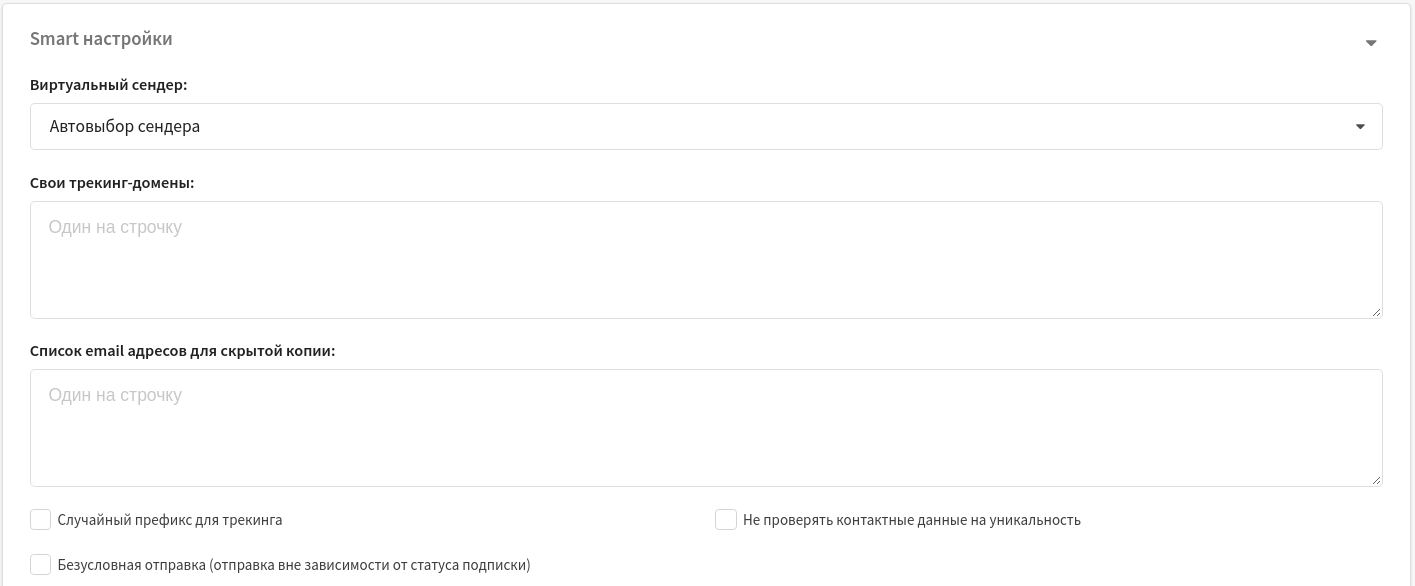
Smart settings
The Smart Settings block includes the following additional mailing options:
- Virtual sender — lets you select a virtual sender for the mailing (a set of rules for sending messages from the platform’s real senders).
- Custom tracking domains — tracks message interactions using additional tracking servers. Specify each domain on a separate line.
- BCC email list — BCC recipients for outgoing messages. Specify each address on a separate line.
- Do not check contact data for uniqueness — disables uniqueness validation of mailing recipients based on subscription data.
Mailing Watchers
You can also configure mailing watchers in Smart Settings. Watchers receive the same messages as mailing recipients. To do this, you need a watchers database. It is created the same way as a regular database, but you must enable the corresponding option in General settings.
In Smart Settings, select the watchers database and set the message sending limit for each mailing launch:

Message Time-To-Live (TTL) Restriction
Message Time-To-Live (TTL) is the period during which the system attempts to send a message from the delivery queue. If the message is not delivered within this time, sending stops and the message is removed from the queue.
TTL should be used for campaigns that are relevant only for a limited time. For example, if a message is related to a promotion, an event reminder, a one-time code, or an offer that quickly loses relevance.

To configure TTL, enable the Limit message lifetime (TTL) option and specify the waiting time in days, hours, minutes, or seconds.
After the specified time expires, the system stops delivery attempts for the undelivered message and registers a delivery failure event.
- The TTL value must be within the limits defined by the
MTA_MIN_TTLandMTA_MAX_TTLconfiguration parameters. - If TTL is set in multiple places, the value with the highest priority is applied: the
expirationAPI parameter > the value specified in Smart settings > theMTA_TTL_DEFAULTconfiguration parameter. - TTL is calculated separately for each message from the moment it is placed in the queue. Therefore, even within a single mailing, different recipients may have different message TTL values.
- After TTL expires, the system stops delivery attempts even if the channel is still technically able to deliver the message.
- TTL does not work for channels that do not return message delivery statuses: Telegram, MAX, and custom channels.