Configuring and installing Tag Manager
To get started with Tag Manager, go to Weblayer ➝ Tag Manager.
Step 1. Creating a container and installing it on the site
A container stores tags, triggers, and variables. It is a piece of code that is installed on the site. After installation, all further tracking configuration is done in the platform interface without changing the source code.
By default, a container is already created in your account. You can work with it or add a new one. It is recommended to configure a separate container for each website or mobile app.

The following actions are available in the actions menu on the right side:
![]() — clone
the container: a new container is created and the settings, tags, triggers, and variables of the current container are copied to it (the version history is not copied).
— clone
the container: a new container is created and the settings, tags, triggers, and variables of the current container are copied to it (the version history is not copied).
![]() — delete
the container along with all created tags, triggers, and variables. Tags from this container will no longer be
activated on the site.
— delete
the container along with all created tags, triggers, and variables. Tags from this container will no longer be
activated on the site.
Creating a new container
To create a new container, follow these steps:
1. Click the + Create button in the upper right corner.
2. Enter a custom name for the container.
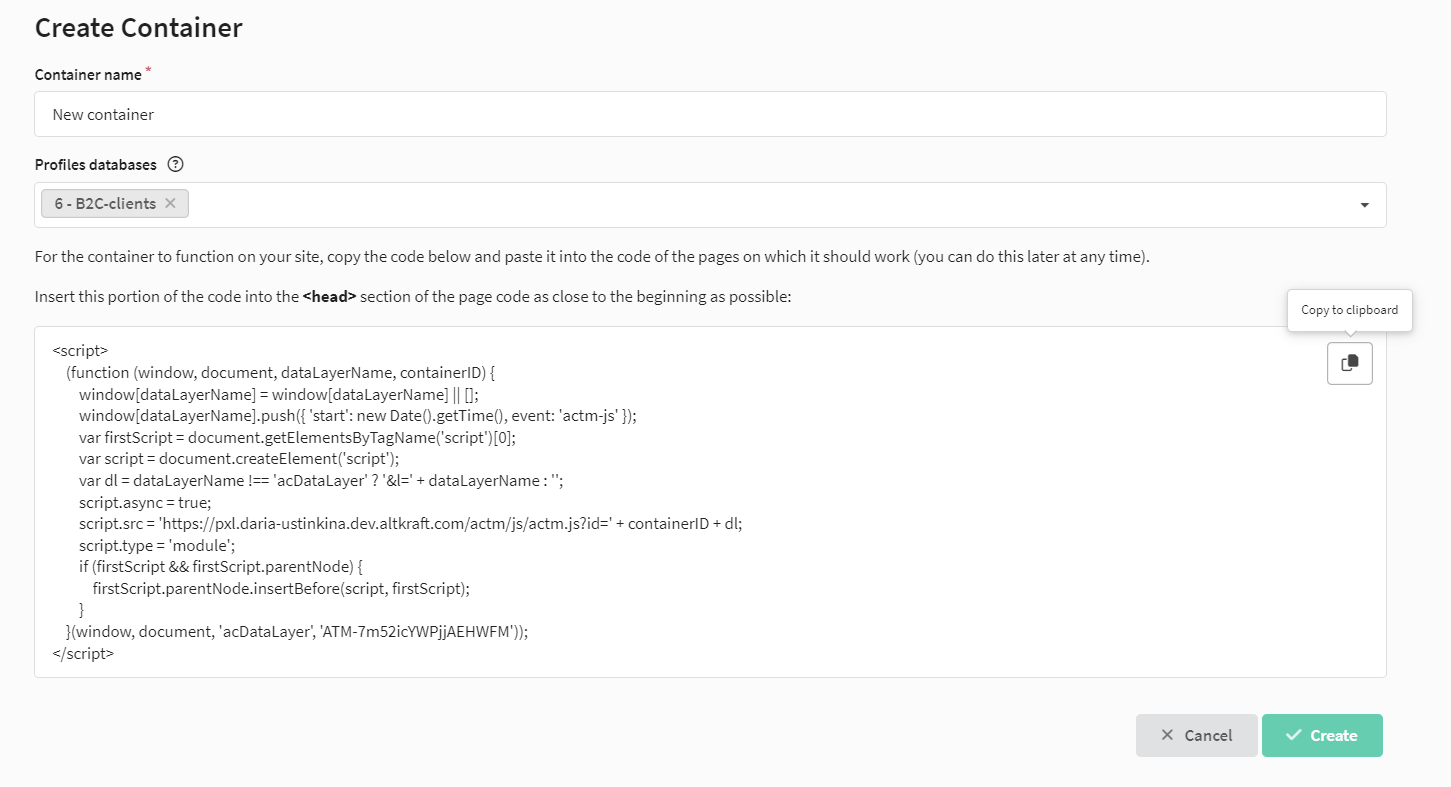
3. Select profile databases. Tags track the behavior of site visitors and send data to the Altcraft system. The collected data can be used to search for existing profiles in the database. Specify at least one database for the search.
4. Install the container on the site. To do this, copy the provided code and pass it to your developers. They must place the container code on every page of the site where you plan to use tracking tags. The container code should be added to the <head> section, as close to the opening tag as possible.
5. Click the Create button to save the container.
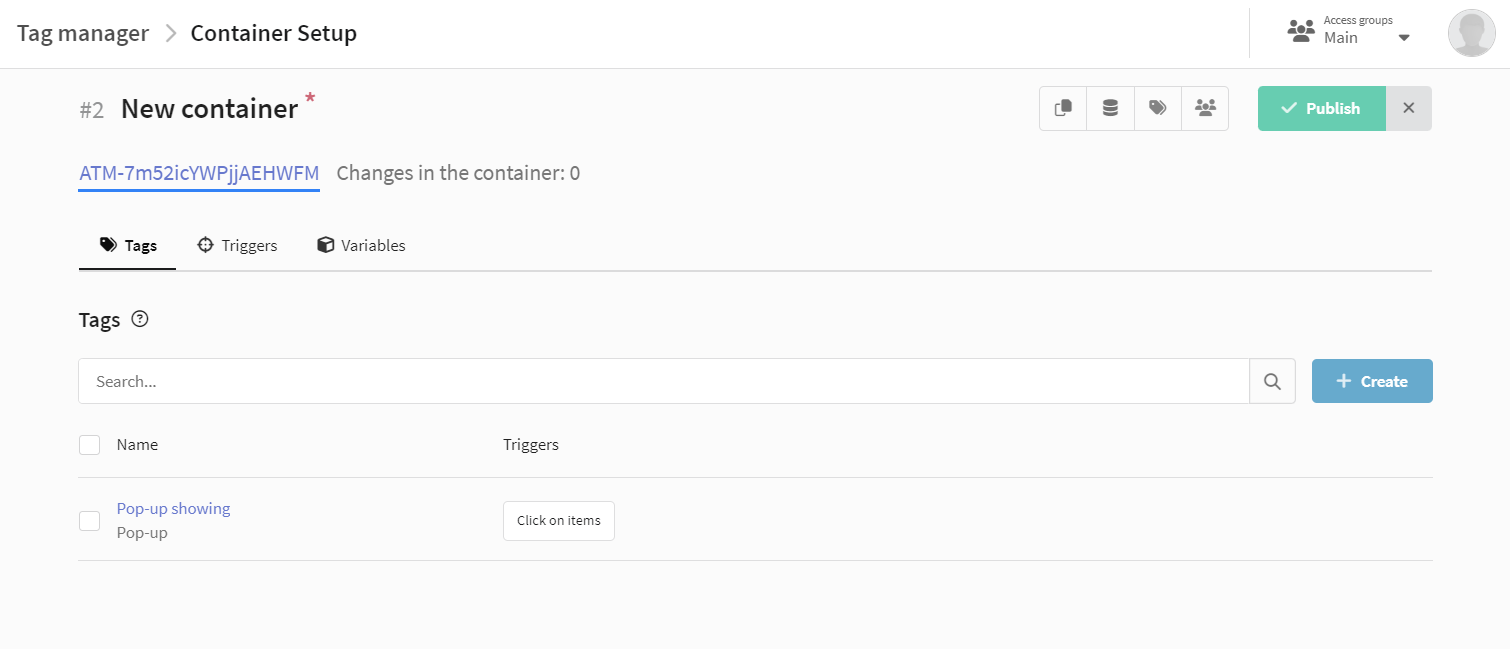
Working in a container
To edit an existing container, click its name. When you click the container identifier (ATM-xxxxxxx), a window with the code opens. If you have not yet placed the container on your site, pass the code to your developers.
To the right of the ID there is a counter that shows the number of unpublished changes. After a version is published, the counter is reset to zero.
For additional settings, a quick actions menu is available on the right:
![]() — view
version history;
— view
version history;
![]() — select
databases for profile search;
— select
databases for profile search;
![]() — assign
tags for quick search;
— assign
tags for quick search;
![]() — configure
access groups.
— configure
access groups.
Any changes to the container settings (editing the name or access groups, configuring tags and triggers) are automatically saved in the platform, but they are not applied on the site until you publish the container.
Step 2. Adding tags and configuring triggers
A tag is a piece of code that runs on the site when a certain condition is met. A trigger is the condition that fires a tag.
Triggers monitor specific events on a site (such as clicks, page loads, or form submissions) and fire tags in response to those events.
To fire a tag, you must configure at least one trigger.
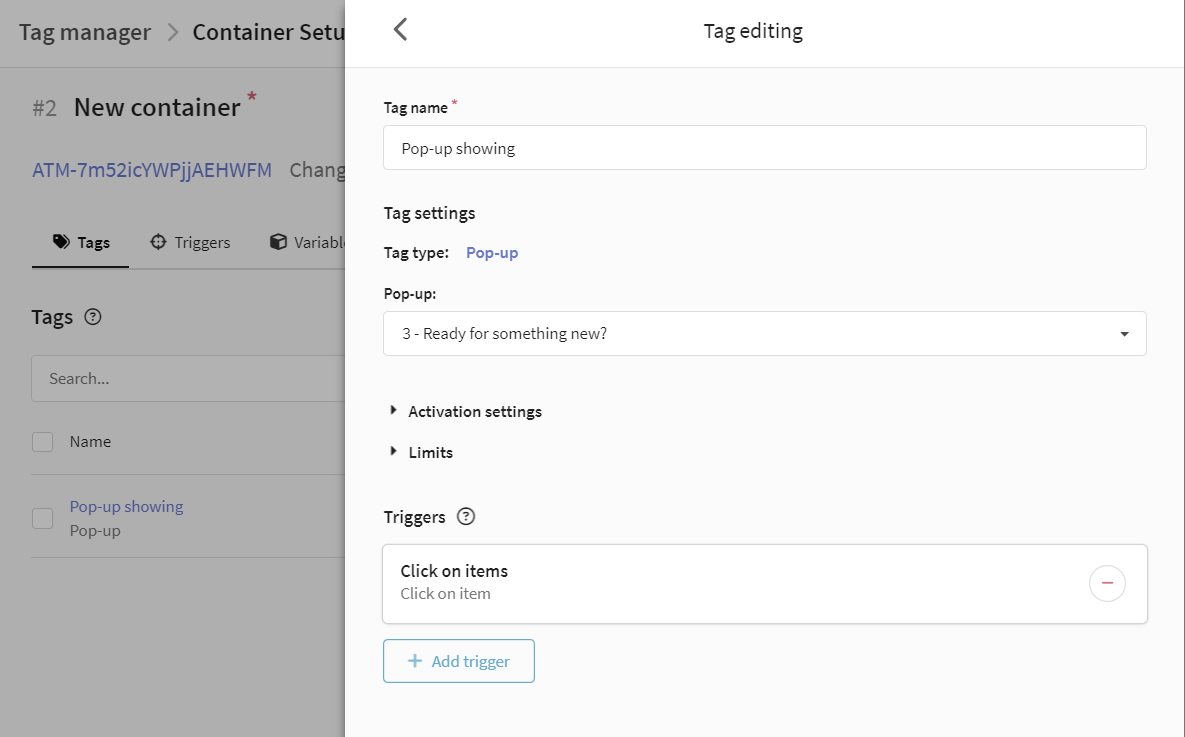
To create a tag and configure the conditions for firing it, follow these steps:
1. On the Tags tab, click + Create.
2. Enter the name of the tag.
3. Select the tag type:
-
Pop-up — used to display a pop-up window to website visitors. You must first create a pop-up and then select it in the Pop-up field. Read more about pop-ups in this article.
-
Custom HTML — used to create a custom tag. Paste your HTML code into the editor window.
4. Configure activation settings and limits.
Tag activation settings
Frequency of tag activation:
-
Once per event — the tag is activated only once when a specific event occurs.
-
Once per page — the tag will fire only once per page, regardless of the number of events.
-
No restrictions — the tag is activated each time the event specified in the trigger occurs.
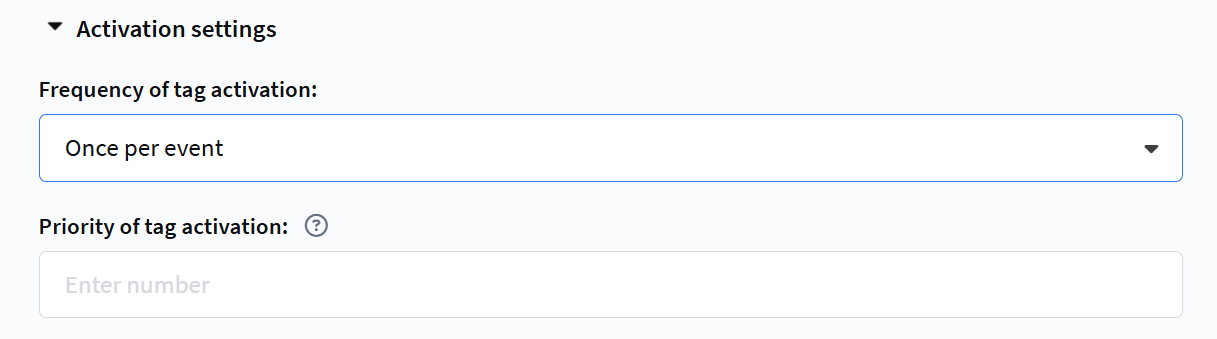
Priority of tag activation. Sets the order in which tags are fired. By default, the priority of a tag is 0. To change the priority, specify a positive or negative integer. For example, a tag with priority 2 will be fired before a tag with priority 1. Tags run asynchronously.
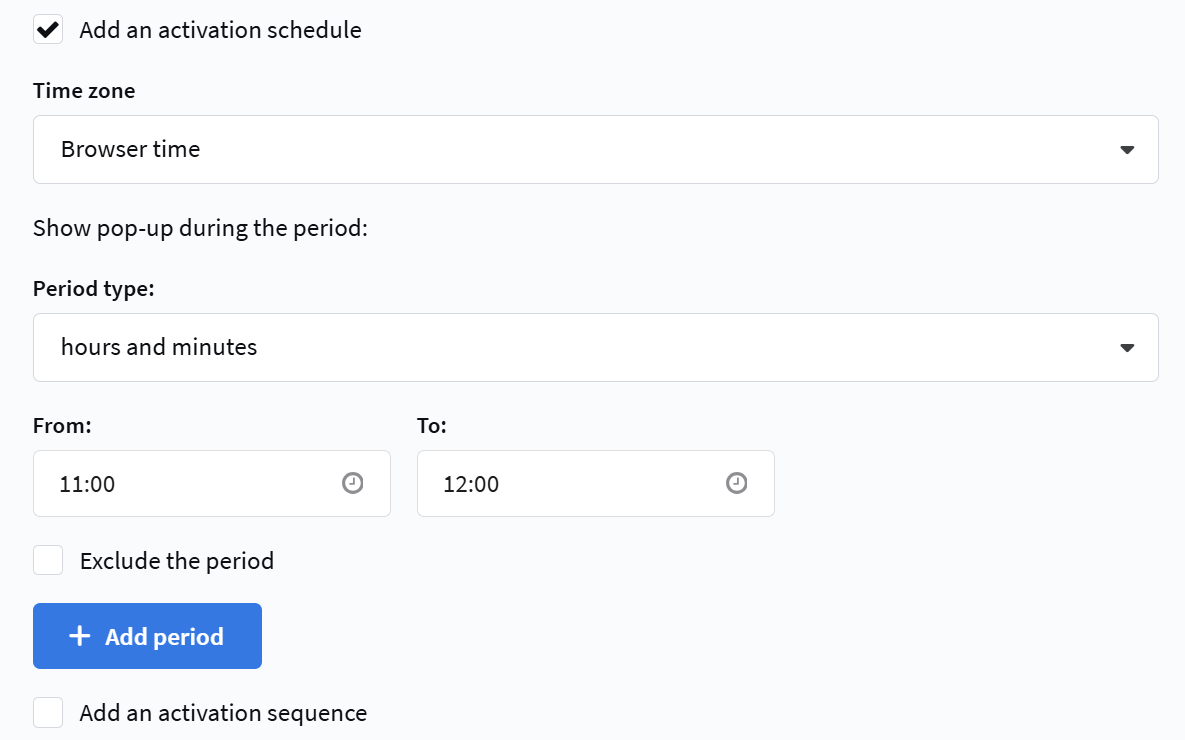
Add an activation schedule. Lets you configure tag activation during a given period. For example, you are running a promotion that lasts only one hour. In this case, the banner with information should be shown to site visitors only during this hour.
Select the period type, set the start and end date and time. If you want the tag to remain inactive during a certain period, select the Exclude period option. You can also combine several time periods — click the Add period button.
Add an activation sequence:
-
Activate before this tag. Select a tag that must be fired before the current tag. If the selected tag does not fire, the tag you are currently creating will not be activated.
-
Activate after this tag. Select a tag that must be fired after the current tag. If the tag you are currently creating does not fire, the selected tag will not be activated.

Tag limits
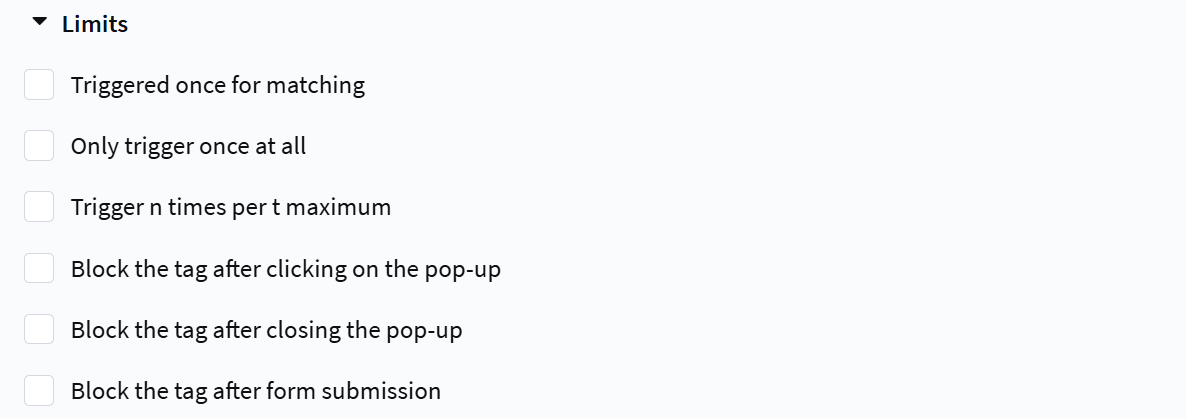
Limits
-
Trigger only once per match — the tag is executed only once each time a condition that matches its settings becomes true. If the condition becomes true again, the tag will not be executed again. This applies to conditions related to matching, such as page URL, page title, and other parameters that may change while the page is being viewed.
-
Trigger only once — the tag is executed only once, regardless of which conditions are met. Use this limit to initialize scripts that must be executed only once.
-
Trigger at most n times per period t — limits how many times the trigger can fire during a certain period of time.
-
Block the tag after clicking in a pop-up — after clicking any element in the pop-up, the tag will not be activated again, even if the event it listens to occurs again. This prevents multiple tag activations on repeated clicks in the pop-up.
-
Block the tag after closing a pop-up — after clicking the Close button in the pop-up, the trigger will not fire again, even if the event occurs again.
-
Block the tag after submitting a form — after the form associated with the tag is submitted, the trigger will not fire again, even if the conditions for its activation are met again.
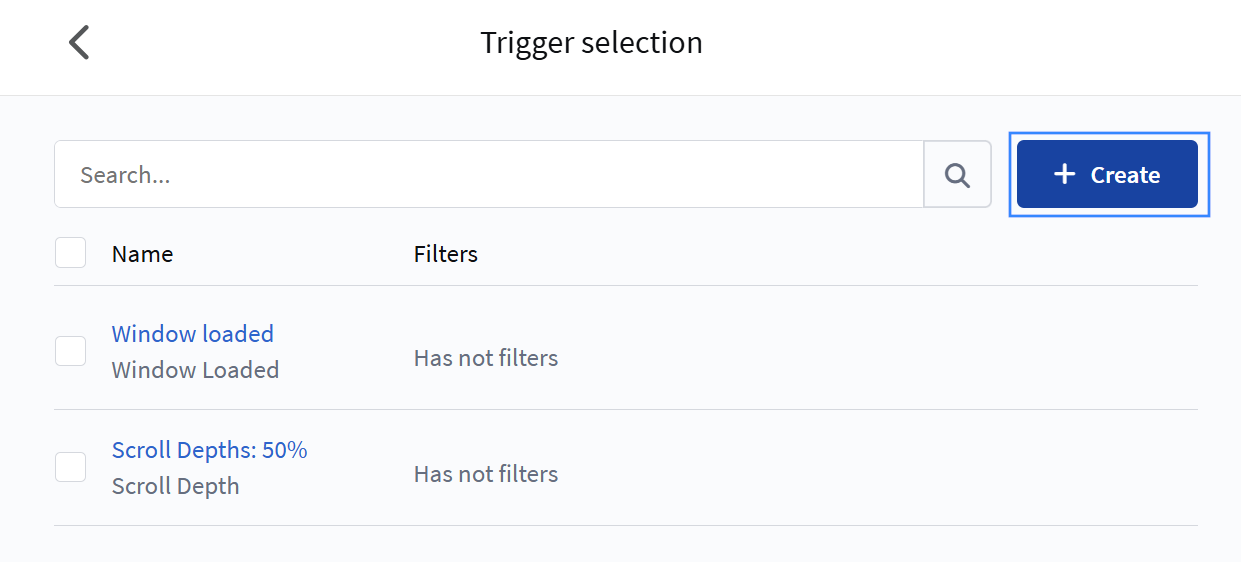
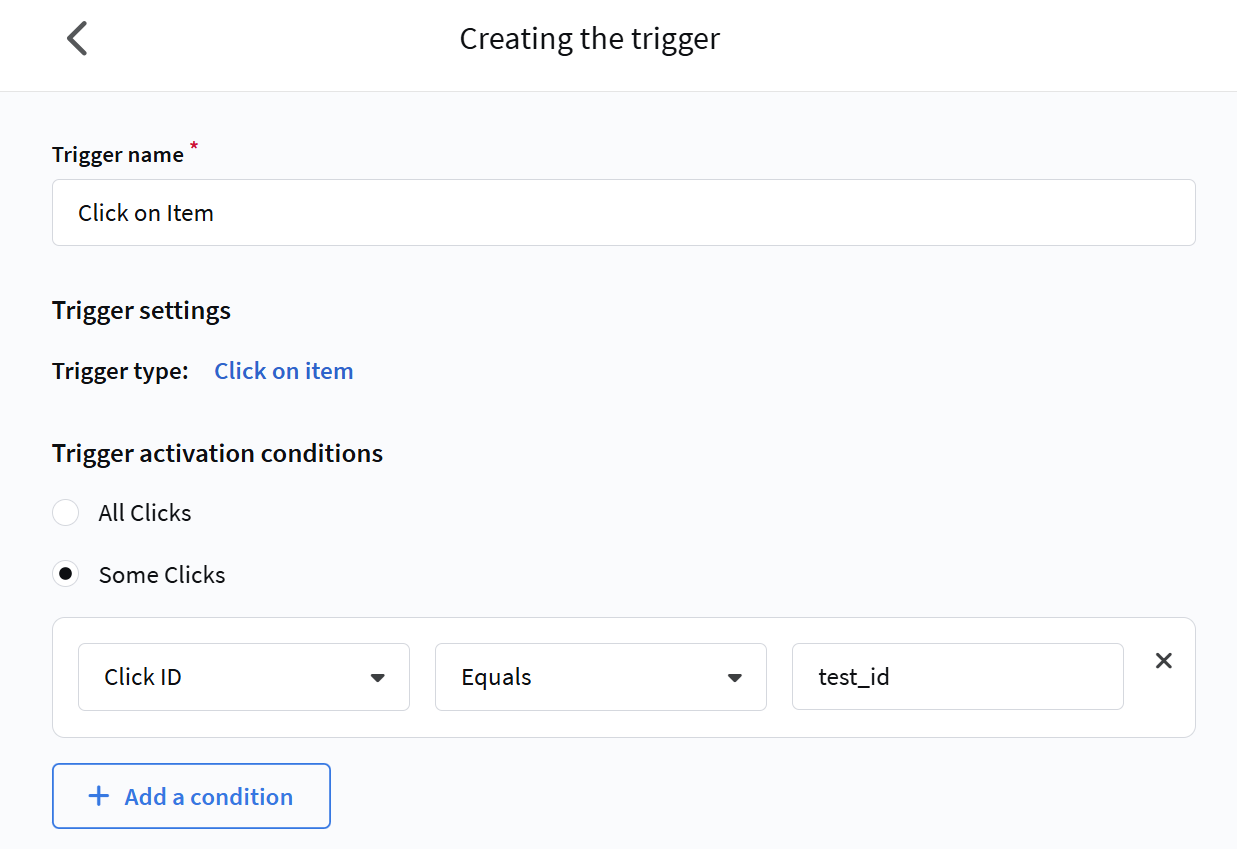
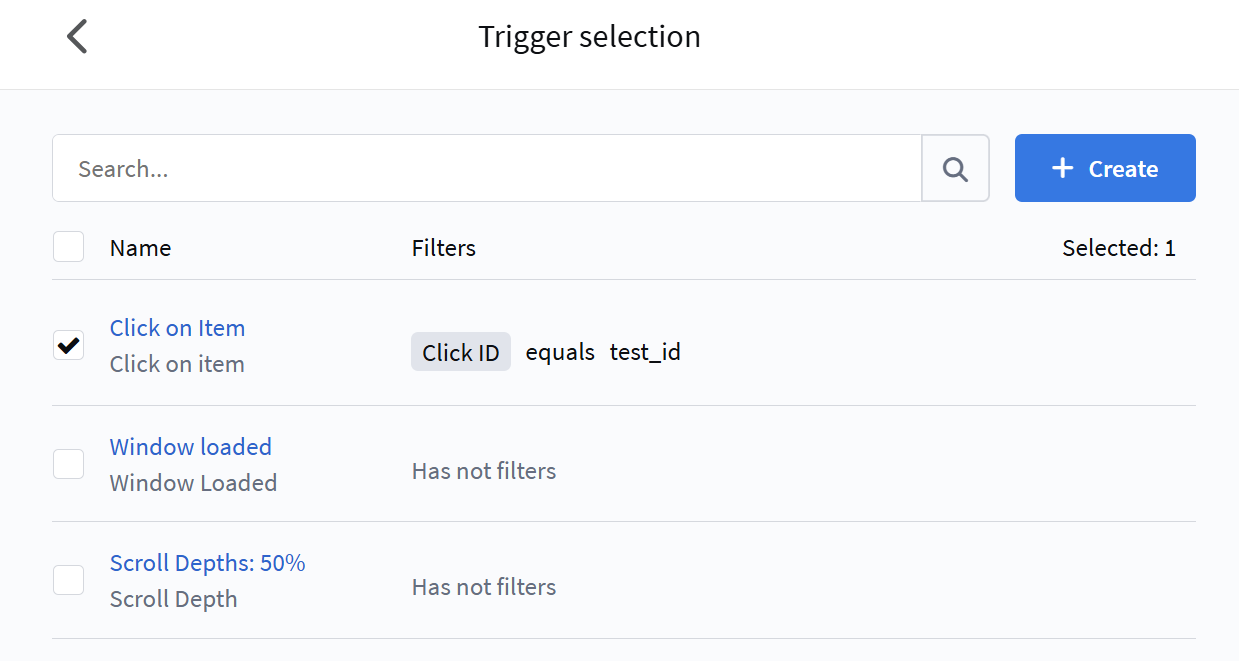
5. Click Select triggers. A new window opens with all available triggers. If you have already created a trigger, you can go straight to step 9.
6. To set up a new trigger, click + Create:
7. Enter the name of the trigger and select its type.
Read more about trigger types in this article.
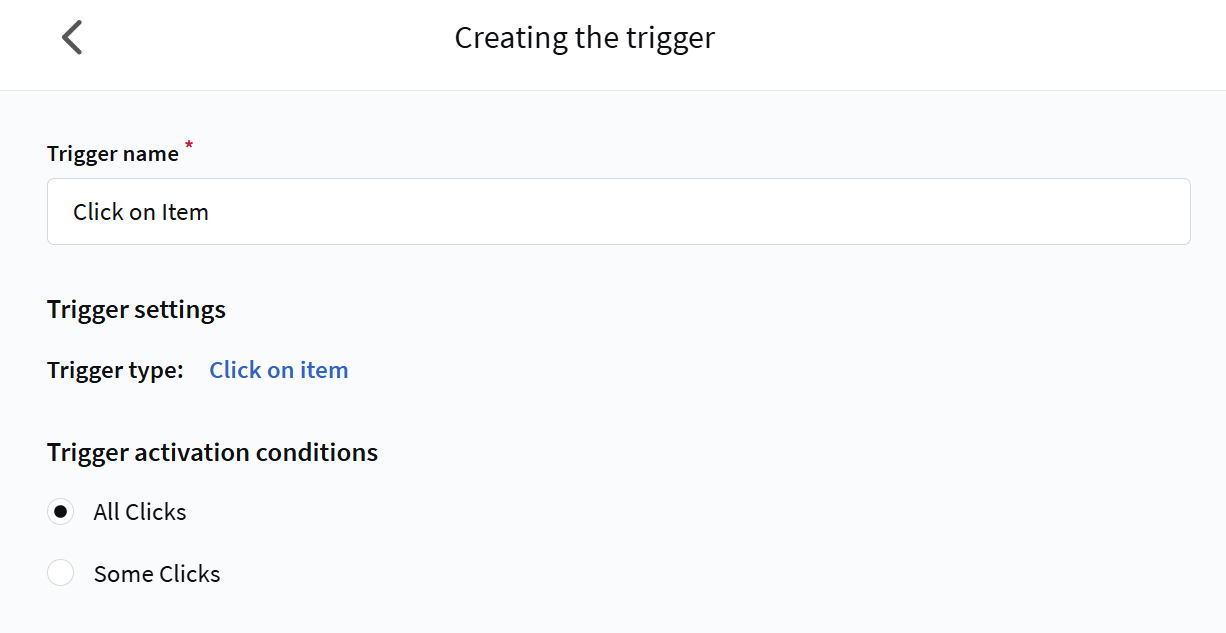
8. By default, triggers fire in response to all events of a certain type. To set additional trigger activation conditions, configure a filter. To do this, in the Trigger activation conditions block, select Some events. After configuring the filter, save the trigger using the button at the bottom of the page.
A filter consists of a variable, an operator, and a value. Select a variable (built-in or custom) and an operator. Then select or manually enter a text value for the variable.
Each event on the site is associated with a set of variables that contain information about it. When an event occurs, the trigger reads a specific variable. Tag Manager compares the value of this variable with the value specified in the filter. If the value of the variable matches the parameters specified in the filter, the trigger is activated and fires the tag.
Thus, using a filter, you can limit the audience for which the tag will be activated.
9. In the Trigger selection window, select one or more triggers and click the Select button at the bottom of the page. If you select multiple triggers, the tag will be activated when any of them fires.
10. In the Tag creation window, check the settings and click Save.
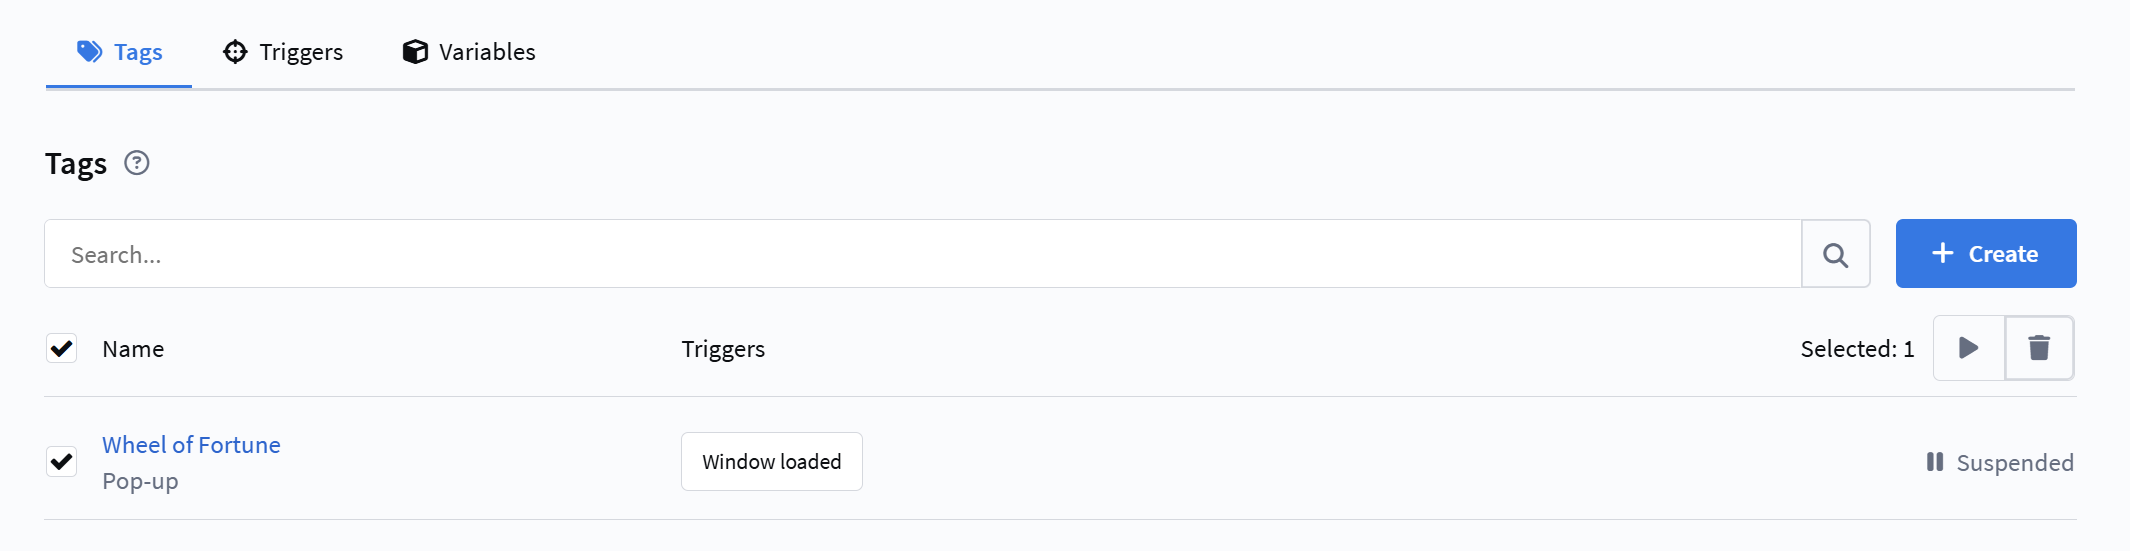
The created tag appears on the Tags tab. To change its settings later, click its name. To temporarily stop tags from running on a page, select the tags and click ![]() , and then publish a new container version. You can also remove unnecessary tags from the container using
, and then publish a new container version. You can also remove unnecessary tags from the container using ![]() .
.
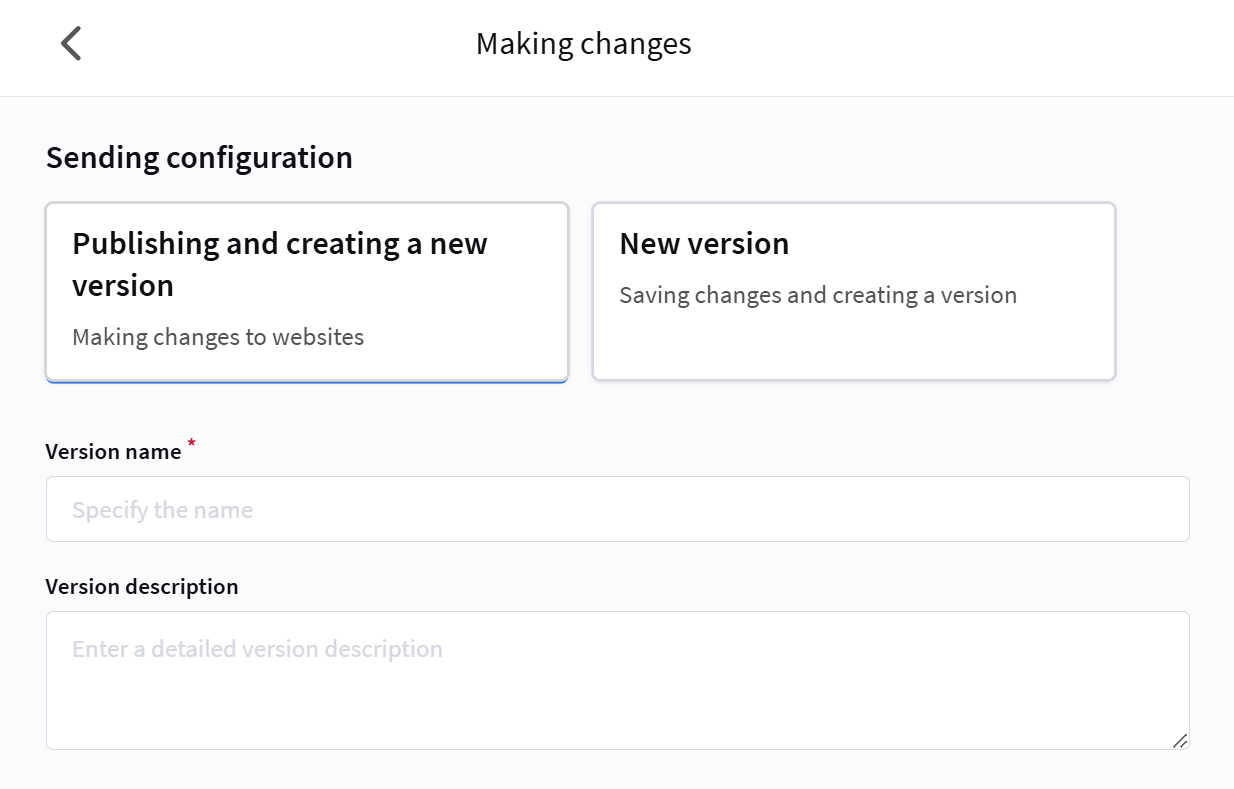
Step 3. Publishing a container version
A version is a saved copy of the container at a specific point in time. If you make changes to the container (add a tag, change a trigger), you can save these changes as a version. To do this, in the Container setup window click the Publish button. Two sending configurations are available:
-
Publish and create a new version — a new version of the container is created and all changes are applied on the site.
-
New version — a new version is created and all changes are saved, but the container is not published and no changes are applied on the site.
Before publishing, the system checks that all variables used in HTML tags exist in the container. If unknown variables are found (for example, removed or renamed ones), publishing is canceled and an error message is shown.
It is recommended to provide a name and description for the version so you can see exactly what changes were made. Then confirm saving by clicking Publish at the bottom of the page.
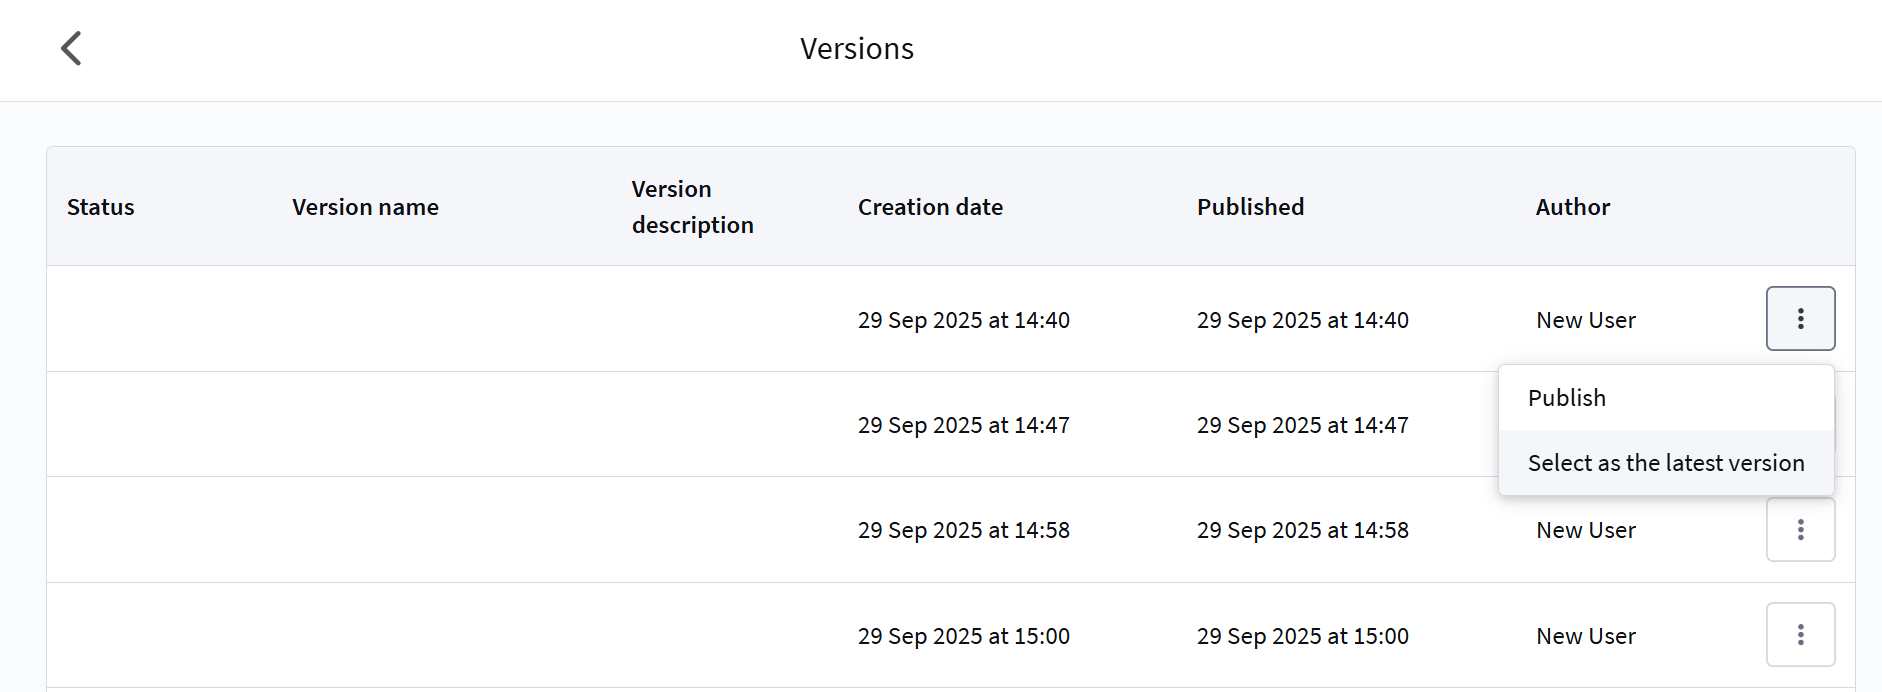
To open the container version list, use the ![]() button in the quick actions menu. The table shows which user created or published each version and when.
button in the quick actions menu. The table shows which user created or published each version and when.
You can switch to another version or publish it instead of the current one. To do this, open the additional actions menu ![]() and click Select as the latest version:
and click Select as the latest version:
The first version of the container has been published and Altcraft Tag Manager has been installed on your site. Don't forget to check that the tag is working correctly.