Altcraft Docs LogoAltcraft Docs Logo
User guide iconUser guide
Developer guide iconDeveloper guide
Admin guide iconAdmin guide
English
  • Русский
  • English
Login
    User documentationGetting StartedFAQAltcraft glossary
      Profiles and databasesarrow
    • Subscription resourcesManaging databasesSubscriber profileProfiles import and data updateScheduled customer data importAutomatic data collectionBulk customers profiles updateDouble opt-in subscriptionSuppression listsProfile relationsProfile history exportProfile exportCreating a static segment based on import resultsHow to open a CSV fileMatchingTypes of fields in the databaseGlobal control groupsSubscription Manager
      Communication channelsarrow
      • Email channelarrow
      • Email: ISP interactions best practicesEmail: sending domain configurationEmail: setting up and using postmastersБыстрый старт
        Push channelarrow
        • Mobile Pusharrow
        • Settings & implementation
            Integrate your app with Altcraftarrow
          • Providers: push message structureProcessing and adding a subscriptionEvent registration
          Web pusharrow
        • Preliminary Settings
            Web browser push configurationarrow
          • Firebase Cloud messagingApple SafariMozilla Services
          Connecting Web Push to a WebsiteTransferring Data to the PlatformWeb Push SDK Methods
            Import of subscriptions from third-party push servicesarrow
          • Migrating push subscriptions from third-party servicesHow to transfer push subscriptions configured for Safari?Migration from OneSignal
      SMS channel
        Creating mailing from scratcharrow
      • EmailSMSWeb PushMobile PushWhatsAppViber*™Руководство: SMS-рассылка через VK NotifyMAX BotMAX GroupNotifyTelegram BotTelegram Group
      Communication Channels WorkflowРуководство: SMS-рассылка через УТШРуководство: push-рассылка через сервис от "Согласие"
      Segmentationarrow
    • Static SegmentsDynamic SegmentsUpdatable Segments
        Segmentation Conditionsarrow
      • Segmentation by Profile dataSegmentation by Interactions with EntitiesSegmentation by Activity of the channelSegmentation by external dataSegmentation by external SQL tablesSegmentation by Profile structure
      Best Send Time (BST)Logical operators "AND" and "OR"Recommendations for working with segments
      Message templatesarrow
      • Working with message templatesarrow
      • Working in the editorEmail-templateSMS templatePush templateMAX templateTelegram templateWhatsApp templateViber™ templateNotify template
        Visual editor for email-templatearrow
      • Visual editor interfaceAdding blocksElements and their settingsCustom blocksStyle managerLayer manager
      Template fragmentsImage galleryContent personalizationCreating tables based on array elementsBlock editor for email template
        Altcraft Variables and Functionsarrow
      • Logical expressions in messagesLoops in messagesMarket variables in templatesUsing the JSONPath functionality
        Dynamic content in messagesarrow
      • Dynamic HTML contentDynamic JSON contentContent from SQL database in templatesDynamic API content
      Importing and exporting a message templateImporting a template from a third-party serviceExporting a template from Pixcraft
      Mailingsarrow
    • Mailings calendarBroadcast mailingsRegular mailingTrigger mailingMultivariate testingMailing testingMailing schedulePlacement mailing
      Campaignsarrow
    • Working with CampaignsLocal control groups (LCG)Stratification Violation ErrorAudience expansionAudience building
      Automation scenariosarrow
    • Managing scenariosNodes of the scenarioClassic marketing scenariosStep-by-step welcome scenario guideScenario for automatic notification of the managerAbandoned cart scenario
      Marketarrow
    • Market settings
        Productsarrow
      • How to create a product manuallyHow to import a product from a fileScheduled product importProduct and SKU SegmentsPreparing the YML file
      OrdersMarket variables in message templateGuide: how to send an order confirmation email
      Loyalty programsarrow
    • Loyalty programsLoyalty integration with external systemsБыстрый стартBasic loyalty program use casesOrder SegmentsPromotion codes
      Reports and analyticsarrow
    • Channel reportTraffic report
        Summary reportarrow
      • Summary report metrics
      Cohorts reportLifetime reportFunnels reportGoals reportAudience growth reportClick map reportLoyalty programs reportBounces reportUndeliveries reportReport on global control groups
      Integrationsarrow
      • Action hooksarrow
      • Altcraft Action HooksAction hooks event typesAction Hook Message StructureJSON batch request (HTTP POST action hook)Message to RabbitMQ brokerMessage to RabbitMQ exchangerMessage to Kafka brokerTest event
        Integration of third-party services using Albatoarrow
      • Connecting Altcraft to Albato Launching the welcome scenario using AlbatoTransmitting event dataSetting app a trigger mailingEvent registrationGoogle Sheets and Altcraft integration AmoCRM and Altcraft integration
      Facebook Ads Manager™Google Ads AudiencesMAXYandex.Audience™VK Ads™Static segment synchronizationYandex AppMetrica™Tilda™Lpgenerator™WhatsAppViber*™ integrationIntegration scopeData Transmitted During SynchronizationNotify
      Weblayersarrow
      • Formsarrow
      • Create a formForm constructorAppearanceActions after form activationData analyticsBinding data channel and formsConditional logic in forms and surveysNPS testing
        Pixelsarrow
      • Goal customer actions and scoring
        Pop-upsarrow
      • Creating and publishing a pop-upSetting up a popup in the code editorManaging pop-ups manually via scriptPopup analyticsGuide: pop-up for push subscriptionsCase: Creating a pop-up with the "Wheel of Fortune" widgetBasic cases of placing a popup via the Tag Manager
        Tag Managerarrow
      • Configuring and installing Tag ManagerTrigger typesVariables typesLinking a pixel and the Tag manager
      Settingsarrow
    • Account settingsCustom linksVirtual sendersSending policiesAudit journalTags FAQ
        Users, groups and accessarrow
      • Two-Factor Authentication (2FA)
        Connectionsarrow
      • Connection to Facebook Ads ManagerConnection to Google AdsConnecting to Yandex.Audience™Connection to 360dialogConnection to EdnaConnection to Devino TelecomConnection to SMSTrafficConnection to VK Ads™Connection to MTS OmniChannelCustom Authentication ConnectionOAuth2 connectionBasic Authentication connectionToken Authentication connectionConnection to RapportoMAX connectionConnection to Notify
      Attribute settings
      API requests: where to startarrow
    • Import or update a profileTrigger mailing launchEngage profile in scenario
      Changelogarrow
    • v2026.1.76v2025.4.75v2025.4.74v2025.3.73v2025.2.72v2025.1.71v2024.4.70v2024.3.69v2024.2.68.2v2024.1.68
    Documentation archivelibrary
  • Profiles and databases
  • Scheduled customer data import

Scheduled customer data import

Customer data import can be automated using scheduled Database import. The import module takes data from external data tables. To configure automatic data collection, you need to configure SQL connector in admin panel and bind it to your account. In your account, to proceed to import creation, go to Data —> Database Imports.

You can also go to this section from the list of databases by choosing "Import customer profiles" in the context menu on the right:

General settings​

In general settings of import, you can set import name, assign access groups and labels and set how the import will process data in the platform account:

  1. Database — import will add or update fields in the selected database of customer profiles. The set of available fields for storing information depends on the database.
  2. Database import mode — import can work in three modes:
    • Add new leads and update existing ones
    • Add new leads, do not update existing ones
    • Update only
  3. Profiles matching mode — You can search by contact data, subscription data (including Push), by profile ID to update existing profiles — and by custom database field.
  4. Matching field — if you search for profiles by custom field of the database, you need to select it in this menu.

For scheduled import IP location is also available. If you have configured trigger mailings to import or update profiles, you can restrict their triggering for scheduled import.

In the main settings there is an option to instantly start import in addition to the schedule. If this item is checked, after clicking the Apply or Save button, the import will be launched.

Database import schedule​

You can flexibly configure schedule for regular import. Choose schedule plan from the menu and configure it depending on your import purpose.

tip

Mailing schedule is described in detail on this page.

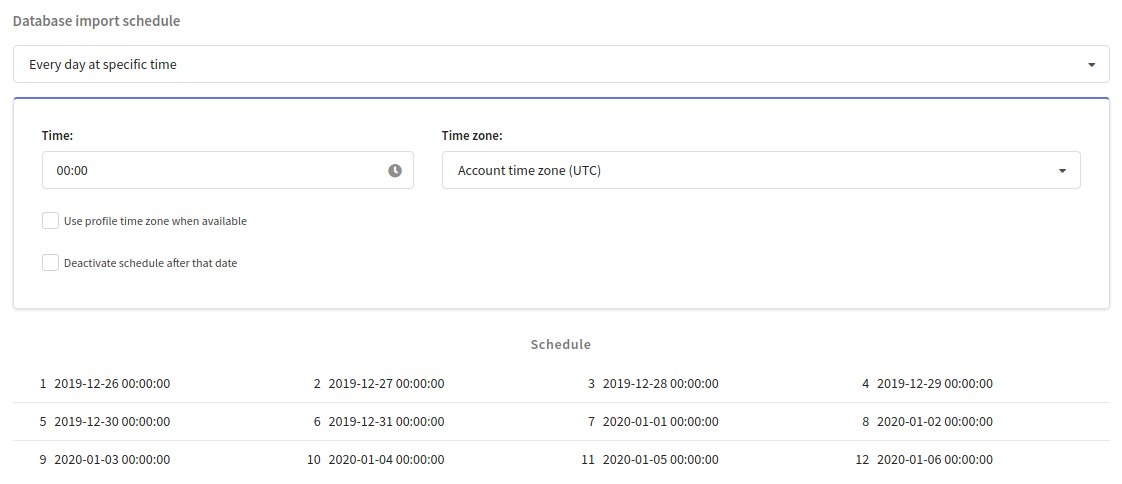
For each schedule plan, you can set the time zone for the calculation. You can also set import deactivation date:

Database import settings​

Choose the necessary database connector (configured in administrative panel) in database import settings and the data table to take data from:

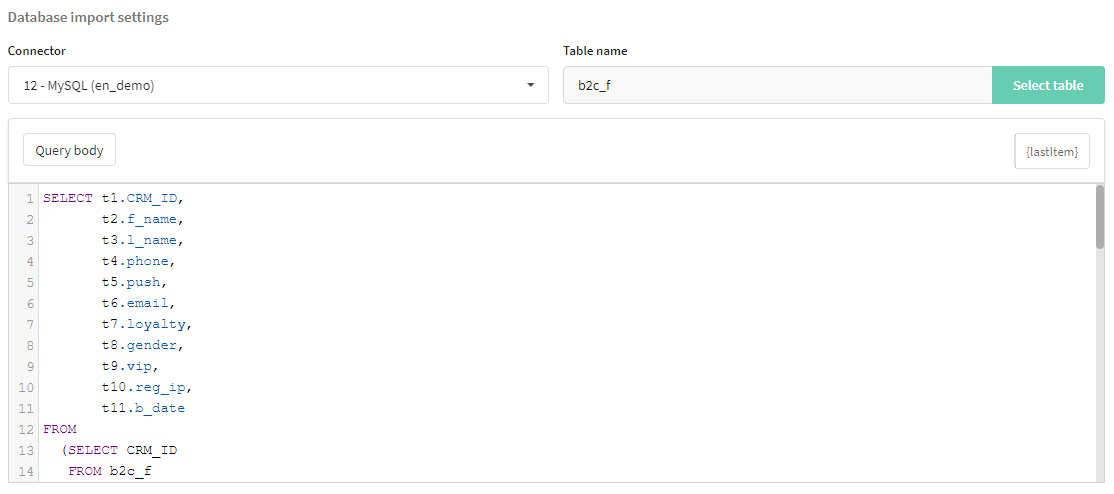
Create Query body depending on DB management system you use: MySQL, PostgreSQL, MSSQL, Oracle, Hive or ClickHouse. SELECT operator is necessary on your queries. There are no any other restrictions.
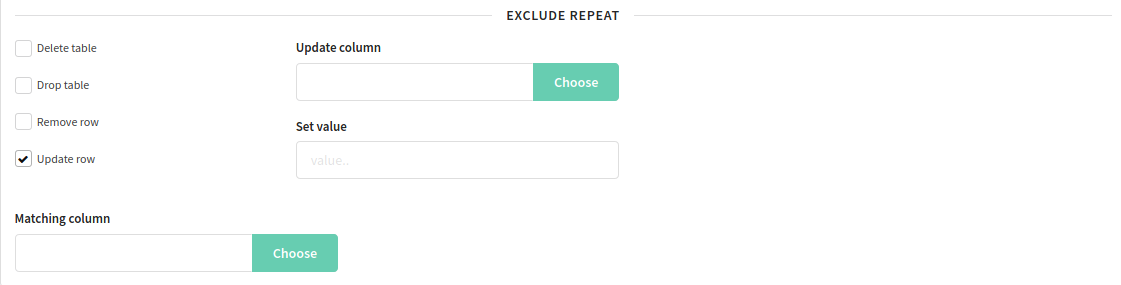
Prevent duplication​

These functions are available to prevent repetative data update:

Splitting import into parts​

When you import big amount of records, you can divide this process, to distribute loading. To do this, you need to add {lastItem} variable into Query body for the column with unique ID. It is recommended to sort IDs when making a query.

Query example: SELECT * from TestTable where id>{lastItem} LIMIT 10

Next, you need to specify from which row in the table you want to start the first import. To do this, select the column with the ID in Next import start column and specify Field value.

An example of settings for starting import from the first row (if the data in the id column is sorted in ascending order):

After starting a regular import, Field value will be automatically updated — it will be filled with the last ID after the previous run.

Column mapping​

In this block, you need to determine the correspondence of profile fields in the Altcraft database and columns of the external SQL database. After clicking on the Add column button on the left of the drop-down menu, select Altcraft profile field for updating or recording data.Dur

When you choose column of external SQL database, its first value will be shown to the right as gray text, like in example below:

Field import specifics​

When importing data into the system, the platform expects specific value formats for each field type. All valid formats are described in this article. Make sure the data in your source matches these requirements, otherwise the platform will not be able to process it correctly.

For Object and Array of Objects fields, the platform expects the value to be a string containing valid JSON. To set this value, you need to first convert the JSON object into a string and then escape it according to the CSV rules described in RFC 4180 (double quotes " are replaced with "").

Array of objects example:

[
{
"field1": 123,
"field2": {"subfield": false},
"field3": "abc"
}
]

Expected value: "[{""field1"": 123, ""field2"": {""subfield"": false}, ""field3"": ""abc""}]"

For Enum fields, you can import either the values themselves or their indexes. For example, if you have created a enum list in the database with options "tariff_1", "tariff_2", "tariff_3", you can specify the same values in the source column or use the indexes: 1 — "tariff_1", 2 — "tariff_2", 3 — "tariff_3", 0 — "Not selected" (default value).

Please note that values consisting only of digits cannot be imported directly — the platform will treat them as indexes. For example, if the list contains the values 100 and 200, you need to import the corresponding indexes: 1 — 100, 2 — 200.

Subscription settings​

During import, you can automatically subscribe customers to certain resources - through one or more channels. For every subscription you need to select a resource, communication channel and select column in the data table from which contact data for subscriptions will be imported.

You can set status for every subscription:

  • During import, you can give "Subscribed" status for Single opt-in, or "Unconfirmed" status for Double opt-in logics.

  • During data update, you can change subscription status depending on user actions, like suspending or unsubscribing

Database imports report​

In this block, you can see information about last 10 imports. If any errors occurred during last import, you can load report about them.

Last updated on Mar 12, 2026
Previous
Profiles import and data update
Next
Automatic data collection
  • General settings
  • Database import schedule
  • Database import settings
    • Prevent duplication
    • Splitting import into parts
  • Column mapping
    • Field import specifics
  • Subscription settings
  • Database imports report
© 2015 - 2026 Altcraft, LLC. All rights reserved.