Managing databases
Description
Modern people-based marketing techniques use real time behavior tracking and customers personal information.
Altcraft database management provides you with powerful and flexible tools to collect and make use of customer profiles data.

Flexibility and usefulness of database depends on how it is created, filled, and maintained. If data is correctly collected and organized, then it becomes possible to segment subscribers depending on certain attribute to separate groups and send targeted content to each group.
This process is called Segmentation, and for this we have certain element - segment, which has many intuitive settings.
Think about your marketing for a minute. What goals do you have, who is your audience and what information is interesting for them.
For example:
- Do you have your seasonal customers? Do they prefer certain product types?
Is it necessary to send different content templates depending on customers occupation or hobbies;
- What other parameters affect your customers behaviour?
It can be convenient to figure out what customer information is necessary for you, and write it. You can use it to create custom fields for storing information about your customers in the database.
Thoughtful database setup will bring skyrocketing impact, especially in the long run.
Managing a database
To manage databases, select Data —> Profiles databases in the main menu. To create a new database, click + Create in the top panel. To edit an existing database, click on its name.
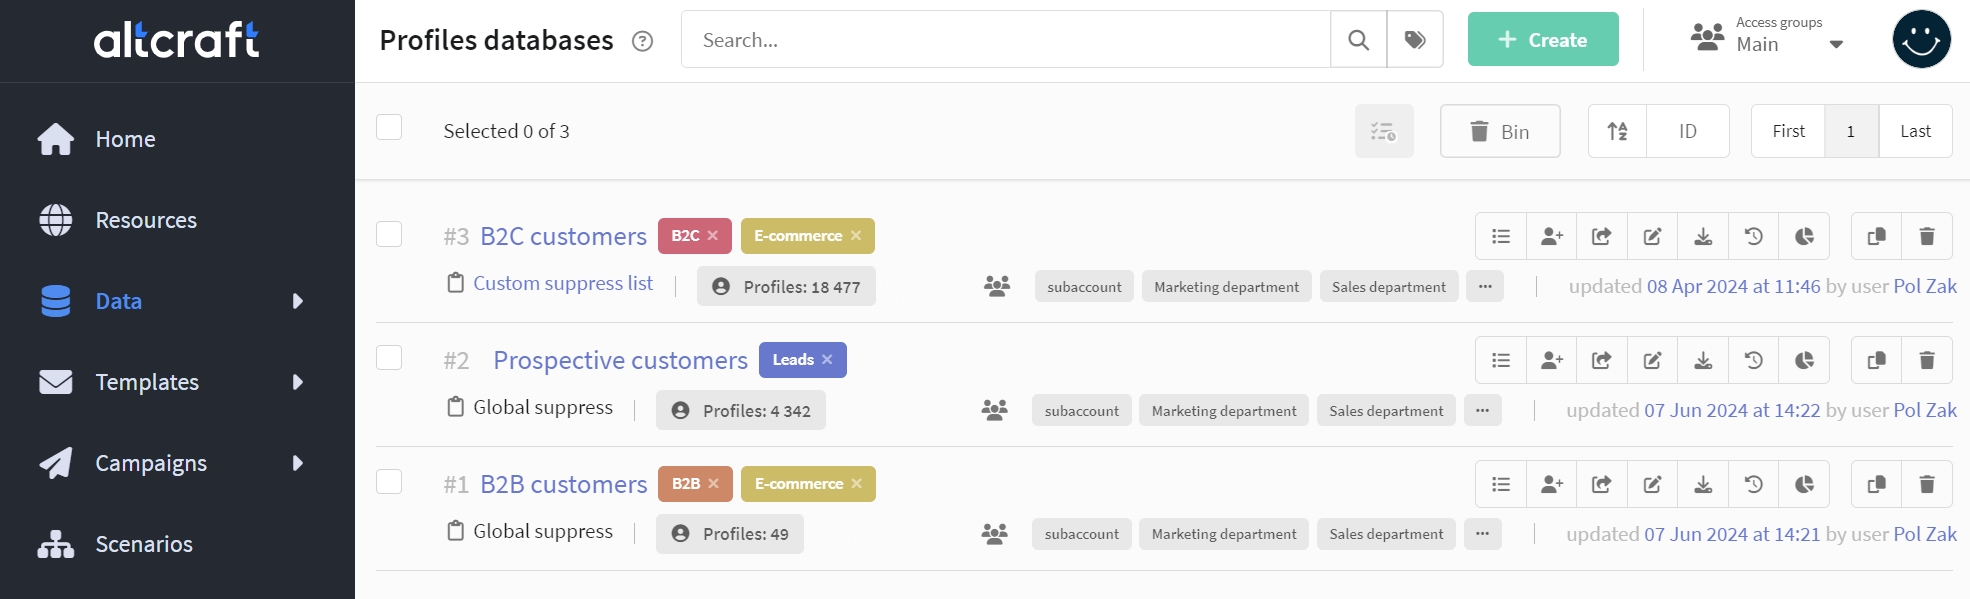
The following functions are available in the context menu:
![]() — view profiles
— view profiles
![]() — copy profilesto another database
— copy profilesto another database
![]() — update multiple profiles in the database.
Using this instrument, you canupdate profiles, subscribe them to resources, attach or detach promo codes.
— update multiple profiles in the database.
Using this instrument, you canupdate profiles, subscribe them to resources, attach or detach promo codes.
![]() — exportcustomer profiles into a file.
Beforeexport, you can specify data you need to download.
— exportcustomer profiles into a file.
Beforeexport, you can specify data you need to download.
![]() — export profile history. Download data
on profile activity.
— export profile history. Download data
on profile activity.
![]() — create a new empty database with the
same structure. Custom fields will be copied into a new database.
— create a new empty database with the
same structure. Custom fields will be copied into a new database.
![]() — delete database altogether with profiles.
— delete database altogether with profiles.
You can delete a database only if it does not contain any profiles that have had interactions within the account. If there have been interactions, such as sending mailings to these profiles, you must first delete those profiles from the database.
Creating a profiles database
General settings
The following settings can be configured for a database:
- Database name: name displayed in platform database lists.
- Description: database purpose description.
- Set group: database access group.
- Tags: custom tags that can be used for quick search and analytics.
- Subscription manager title: title displayed only in subscription manager.
- Subscription manager language: subscription manager page language for database profiles.
- Attached suppression list: a custom suppression list for this database.
- Resources: enable communication with database profiles through various channels within a specific topic. Instructions on how to configure the resource are provided in this article.
- Watchers database: select this option for a database of observers. They will receive messages when a mailing starts together with your customers. Databases with this option can be selected in Smart mailing settings.

Default fields
Standard profile fields are designed to keep the most frequently used customer information.
Default — this value is used when field value is unknown after profile import.
Make required — this field will be required during import. If you enter a Default value, profile import without this field value will be possible.
Subscription manager — this field value will be shown in subscription manager page.

Fields with customer geodata are divided into two types:
- The first ("reg." In the field name) is the information received during registration: based on the IP address or static import data.
- The second is the latest data received from the client’s actions history: also based on IP address or transmitted data.
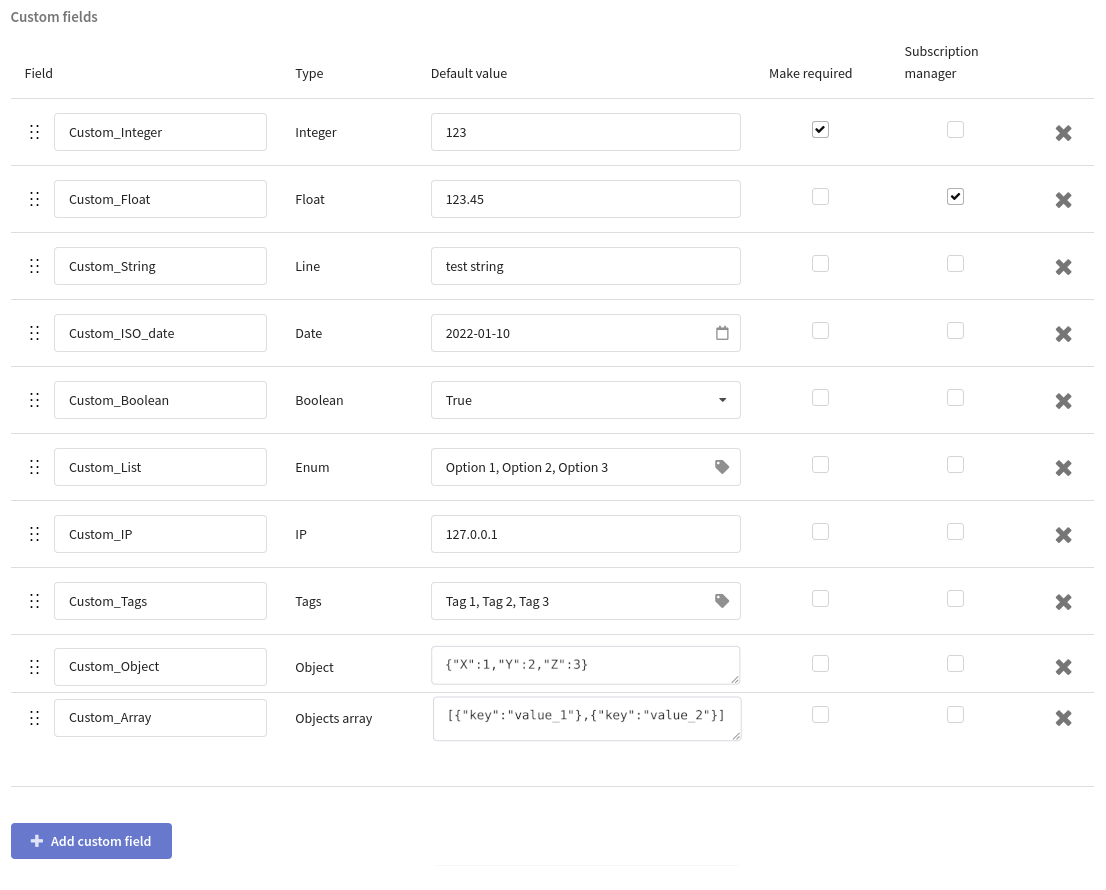
Custom fields
Custom fields are created by users of the Altcraft system to store specific for business customer information. You can create unlimited custom fields. They can contain 10 different data types:
- Number — positive and negative integer numbers.
- Float — floating-point number: it has a decimal place.
- Line — text in any language, including numbers, special characters, spaces. Unicode standard is used.
- Date — date in RFC 3339 format, like
2019-08-22T00:00:00.000Z. - Boolean — this field provides a choice of two options:
TrueorFalse(Yes or No). It is used to define if customer has certain attribute, like VIP status. - Enum — this field is similar to Boolean, but allows you to choose one option from unlimited number of options created by user. For example, customer tariff plan. Options are written in a comma separated line.
- IP — IP in IPv4 format. For example,
127.0.0.1. - Tags — in this field, several values can be written simultaneously. They may be products or services purchased by customer, or other values, composition of which may vary. Tags are written in line, separated by
"," "|" or ";". Therefore, these characters can not be used in tag itself. For example:Product-1,Product 2,Product_3. - Object is a field for storing undefined data: a set of flags or complex data structures.
- Array of objects is a field for storing a subtable, which, for instance, may contain a list of managers, contracts, etc.
1. Naming rules. In object field names, only Latin letters (in any case), digits from 0 to 9, the underscore _, and the hyphen - are allowed.
2. Data type. You can store data of int, float, string, boolean types in the "Object array" or "Object" fields.
Example
[
    {
        "key1": 12.3,
        "key2": 12,
        "key3": true,
        "key4": "text"
    }
]
3. Object structure. If you use such types as "Array of objects" or "Object", you can only store peer objects or peer objects that are nested within other objects. If you use objects with a more complex structure, connect the SQL database and create queries to select profiles.
Details
Valid values:
[
	{"x":1},
	{"y":2}
]

//OR

{
  "key_1":
    {
      "sub_key_1":
        {"x":1,"y":2}
    },
  "key_2":
    {
      "sub_key_1":
        {"x":5,"y":3}
    }
}

//OR

[
    {"key": "value_1", "new_key": "new_value1"},
    {"key": "value_2", "new_key": "new_value2"}
]
Invalid values:
[
	["x","y"],
	["z","w"]
]

//OR

{
  "key":
    [
      ["x","y"],
      ["z","w"]
    ]
}

//OR


[
    {"key1": "value_1", "new_key10": "new_value1"},
    {"key7": "value_2", "new_key300": "new_value2"}
]
You can find detailed information about the types of fields in the database and the allowed values in this article.
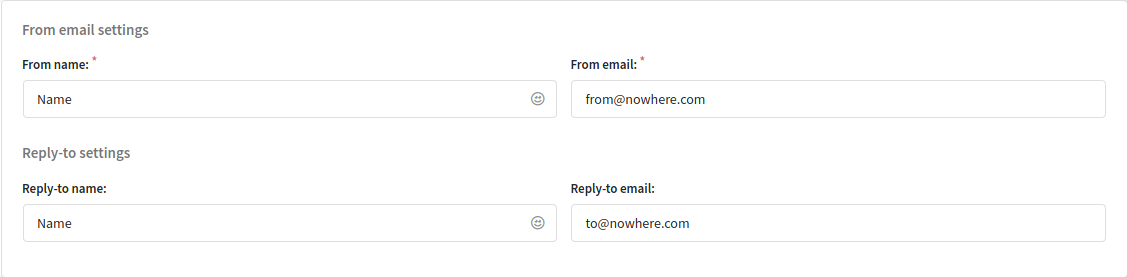
Email settings
These fields are required for creating a new database:
And these you will need to gather replies:
Machine learning settings
Enabling machine learning in the database allows you to determine the best time to send a message to a profile. This data can then be used to segment profiles and set up scenarios.
To get started with this module, you need to add fields to the platform configuration file.

After saving the settings, you will see a window with information about when the recalculation of profile data in the machine learning database is scheduled. The first best time data will be displayed after the first calculation.

The schedule for updating machine learning data is set in the configuration file in the ML_REFRESH_TIME_HOURS (UTC +0) field. The default is at 00:00.