Profile relations
To attach, detach, edit or modify relations automatically you would need API integration. Check this Section of API documentation.
The relations between profiles allow you to implement customer interaction strategies on the platform. You can relation profiles within the same database or relation profiles from different databases. There are two types of communication:
Direct — outgoing. Shows the relationship of the profile to other profiles. For example, the relationship of a referral client with his clients. Feedback is incoming. Shows how other profiles relate to the selected profile. For example, clients of one agent or manager of a company evaluate the quality of his work. Each relationship has properties - relationships between clients. Properties can be in the form of numeric or Boolean (false - true) values.
Relation objects are created in the user interface. You can add, remove, strengthen, or change a relation either manually or using special API requests described in this section of the documentation.
Managing relations
In the main menu search for Relations in the Data section. Here all your existing relations are enlisted, accompanied by created-updated summary and databases involved. Using actions menu on the right side you can quickly clone or delete a relation. To edit an existing relation, click on its name. To add a new record, click + Create at the top of the page:

General settings
In General settings enter the new relation's name and short name as well. Short name will be used in message template editor and relations API requests.
Below select Databases containing profiles you are going to relate:
- Database A — contains profiles that are collecting relations. These can be your products, managers, agents — or partners. We can call them objects.
- Database B — contains profiles that initiate relations — your or your partners' customers, reviewers or subjects we can call them.
If you are using one database relations, select it in both drop-downs!

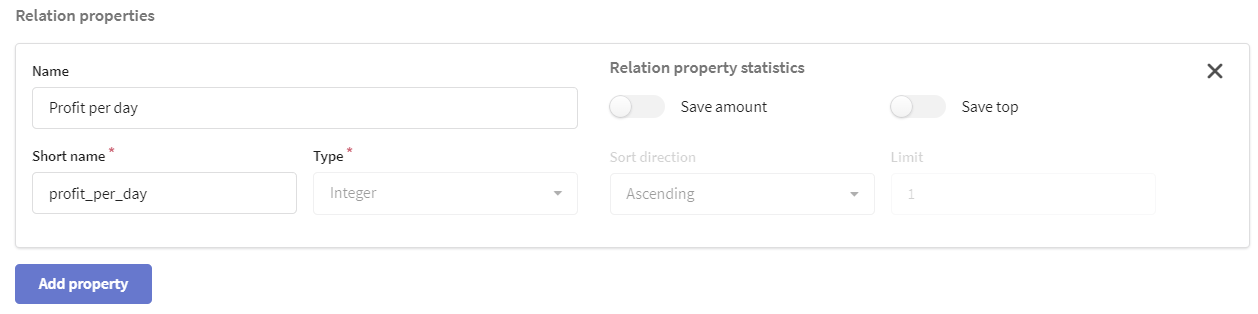
Relation properties
One relation can contain up to 11 properties, describing the value or weight of interaction between profiles. For each new property enter a name and a short name for templates and API.
Property type sets which data will be used to measure relation impact:
- Integer — any integer number. Fits well for quality assessment, numbers of purchases, social network profile views and post likes.
- Float number — a floating-point number. Monetary values and other more complex numbers can be recorded in this property.
- Boolean — a boolean true-false value. Can be used for one-time or on-off actions: subscriptions, recommendations, or availibility.
For numeric properties you can store statistics: save amount and save top. The sorting direction determines whether to store the highest or lowest values in the top, and the limit (from 1 to 20) sets the number of relations for statistics:
Relating profiles manually
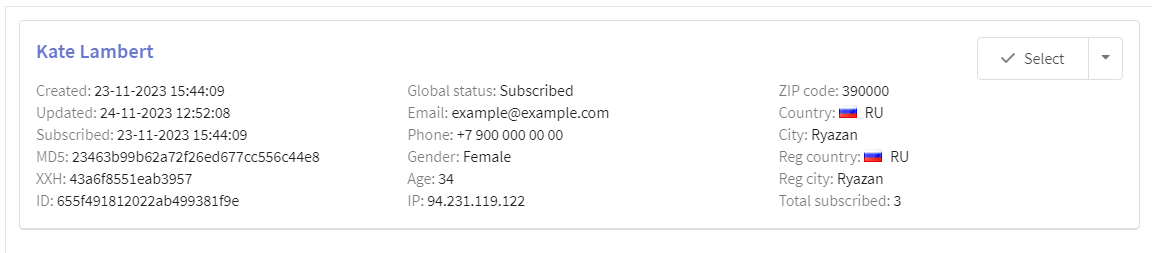
Open the subscriber profile in Database A. On the Data tab, go to the Relation section. The available relations for the profile of the current database are displayed here.

In the window that opens, specify the rule for selecting a profile from the Database B. Standard rules are used, as in the search or segmentation of profiles.
Click **Apply ** and Select:
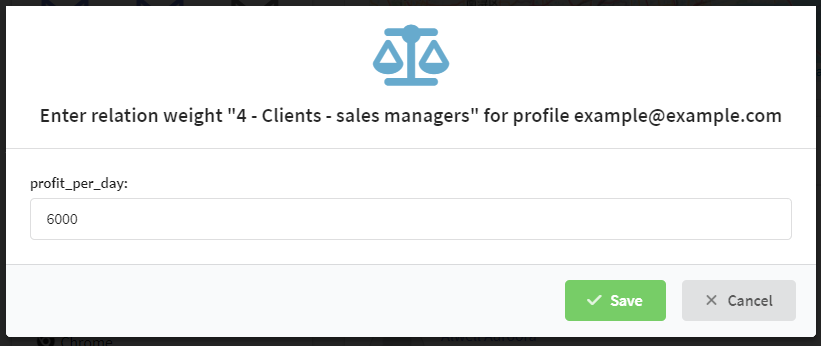
Then enter relation's property weight:
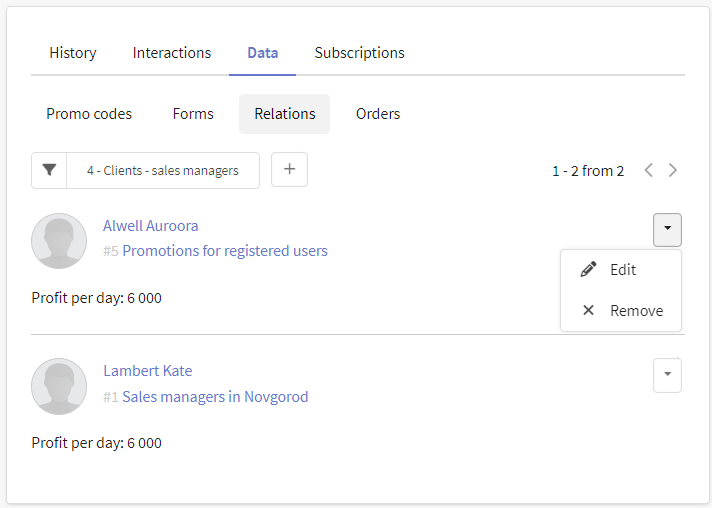
After adding a relation, a brief summary and a top on the properties of the relation will be available in the profile, as well as a list of related profiles from the Database B. You can change the weight of the relation or delete it using the drop-down menu on the right side of the entry:
What are relations and relation values used on the platform for?
1. Segmentation
They can be used to create a static or dynamic segment. Due to this, the target audience is "separated" from all the clients of one database based on the attitude of its participants to each other.
Additionally, you can add checks for certain communication properties:
- false or true — for Boolean properties
- more/less, more/less or equal, equal/not equal — for numeric properties
In the segmentation rule, select the presence or absence of direct or reverse, and add the necessary parameters.
For example, you can use the rule below to find customers who approve of your projects and even donate more than 200 currency pieces.

2. Dynamic content in templates
Relation values can be added to message template using special variables.
In the variables menu, select direct or feedback and the desired value for substitution.
For example, for an online training center, you can notify methodologists about how many hours students spent studying with certain instructors, and for clients - provide an up—to-date schedule of the instructors they prefer.
Relation variables can also be inserted manually using the following editor script:
{relation.[short_connection_name].[direct for direct or reverse for reverse].[property name].[count — quantity, total — sum, top — top relations]}
The number of direct relations to the profit property:
{relation.managers_loyal.direct.profit.count}
Top feedbacks with the profit property. A loop is used to output list of values.
The loop substitutes the data of those profiles that are specified in the relation, and not from the database through which the mailing is sent. Thus, if you send an email to your agent, it may use personal customer data stored in a separate database.
{for $index $item = relation.managers_loyal.reverse.profit.top}
{$item.lead._fname} {$item.lead._lname} ({$item.value} profit)
{else} There is no ‘profit’ for you :(
{end}
The sum of the value of the profit property for direct relation:
{relation.managers_loyal.direct.profit.total}
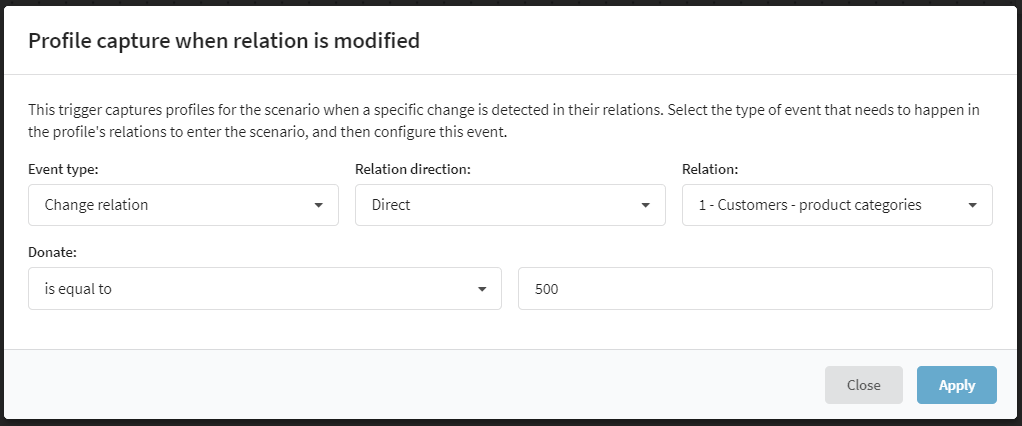
3. Trigger mailing or automation scenario
A trigger mailing can be configured to create or delete a relation:

The trigger can be triggered when both the direct and reverse relation between profiles changes. This may take into account the appearance, change or deletion of the relation, as well as the achievement of the relation property set in the trigger value.
Or connections can be implemented in automation scenario:
For example, if you have a referral program, set up 2 different automated workflows for both referral and for customers engaged by the referral:
for the referral — a trigger "When a direct relation is attached". It will launch when a referral engages a new customer for you. Use this scenario or trigger to further motivate your referral. You can additionally specify values, like profit of the initial transaction.
for the engaged customers — a trigger for reverse relation. Use it to promote your products and motivate customers to become new referrals.