Altcraft Docs LogoAltcraft Docs Logo
User guide iconUser guide
Developer guide iconDeveloper guide
Admin guide iconAdmin guide
English
  • Русский
  • English
Login
    User documentationGetting StartedFAQAltcraft glossary
      Profiles and databasesarrow
    • Subscription resourcesManaging databasesSubscriber profileProfiles import and data updateScheduled customer data importAutomatic data collectionBulk customers profiles updateDouble opt-in subscriptionSuppression listsProfile relationsProfile history exportProfile exportCreating a static segment based on import resultsHow to open a CSV fileMatchingTypes of fields in the databaseGlobal control groupsSubscription Manager
      Communication channelsarrow
      • Email channelarrow
      • Email: ISP interactions best practicesEmail: sending domain configurationEmail: setting up and using postmastersБыстрый старт
        Push channelarrow
        • Mobile Pusharrow
        • Settings & implementation
            Integrate your app with Altcraftarrow
          • Providers: push message structureProcessing and adding a subscriptionEvent registration
          Web pusharrow
        • Preliminary Settings
            Web browser push configurationarrow
          • Firebase Cloud messagingApple SafariMozilla Services
          Connecting Web Push to a WebsiteTransferring Data to the PlatformWeb Push SDK Methods
            Import of subscriptions from third-party push servicesarrow
          • Migrating push subscriptions from third-party servicesHow to transfer push subscriptions configured for Safari?Migration from OneSignal
      SMS channel
        Creating mailing from scratcharrow
      • EmailSMSWeb PushMobile PushWhatsAppViber*™Руководство: SMS-рассылка через VK NotifyMAX BotMAX GroupNotifyTelegram BotTelegram Group
      Communication Channels WorkflowРуководство: SMS-рассылка через УТШРуководство: push-рассылка через сервис от "Согласие"
      Segmentationarrow
    • Static SegmentsDynamic SegmentsUpdatable Segments
        Segmentation Conditionsarrow
      • Segmentation by Profile dataSegmentation by Interactions with EntitiesSegmentation by Activity of the channelSegmentation by external dataSegmentation by external SQL tablesSegmentation by Profile structure
      Best Send Time (BST)Logical operators "AND" and "OR"Recommendations for working with segments
      Message templatesarrow
      • Working with message templatesarrow
      • Working in the editorEmail-templateSMS templatePush templateMAX templateTelegram templateWhatsApp templateViber™ templateNotify template
        Visual editor for email-templatearrow
      • Visual editor interfaceAdding blocksElements and their settingsCustom blocksStyle managerLayer manager
      Template fragmentsImage galleryContent personalizationCreating tables based on array elementsBlock editor for email template
        Altcraft Variables and Functionsarrow
      • Logical expressions in messagesLoops in messagesMarket variables in templatesUsing the JSONPath functionality
        Dynamic content in messagesarrow
      • Dynamic HTML contentDynamic JSON contentContent from SQL database in templatesDynamic API content
      Importing and exporting a message templateImporting a template from a third-party serviceExporting a template from Pixcraft
      Mailingsarrow
    • Mailings calendarBroadcast mailingsRegular mailingTrigger mailingMultivariate testingMailing testingMailing schedulePlacement mailing
      Campaignsarrow
    • Working with CampaignsLocal control groups (LCG)Stratification Violation ErrorAudience expansionAudience building
      Automation scenariosarrow
    • Managing scenariosNodes of the scenarioClassic marketing scenariosStep-by-step welcome scenario guideScenario for automatic notification of the managerAbandoned cart scenario
      Marketarrow
    • Market settings
        Productsarrow
      • How to create a product manuallyHow to import a product from a fileScheduled product importProduct and SKU SegmentsPreparing the YML file
      OrdersMarket variables in message templateGuide: how to send an order confirmation email
      Loyalty programsarrow
    • Loyalty programsLoyalty integration with external systemsБыстрый стартBasic loyalty program use casesOrder SegmentsPromotion codes
      Reports and analyticsarrow
    • Channel reportTraffic report
        Summary reportarrow
      • Summary report metrics
      Cohorts reportLifetime reportFunnels reportGoals reportAudience growth reportClick map reportLoyalty programs reportBounces reportUndeliveries reportReport on global control groups
      Integrationsarrow
      • Action hooksarrow
      • Altcraft Action HooksAction hooks event typesAction Hook Message StructureJSON batch request (HTTP POST action hook)Message to RabbitMQ brokerMessage to RabbitMQ exchangerMessage to Kafka brokerTest event
        Integration of third-party services using Albatoarrow
      • Connecting Altcraft to Albato Launching the welcome scenario using AlbatoTransmitting event dataSetting app a trigger mailingEvent registrationGoogle Sheets and Altcraft integration AmoCRM and Altcraft integration
      Facebook Ads Manager™Google Ads AudiencesMAXYandex.Audience™VK Ads™Static segment synchronizationYandex AppMetrica™Tilda™Lpgenerator™WhatsAppViber*™ integrationIntegration scopeData Transmitted During SynchronizationNotify
      Weblayersarrow
      • Formsarrow
      • Create a formForm constructorAppearanceActions after form activationData analyticsBinding data channel and formsConditional logic in forms and surveysNPS testing
        Pixelsarrow
      • Goal customer actions and scoring
        Pop-upsarrow
      • Creating and publishing a pop-upSetting up a popup in the code editorManaging pop-ups manually via scriptPopup analyticsGuide: pop-up for push subscriptionsCase: Creating a pop-up with the "Wheel of Fortune" widgetBasic cases of placing a popup via the Tag Manager
        Tag Managerarrow
      • Configuring and installing Tag ManagerTrigger typesVariables typesLinking a pixel and the Tag manager
      Settingsarrow
    • Account settingsCustom linksVirtual sendersSending policiesAudit journalTags FAQ
        Users, groups and accessarrow
      • Two-Factor Authentication (2FA)
        Connectionsarrow
      • Connection to Facebook Ads ManagerConnection to Google AdsConnecting to Yandex.Audience™Connection to 360dialogConnection to EdnaConnection to Devino TelecomConnection to SMSTrafficConnection to VK Ads™Connection to MTS OmniChannelCustom Authentication ConnectionOAuth2 connectionBasic Authentication connectionToken Authentication connectionConnection to RapportoMAX connectionConnection to Notify
      Attribute settings
      API requests: where to startarrow
    • Import or update a profileTrigger mailing launchEngage profile in scenario
      Changelogarrow
    • v2026.1.76v2025.4.75v2025.4.74v2025.3.73v2025.2.72v2025.1.71v2024.4.70v2024.3.69v2024.2.68.2v2024.1.68
    Documentation archivelibrary
  • Profiles and databases
  • Suppression lists

Suppression lists

Suppression list is a list of email addresses, email domains and phone numbers, which you do not want to send messages to. Suppression list filters an email address or a phone number at moment of mailing launch. Suppression lists are formed to follow CAN-SPAM law rules.

Three types of black lists are used in the platform:

  • Global Platform suppression list — affects mailings in all platform Accounts. If hard bounce is returned for the email address, it goes to global list. Valid addresses, that must be restricted from mailing, are stored separately.
  • Global Account suppression list — it is created automatically in every account of the platform. Added contacts will be blocked from all Account mailings.
  • User suppression lists — they are created by users in platform accounts. They can be attached to Profile databases or to Messages Templates.

Several suppression lists with certain rules are considered, because segment (which can contain several databases with suppresion lists) and several messages can be used in the mailing.

Global suppression list of the platform​

Global suppression list of the platform affects all platform Accounts. In consists of two parts:

  • Invalid emails list — all emails, for which hard bounce (address does not exist) was received from email provider, go to this list.
caution

Take your notice, that when such answer has been received, Subscription status of the customers changes to hard bounce. These subscriptions will not be used in the mailings, because sending to non-existing addresses makes sender reputation with mail service worse.

If you change status of these subscriptions to Subscribed — they will stay in global lost and will not be processed. To resubscribe these customers, you need to remove them from global suppression list of the platform.

  • Global suppression list — any addresses or any domains for all Accounts of the platform. Platform Administrator can add data in this list, using Administrative panel.

Account suppression lists​

To access Account suppression lists management, choose Data —> Suppression lists in the main menu. This will open a menu displaying the existing suppression lists for your account. From there, you can use the quick actions menu to begin working with the desired suppression list immediately:

File import​

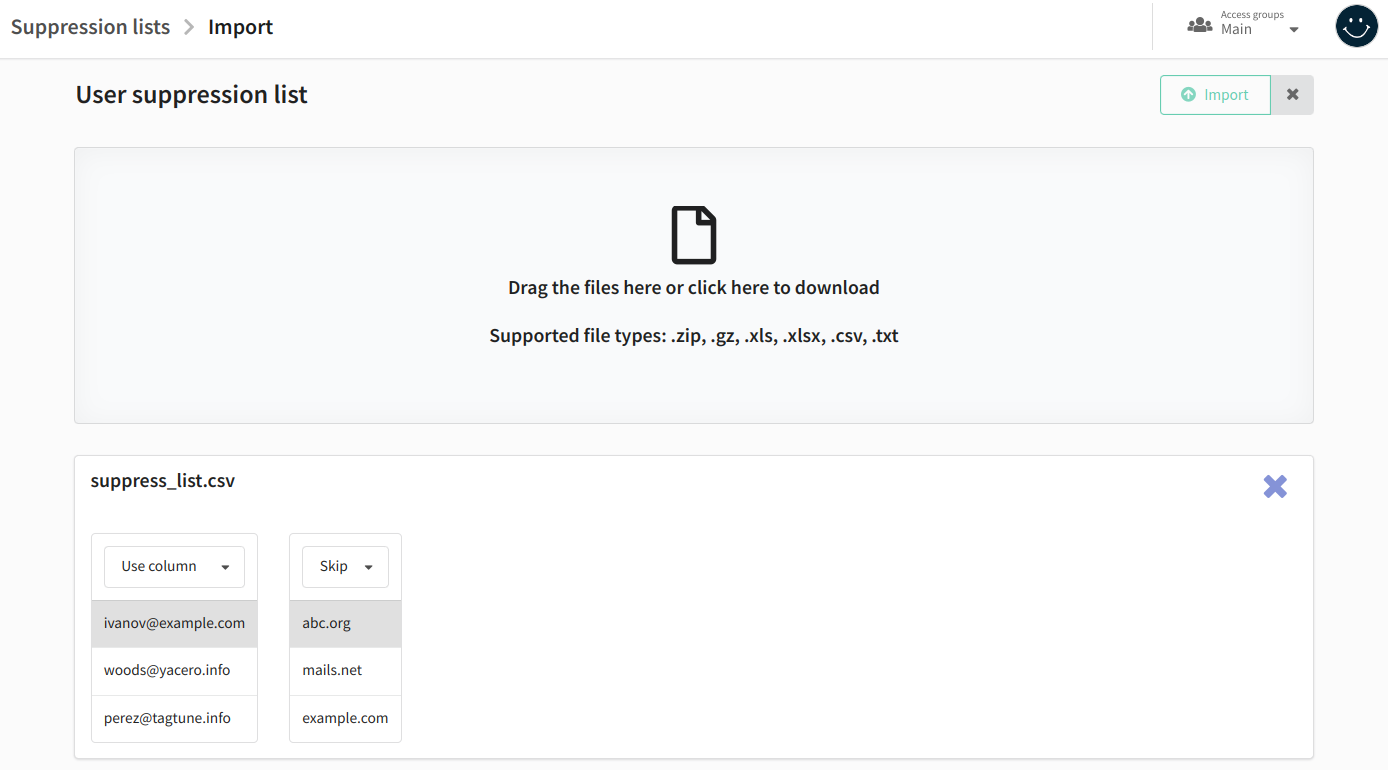
Choose appropriate point in quick actions menu to add contacts from file to suppression list. Drag your file with contacts list in CSV or XLS format into the form opened. You can upload several files, and there can be several columns in these files. Next, you can choose, which column you are going to use for the import to suppression list. After that, click Import:

Manual import​

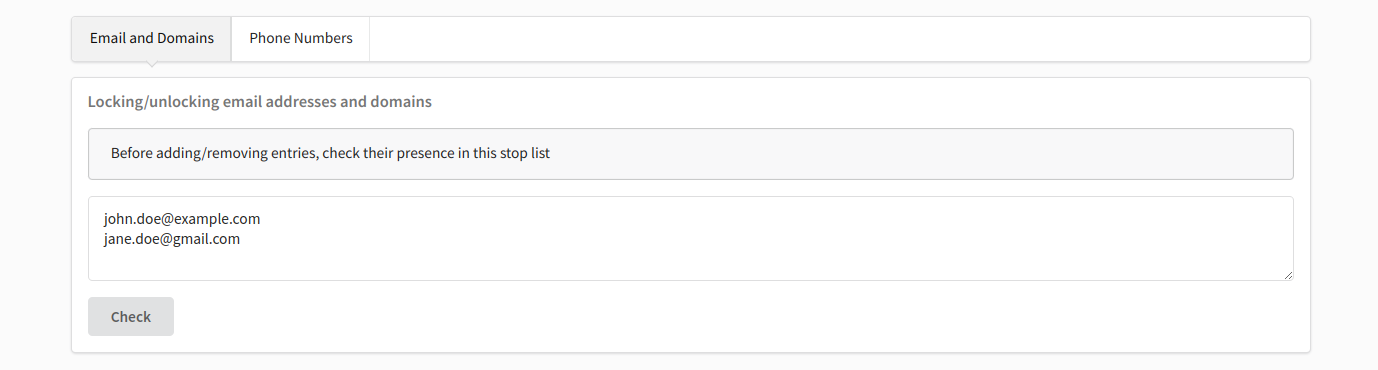
If you want to add customer contacts manually, open the desired suppression list. You can add customer email addresses, email domains, and phone numbers to the blocklist. Depending on the contact type, open one of the tabs and enter the contact details you want to add to the list in the Lock/Unlock section.

tip

Multiple entries should be separated by commas, spaces, or placed on new lines. You can specify up to 500 email addresses, domains, or phone numbers.

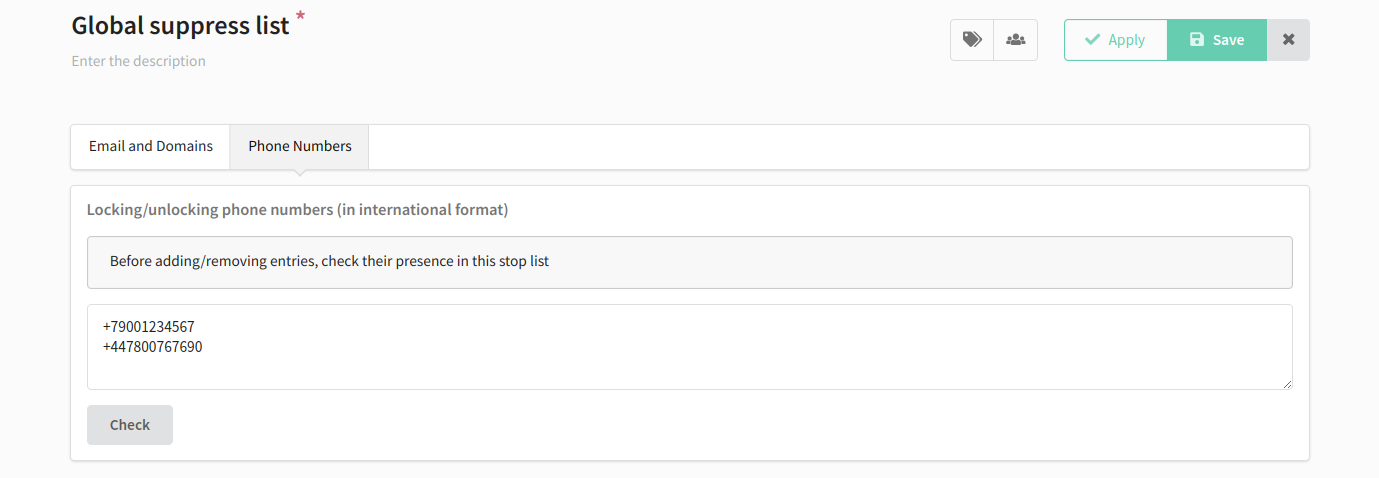
Phone numbers should be in international format (e.g., +79123456789).

Then click Check:

Two tabs will appear: Not found in suppressed and Exists in suppressed. If a domain, email address, or phone number is not in the suppression list (it will appear in Not found in suppressed), you can select it and add it (Add selected). If it is in the suppression list, you can remove it (Exclude). Additionally, you have the option to select all email addresses, all domains, or all phone numbers in tabs (Check):

Global suppression list​

In every Altcraft account, one global suppression list is created automatically, which works always - for all mailings within the Account. You do not need to attach it manually to Profiles databases and Messages templates.

You can add subscriptions manually or import from the file to the global suppress list:

If you want subscriptions to be automatically added into the global suppress list, you need to use a link in the message - URL of global unsubscribe variable {globalunsubscribe}. Address of subscribers, who follow this link, will immediately go to global suppress list and will be excluded from all future mailings in the account.

tip

Note that communications will stop only for the email address to which the message with the unsubscribe link was sent. If the profile has a subscription with a different email address, messages will continue to be delivered to it as usual.

User suppression lists​

Press + Create in lists menu to add user suppression list into the account. Select Suppression list name, enter Description, set access group and tags for quick search, if it is necessary:

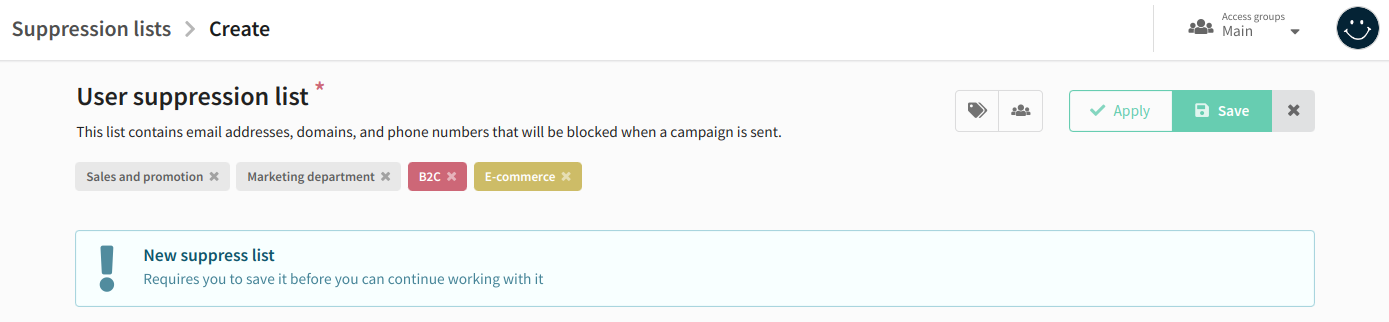
After saving it, you can manually add customer contacts to the created suppression list or import them from a file. Additionally, you can attach the list to profile databases and templates. You also have the option to check at any time which platform objects the list is attached to.

Suppression list for a Profiles database​

User suppression lists can be attached to a certain Profiles database of the Account. This list will be active only during orchestrating Mailings for an audience, which includes this profiles database. For this, choose Attached suppression list in General settings of Database editing form:

Suppression list for a Message template​

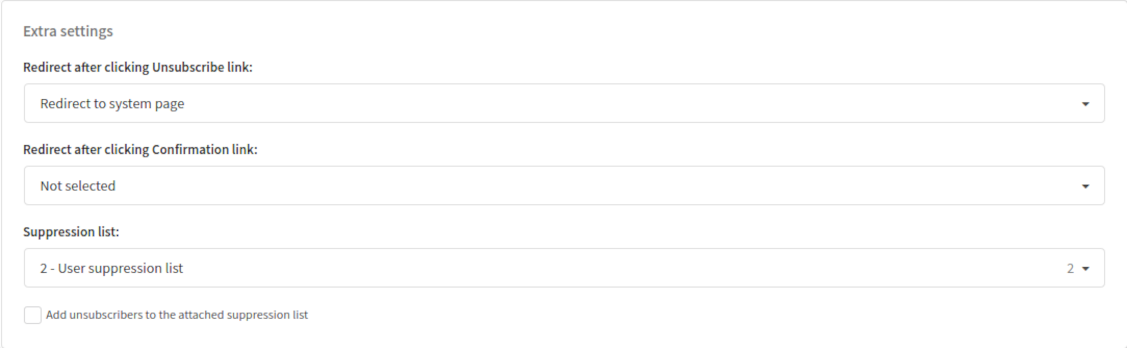
The second option of using custom suppression lists is attachment to certain Messages templates. This will allow you to control, which audience should not receive certain content: all unsubcriptions by template will go this list and therefore, communications will be blocked.

Open the necessary Template, and go to Options tab, and choose necessary suppression list in Extra settings block:

Rules of suppression lists interaction​

You can use several suppression lists during mailing. Subscribers are excluded from the mailing in the following way:

1. Global suppression lists are checked, and all subscribers there are excluded from the mailing.

2. Next, suppression lists, attached to Profiles databases, excluded subscribers of their databases from mailing.

info

If there are two same subscriptions in two databases, and suppression list, which contains them, is attached only to the first database, then messages from mailing, which contains the segment with this databases, will be completely sent. This happens, because suppression list will act only on the database, that it is attached to, which is the first one.

3. Next, suppression list, which is attached to the Message template, will exclude only subscribes, who would receive this message.

Last updated on Mar 12, 2026
Previous
Double opt-in subscription
Next
Profile relations
  • Global suppression list of the platform
  • Account suppression lists
    • File import
    • Manual import
  • Global suppression list
  • User suppression lists
  • Suppression list for a Profiles database
  • Suppression list for a Message template
  • Rules of suppression lists interaction
© 2015 - 2026 Altcraft, LLC. All rights reserved.