Case: Creating a pop-up with the "Wheel of Fortune" widget
The special "Wheel of Fortune" widget lets you create an interactive pop-up that engages website visitors with a prize game. A user fills out a simple form and spins the wheel to receive a random gift: a discount, a promo code, or another bonus. This guide describes how to create such a pop-up in the Altcraft builder:
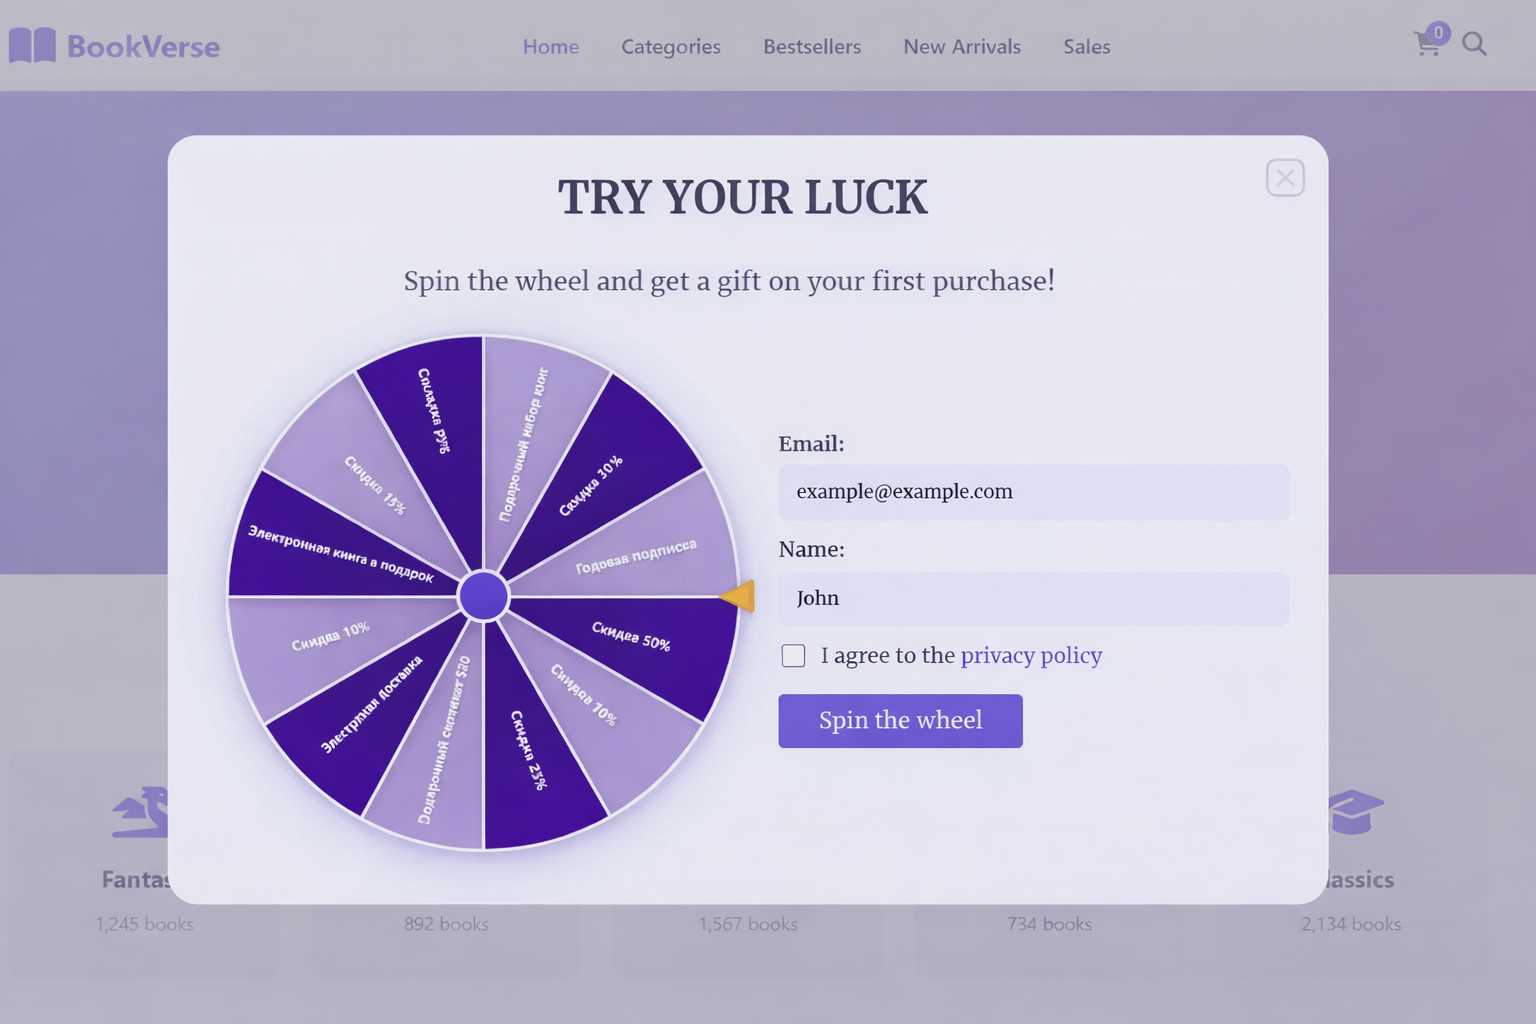
Before configuring the wheel, it's recommended to create a field in the profiles database where the won prize will be saved. You can learn how to create custom fields in this article.
Creating a pop-up and choosing a template
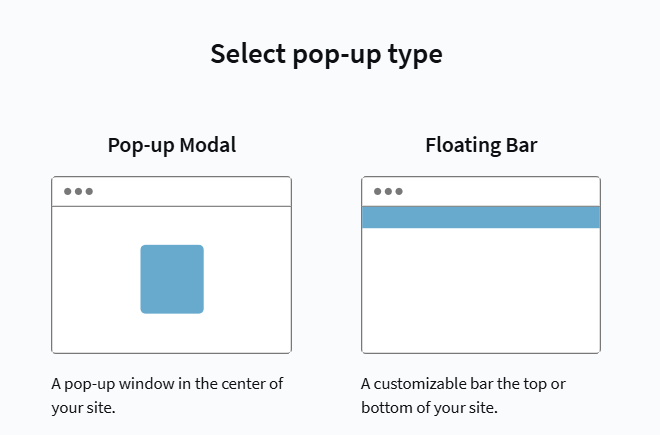
Start by creating a new pop-up in Web Layer — Pop-ups, and click Create. Choose the pop-up type. for a wheel of fortune, Modal window is the best fit—it appears in the center of the screen:
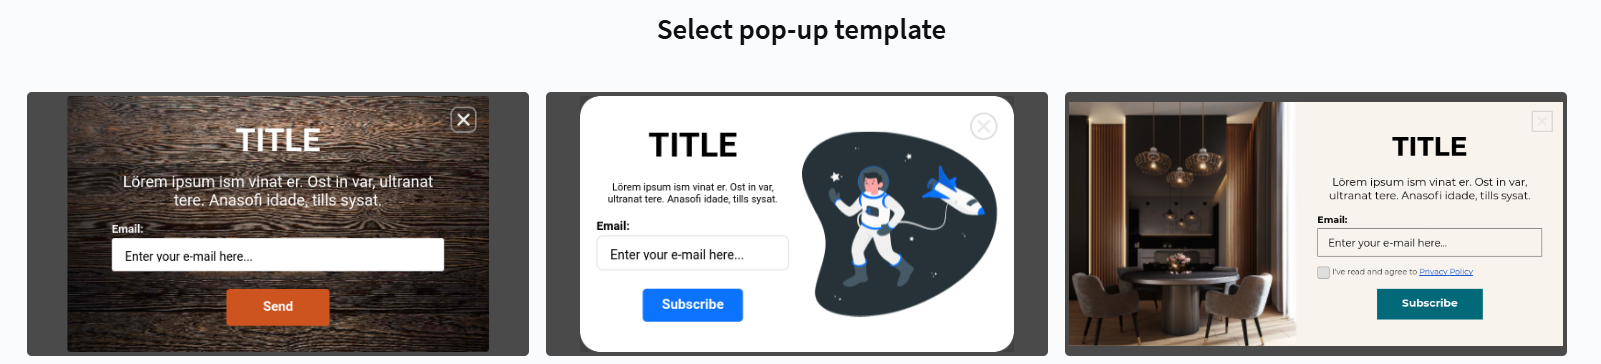
Choose a template. Use any ready-made template as a base. For easier customization, choose templates with a minimalist design (for example, one with an astronaut):
Set a name and description: specify the system name and, if needed, a description:

Integrating the widget code
The "Wheel of Fortune" widget is implemented with HTML, CSS, and JavaScript. To add it, replace the standard template code with the provided ready-made code.
- CSS
- HTML
- JavaScript
Go to the CSS tab. Do not remove existing styles. Scroll to the very end of the editor and add the provided CSS code to style the wheel and its container.
.formWrapper {
    display: flex;
    align-items: center;
    justify-content: space-around;
    flex-wrap: wrap;
}

.ac-button:disabled {
    opacity: 0.6;
    cursor: not-allowed;
    background-color: #cccccc;
    color: #666666;
    transform: none;
    box-shadow: none;
}

.ac-button:disabled:hover {
    background-color: #cccccc;
    color: #666666;
    transform: none;
    box-shadow: none;
}
In Settings, open the HTML tab. Completely delete the current editor contents and paste the provided HTML code for the wheel.
<div class="ac-popup-overlay">
    <div class="ac-modal">
        <div class="ac-modal_content">
            <div style="display: none;" data-popupId="{{popup('copywriting' 'popupId' 'text')}}"></div>
            <div id="firstPage">
                <h4 class="ac-title">
                    {{popup('copywriting' 'title' 'text')}}
                </h4>
                <div class="ac-description">
                    {{popup('copywriting' 'text' 'text')}}
                </div>
                <div class="formWrapper">
                    <div class="canvas-container">
                        <canvas id="canvas" width="420" height="420"></canvas>
                    </div>
                    <form id="ac-form" class="ac-form" action>
                            <div class="ac-field">
                            <label class="ac-label" for="email">
                                {{popup('copywriting' 'emailLabel' 'text')}}
                            </label>
                            <input
                                id="email"
                                type="email"
                                class="ac-input"
                                name="{{popup('form' 'email' 'fieldData')}}"
                                placeholder="{{popup('copywriting' 'emailPlaceholder' 'text')}}"
                            />
                            </div>
                            <div class="ac-field">
                            <label class="ac-label" for="name">
                                {{popup('copywriting' 'nameLabel' 'text')}}
                            </label>
                            <input
                                id="name"
                                class="ac-input"
                                name="{{popup('form' 'name' 'fieldData')}}"
                                placeholder="{{popup('copywriting' 'namePlaceholder' 'text')}}"
                            />
                            </div>
                            <div class="ac-field">
                            <label>
                                <input type="checkbox" name="{{popup('form' 'privacyPolicy' 'fieldData')}}" id="privacyPolicy" required>
                                <span>I have read the <a href="{{popup('copywriting' 'policy' 'link')}}" target="_blank">privacy policy</a></span>
                            </label>
                            </div>
                            <div class="ac-validation-msg" for="email"></div>
                            <input type="text" style="display: none;" class="ac-input" id="prizeField" name="{{popup('form' 'prize' 'fieldData')}}">
                        <button class="ac-button" type="button" id="winBtn" disabled>
                            {{popup('copywriting' 'winBtn' 'text')}}
                        </button>

                        <div class="ac-form_submit" style="display: none;">
                            <button type="submit" class="ac-button" id="submitBtn">
                                {{popup('cta' 'text' 'text')}}
                            </button>
                        </div>
                    </form>
                </div>
            </div>
             <div id="secondPage" style="display: none;">
                <h4 class="ac-title">
                    {{popup('copywriting' 'title-congrats' 'text')}}
                </h4>
                <div class="ac-description">
                    {{popup('copywriting' 'text-before-prize' 'text')}}
                    <span id="prizeName"></span>
                    <div>
                        {{popup('copywriting' 'text-after-prize' 'text')}}
                    </div>
                </div>
            </div>
        </div>
        {{popup('closeButton' 'closeButton' 'closeBtn')}}
    </div>
</div>
Switch to the JavaScript tab. Completely delete the existing contents and paste the provided JS code. It handles wheel spinning logic, prize selection, and form behavior.
// Prize list. Length may vary
// id - Identifier sent to the server
// text - Label displayed on the wheel sector
const options = [
  {id: 1, text: '$100'},
  {id: 2, text: '$10'},
  {id: 3, text: '$25'},
  {id: 4, text: '$250'},
  {id: 5, text: '$30'},
  {id: 6, text: '$1000'},
  {id: 7, text: '$1'},
  {id: 8, text: '$200'},
  {id: 9, text: '$45'},
  {id: 10, text: '$500'},
  {id: 11, text: '$5'},
  {id: 12, text: '$20'}
]

// Wheel sector colors. If there are fewer colors than sectors,
// colors are repeated cyclically
const colors = ['white', '#3583FF']

// Initial wheel rotation angle
let currentAngle = 0;

// Wheel spin duration is randomized
// Minimum spin duration (seconds)
const minSpinTime = 4;

// Maximum spin duration (seconds)
const maxSpinTime = 7;

// Delay between wheel stop and prize message display (seconds)
const pageSwitchDelay = 2;

// Color of sector labels on the wheel
const textColor = "black";


let isPreview = true;
let myPopup = null;

const allPopups = document.querySelectorAll('[data-ac-popup-container]');

allPopups.forEach(item =>{
    const idContainer = item.shadowRoot.querySelector('[data-popupId={{popup('copywriting' 'popupId' 'text')}}]');
    if(idContainer){
        myPopup = item.shadowRoot;
        isPreview = false;
    }
})

if (!myPopup) {
  myPopup = document;
}

const winBtn = myPopup.getElementById('winBtn');

function initInputs(){
  let emailInput = myPopup.getElementById('email');
  let nameInput = myPopup.getElementById('name');
  let policyInput = myPopup.getElementById('privacyPolicy');

  function updateButtonState() {
      const isEmailEmpty = !emailInput.value.trim();
      const isNameEmpty = !nameInput.value.trim();
      const isPolicyChecked = policyInput.checked;

      console.log(myPopup.getElementById('winBtn'))
      myPopup.getElementById('winBtn').disabled = isEmailEmpty || isNameEmpty || !isPolicyChecked
  }

  emailInput.addEventListener('input', updateButtonState);
  nameInput.addEventListener('input', updateButtonState);
  policyInput.addEventListener('input', updateButtonState);
  myPopup.getElementById("winBtn").addEventListener("click", spin);

  updateButtonState();
}
if(isPreview) {
  setTimeout(()=>{initInputs()}, 1000);
} else {
  initInputs();
}


let isInitialized = false;

// Initialize wheel rendering once
function initializeWheel() {
    if (isInitialized) return;

    const canvas = myPopup.getElementById("canvas");
    if (!canvas) return;

    const ctx = canvas.getContext("2d");
    if (ctx && !canvas.dataset.initialized) {
        drawRouletteWheel();
        canvas.dataset.initialized = "true";
        isInitialized = true;
    }
}

const observer = new MutationObserver((mutations) => {
    for (let mutation of mutations) {
        if (mutation.type === 'childList') {
            mutation.addedNodes.forEach((node) => {
                if (node.nodeType === 1 && (node.id === 'canvas' || node.querySelector?.('#canvas'))) {
                    setTimeout(initializeWheel, 100);
                }
            });
        }
    }
});

if (document.body) {
    observer.observe(document.body, { childList: true, subtree: true });
}

document.addEventListener('DOMContentLoaded', initializeWheel);

let segmentAngle = Math.PI / (options.length / 2);
let spinTimeout = null;

let spinAngleStart = 0;

let spinTime = 0;
let spinTimeTotal = 0;

let ctx;


// Draw the wheel with all sectors
function drawRouletteWheel() {
  const canvas = myPopup.getElementById("canvas");

  if (canvas.getContext) {
    const centerX = 210;
    const centerY = 210;
    const outsideRadius = 200;
    const textRadius = 130;
    const insideRadius = 0;

    ctx = canvas.getContext("2d");
    ctx.clearRect(0, 0, 400, 400);

    ctx.strokeStyle = "black";
    ctx.lineWidth = 2;
    ctx.font = 'bold 12px Helvetica, Arial';

    ctx.strokeStyle = "white";
    ctx.lineWidth = 15;
    ctx.beginPath();
    ctx.arc(centerX, centerY, outsideRadius, 0, 2 * Math.PI);
    ctx.stroke();

    ctx.strokeStyle = "black";
    ctx.lineWidth = 2;

    for(let i = 0; i < options.length; i++) {
      const angle = currentAngle + i * segmentAngle;
      const segmentMiddleAngle = angle + segmentAngle / 2;
      ctx.fillStyle = colors[i % colors.length];
      ctx.beginPath();
      ctx.arc(centerX, centerY, outsideRadius, angle, angle + segmentAngle, false);
      ctx.arc(centerX, centerY, insideRadius, angle + segmentAngle, angle, true);
      ctx.stroke();
      ctx.fill();

      ctx.save();
      ctx.fillStyle = textColor;

      const textX = centerX + Math.cos(segmentMiddleAngle) * textRadius;
      const textY = centerY + Math.sin(segmentMiddleAngle) * textRadius;

      ctx.translate(textX, textY);
      ctx.rotate(segmentMiddleAngle);

      const text = options[i].text;
      ctx.fillText(text, -ctx.measureText(text).width / 2, 0);
      ctx.restore();
    }

    // Draw pointer
    ctx.fillStyle = "white";
    ctx.strokeStyle = "#666666";
    ctx.lineWidth = 2;

    ctx.beginPath();
    ctx.moveTo(centerX - 10, centerY - 15);
    ctx.lineTo(centerX + 30, centerY);
    ctx.lineTo(centerX - 10, centerY + 15);
    ctx.closePath();
    ctx.fill();
    ctx.stroke();
  }
}

// Animate wheel rotation
function rotateWheel() {
  spinTime += 30;
  if(spinTime >= spinTimeTotal) {
    stopRotateWheel();
    return;
  }
  const spinAngle = spinAngleStart - easeOut(spinTime, 0, spinAngleStart, spinTimeTotal);
  currentAngle += (spinAngle * Math.PI / 180);
  drawRouletteWheel();
  spinTimeout = setTimeout(rotateWheel, 30);
}

// Start wheel spin
function spin(e) {
  e.preventDefault();
  const form = myPopup.getElementById('ac-form');
  const isValid = form.checkValidity();

  if(!isValid){
    myPopup.getElementById('submitBtn').click();
    return;
  }
  winBtn.removeEventListener('click', spin);
  spinAngleStart = Math.random() * 10 + 10;
  spinTime = 0;
  spinTimeTotal = Math.random() * (maxSpinTime - minSpinTime) + minSpinTime * 1000;
  rotateWheel();
}

// Handle selected prize
function handlePrize(prize){
  myPopup.getElementById("prizeField").value = prize.id;
  myPopup.getElementById('submitBtn').click();
  myPopup.getElementById('prizeName').innerText = prize.text;
}

// Switch to prize screen
function showSecondPage() {
  myPopup.getElementById('firstPage').style.display = 'none';
  myPopup.getElementById('secondPage').style.display = 'block';
}

// Stop wheel rotation and determine winning sector
function stopRotateWheel() {
  clearTimeout(spinTimeout);

  const degrees = currentAngle * 180 / Math.PI;
  const segmentDegrees = segmentAngle * 180 / Math.PI;
  const index = Math.floor((360 - degrees % 360) / segmentDegrees);

  handlePrize(options[index]);

  const form = myPopup.getElementById('ac-form');
  const isValid = form.checkValidity();

  setTimeout(()=>{
    showSecondPage();
  }, pageSwitchDelay * 1000);

}

// Easing function for smooth deceleration
function easeOut(currentTime, startValue, changeInValue, duration) {
    const normalizedTime = currentTime / duration;
    const squaredTime = normalizedTime * normalizedTime;
    const cubedTime = squaredTime * normalizedTime;

    return startValue + changeInValue * (cubedTime + -3 * squaredTime + 3 * normalizedTime);
}

drawRouletteWheel();

// Override form submit handler
myPopup.getElementById('ac-form').submit = () => {}
Content and design setup in the visual editor
After integrating the code, go to Design. Here you can fill the pop-up with text and tune its appearance using the familiar visual interface—without editing code.
- Pop-up width
- Copywriting
- Appearance
First, set the pop-up width (Form — width). The wheel canvas size is fixed (420 px). So the pop-up width must be at least 420 px. If you want the wheel and the input form on the same horizontal row, set the width to at least 810 px.
On the Copywriting tab, fill in the key text parameters:
title— main headline on the first screen (for example, "Try your luck!").text— explanatory text or campaign description.emailLabelandemailPlaceholder— label and placeholder for the email field.nameLabelandnamePlaceholder— label and placeholder for the name field.policy— a required link to your privacy policy page. Without filling this field, you won't be able to save the pop-up.winBtn— text on the button that starts the wheel spin (for example, "Spin the wheel!").popupId— a required parameter. A unique text identifier for the pop-up (for example,onlinestore_wheel). It's needed for correct work if there are multiple pop-ups on the page.
The pop-up has two screens. Parameters for the "win message" screen:
title-congrats— congratulations headline.text-before-prize— text shown before the prize name.text-after-prize— additional text under the prize message.
Use the other tabs in Design for fine-tuning the look:
- Background — change the pop-up background color and the page overlay opacity (
overlay). - Border — configure the pop-up corner rounding.
- Form — style input fields: spacing, border colors, background, and text.
- Actions — style buttons (color, rounding, font).
- Typography — choose the common font and styles for all text elements.
Any changes in the visual editor are immediately shown in the preview pane on the right.
Wheel of fortune customization
The wheel's look and behavior (prizes, sector colors, spin speed) are configured by editing variables in the JavaScript code.
Go back to Settings — JavaScript. At the beginning of the file, find and edit the following variables.
- Prizes (options)
- Sector colors (colors)
- Spin speed
- Reveal delay (pageSwitchDelay)
- Text color (textColor)
The options variable defines the list of prizes on the wheel. It's an array of objects, where each object contains an id and the prize label text.
const options = [
    { id: 1, text: '$100' },
    { id: 2, text: '$10' },
    { id: 3, text: '$25' },
    { id: 4, text: '$250' },
    { id: 5, text: '$30' },
    { id: 6, text: '$1000' },
    { id: 7, text: '$1' },
    { id: 8, text: '$200' },
    { id: 9, text: '$45' },
    { id: 10, text: '$500' },
    { id: 11, text: '$5' },
    { id: 12, text: '$20' }
];
How to change:
- Prize text: replace the
textvalue with what you need (for example,'10% off'or'Free shipping'). - Number of prizes: add new objects to the array or remove existing ones. The number of wheel sectors will update automatically.
The colors variable is an array of fill colors for the wheel sectors. Colors are applied in order, starting from the first sector.
const colors = ['black', 'orange'];
How to change: Replace the colors in the array with your own. You can use:
- English color names:
'red','blue','green' - HEX codes:
'#4f46e5','#f59e0b','#10b981' - RGB/RGBA values:
'rgb(79, 70, 229)'
Spin duration is set with two variables:
minSpinTime— minimum spin time (seconds).maxSpinTime— maximum spin time (seconds).
The actual duration of each spin will be a random value within this range.
const minSpinTime = 4;
const maxSpinTime = 7;
How to change: Increase values to make the wheel spin longer, or decrease them for a faster result.
The pageSwitchDelay variable sets the pause (in seconds) between the wheel stopping and the automatic switch to the win message screen.
const pageSwitchDelay = 2;
How to change: Set it to the number of seconds you need.
The textColor variable defines the color of prize labels on the wheel sectors.
const textColor = "white";
How to change:
Replace the value with any valid CSS color so the text remains readable on the sector background. For example, "#ffffff", "black", "#1f2937".
Saving the won prize value
After a user spins the wheel and wins a prize, the result is automatically written into the hidden form field prize. To save this value into the user profile in Altcraft, configure the import action in Actions.
In the pop-up editor, open the Actions tab:
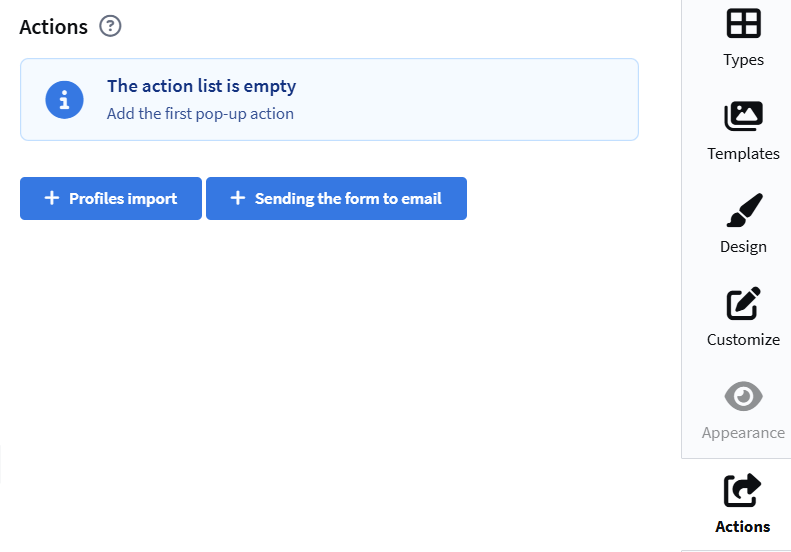
Configure profile import:
- Follow the standard import setup flow described in the pop-up creation article.
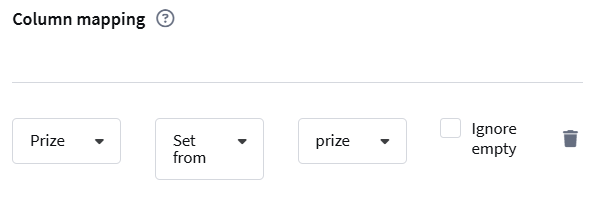
- In import settings, map the
prizefield from the form to the required field in your Altcraft database.
By default, the JavaScript code writes the prize ID into the prize field (prize.id). If you need to save the prize label text (prize.text) instead, edit the handlePrize() function in the JS code and replace prize.id with prize.text.
After configuring import, every form submission will save the prize data (text or ID), along with the user's email and name, into the user profile.
Publishing the pop-up
After you finish configuration, save the pop-up and make sure its status is Active.
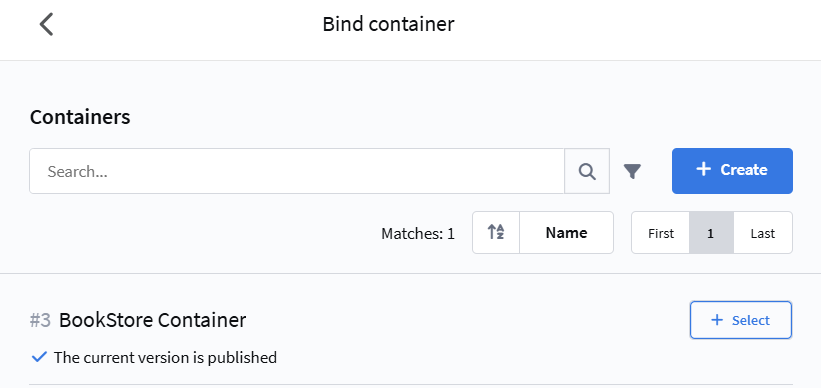
In Appearance, bind the pop-up to a Tag Manager container:
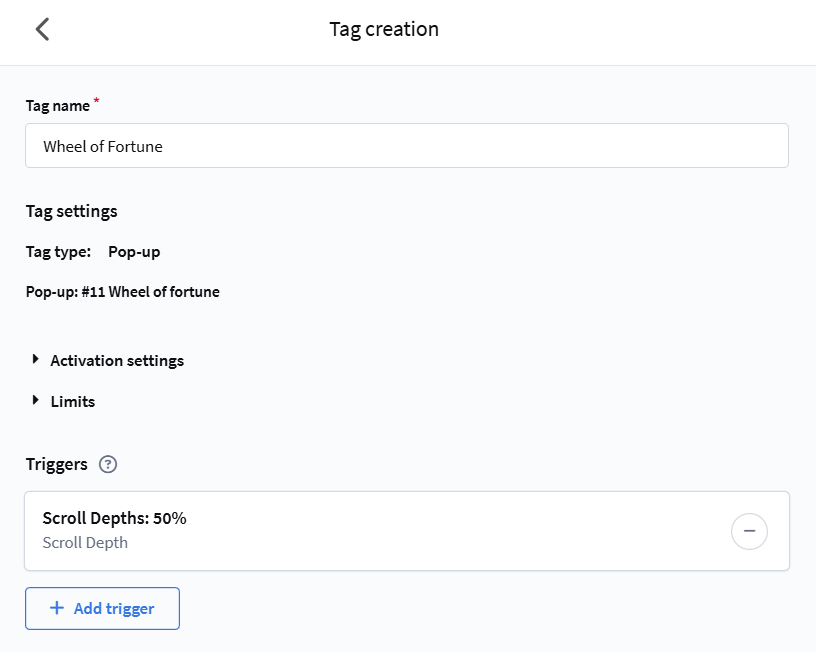
Set the tag Name and configure the trigger — the condition that shows the pop-up (for example, Timer or Scroll depth):
More about triggers is in the dedicated article.
After you finish setup, save the pop-up and make sure the status is Active. Once published, the wheel-of-fortune pop-up will be ready and will appear to visitors according to your rules.
Automatic delivery of personalized prizes via scenarios
To automatically send promo codes that match the won prizes, create a scenario triggered by changes to the Prize field. You'll need separate promo codes for each prize type and conditional branching in the scenario.
Creating promo codes
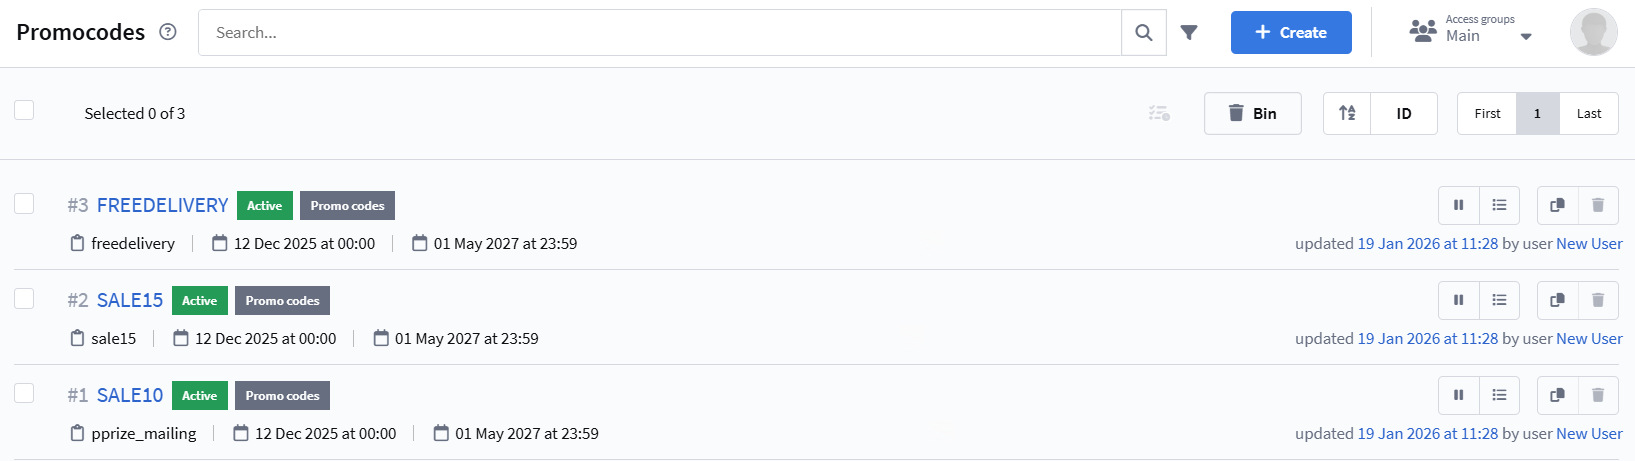
Go to Loyalty — Create to create a new loyalty program. In the program settings, create promo codes for each win. For example:
- 10% discount — promo code
BOOK10 - 15% discount — promo code
BOOK15 - Free shipping — promo code
FREESHIP - And so on for each prize
You can read more about promo codes in this article.
Creating an email template
Create a universal email template that shows different text depending on the won prize. Use logical expressions to check the Prize field value. More about logical expressions and variables in templates is in this article.
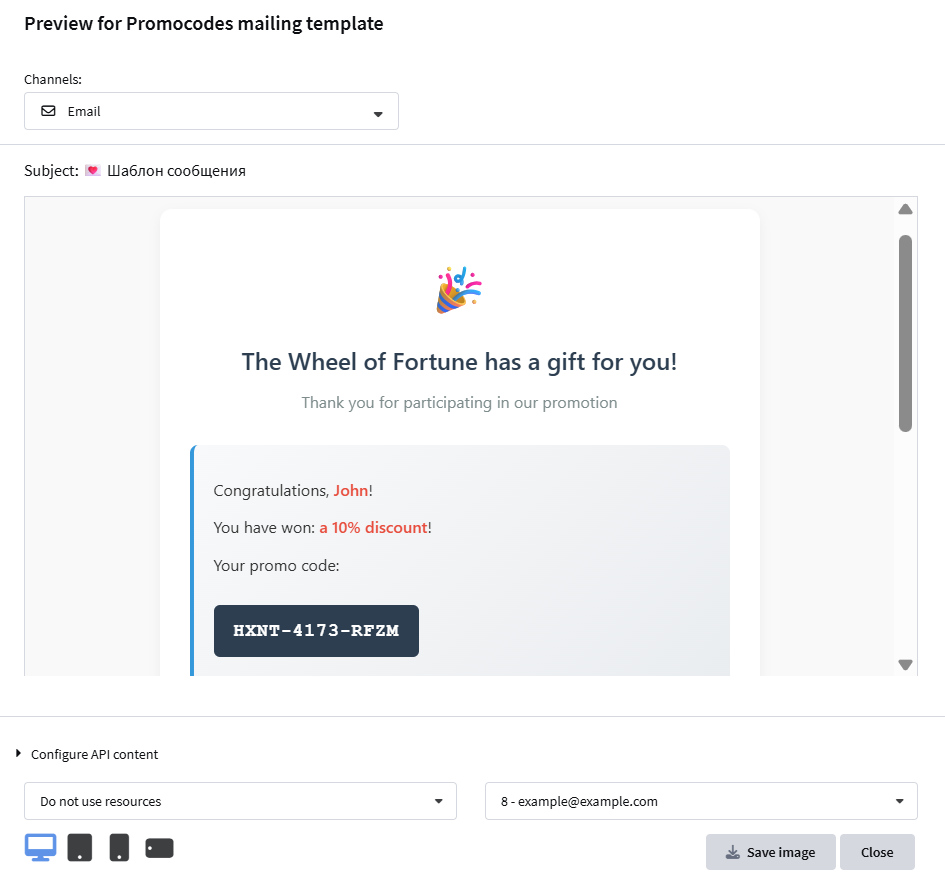
The template checks what value the prize field (for example, Prize) contains in the user profile ({lead.Prize}), and shows the matching text. For each prize type, insert a promo code variable into the email body:
{if lead.Prize}

    {if lead.Prize equal "1" or lead.Prize equal "$100"}
        <p>Congratulations, {lead._fname}!</p>
        <p>You have won a cash prize of $100!</p>
        <p>Your promo code: {loyalty.prize100.promocode}</p>
        <p>The promo code is valid for all products in our store.</p>
    {end}

    {if lead.Prize equal "2" or lead.Prize equal "$10"}
        <p>Congratulations, {lead._fname}!</p>
        <p>You have won a cash prize of $10!</p>
        <p>Your promo code: {loyalty.prize10.promocode}</p>
        <p>The promo code is valid for all products in our store.</p>
    {end}

    {if lead.Prize equal "3" or lead.Prize equal "10% discount"}
        <p>Congratulations, {lead._fname}!</p>
        <p>You have won a 10% discount on your next purchase!</p>
        <p>Your promo code: {loyalty.discount10.promocode}</p>
        <p>The discount is valid for all products in our catalog.</p>
    {end}
{else}
    <p>Congratulations, {lead._fname}!</p>
    <p>You have won a prize in our promotion!</p>
    <p>Please contact your manager for details.</p>
{end}
As a result, you'll get a template where each condition has its own promo code:
Creating a scenario
Go to Scenarios — Create. Select the database where your campaign participants' profiles are stored. In the entry settings, enable Disable re-entry into the scenario for a customer profile. This ensures the scenario starts for each user only once per new win.
After creating the scenario, add an entry trigger. Choose Profile change as the trigger type, select the Prize field, and set the operator to Changed. This means the scenario will start each time the user's prize field appears or changes.
After setting the trigger, add a Condition element to the scenario. In the condition, check the Prize field value. For example, set Field to Prize, Operator to equal, and enter 1 (if you store the prize ID) or the text of the first prize, for example $100.
If the condition is true (the user won prize ID 1 or "$100"), add two nodes:
- Promo code — select the created loyalty program and the specific promo code that matches this prize.
- Send email — select the created universal email template.
If the condition is false, add the next Condition element to check the second prize. Configure it the same way: check whether the Prize field contains 2 or the text of the second prize.
Repeat this logic for each prize, creating a chain of conditions and matching actions to assign promo codes and send emails:
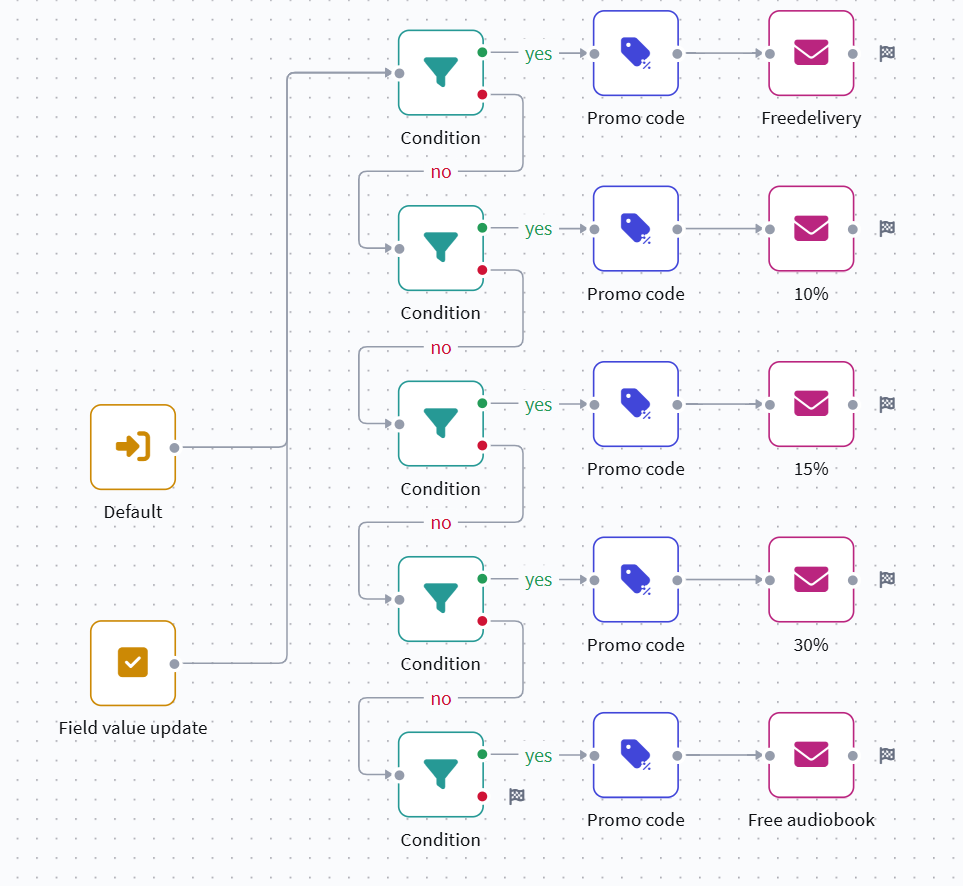
At the end, don't forget to save and activate your scenario.