Email: setting up and using postmasters
##Description {#id-postmasters-description}
Postmaster is a service of an email provider that tracks email distrubution statistics: how many messages were delivered, how many ended up in spam, sending failures, how many emails were complained about, etc.
Postmaster registration is required if you plan to deliver large volumes of messages, more than 10 thousand per day. A postmaster is also required when registering an FBL.
FBL/CFL (FeedBack Loop) is a standard for providing information about spam complaints from an email service provider to the sender of emails. It is highly recommended to use this technology on all ISPs where it is available in one form or another. You can learn more about FBL in this article.
The choice of postmaster depends on which email domains are most commonly used in your database. Each postmaster provides statistics only for their domains.
The most popular postmaster services in Russia:
- Mail.ru Postmaster
- Gmail Postmaster Tools
- Outlook.com Postmaster
- Yahoo Complaint Feedback Loop Service
How to set up Postmaster Mail.ru
Step 1. Create a Mail.ru account or log in using one of the specified methods.
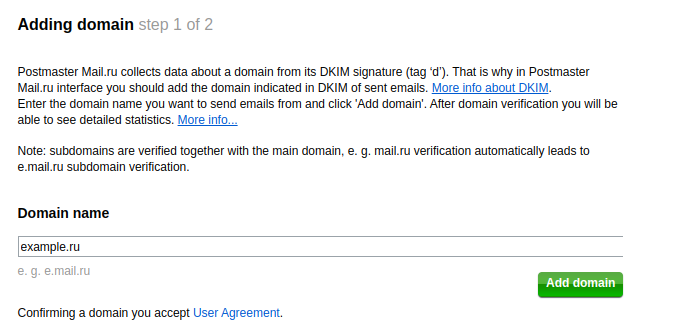
Step 2. Go to the domain adding page - https://postmaster.mail.ru/add/.
Step 3. Enter the name of the domain about which you want to collect statistics and click "Add Domain":
Step 4. Select one of the domain verification methods:
- HTML file - this method can only be used if the domain has a web server. Follow the instructions described on the tab and click "Confirm"
- Meta tag - used only if you have your own website. Add a tag with a personal code to the
headsection of the main page of the site and click "Confirm" - DNS check - allows you to use the postmaster even if you don’t have your own website. The DNS record value must be placed in the domain's DNS records using the interface of the hosting provider.
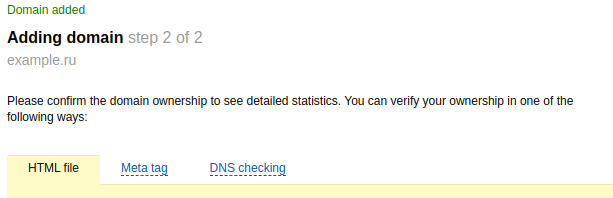
If all instructions are completed correctly, the domain will be added to the postmaster. In the described way, you can add an unlimited number of domains:
Setting up FBL forwarding
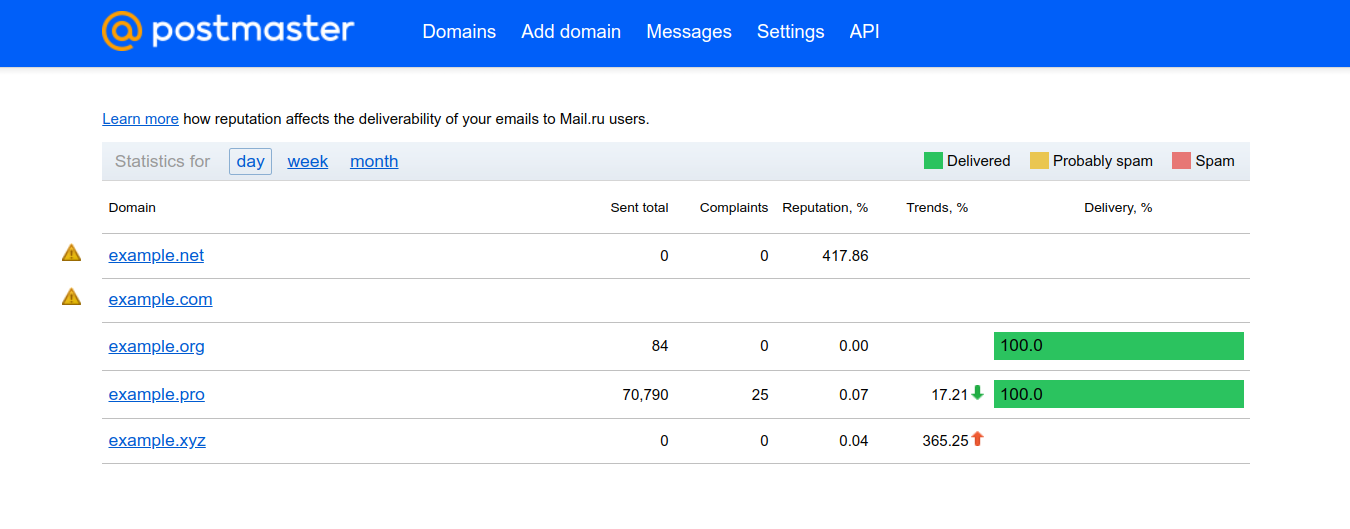
Postmaster Mail.ru supports FeedBack Loop technology. FeedBack Loop provides access to mailing statistics, grouping it by day, week and month.
This statistics allows you to track the following indicators:
- Messages — number of messages sent;
- Complaints — number of clicks on the "Spam" button;
- Reputation, % - average percentage of complaints over 30 days. It is calculated as the ratio of the number of complaints over 30 days to the total number of submissions during this period of time and is expressed as a percentage;
- Trends, % - change in the percentage of complaints for 7 days in relation to the percentage for 30 days;
- Read — number of open letters;
- Deleted read — number of messages deleted after reading;
- Deleted unread — number of messages deleted before being read;
- Delivered, % — percentage of the following types of messages:
- Delivered — the number of emails delivered to the Inbox;
- Probably spam — the number of emails delivered to the Spam folder;
- Definitly spam — the number of messages that were not accepted by Mail.ru servers. In response to such emails, you always receive a messages with the error "550 spam message discarded".
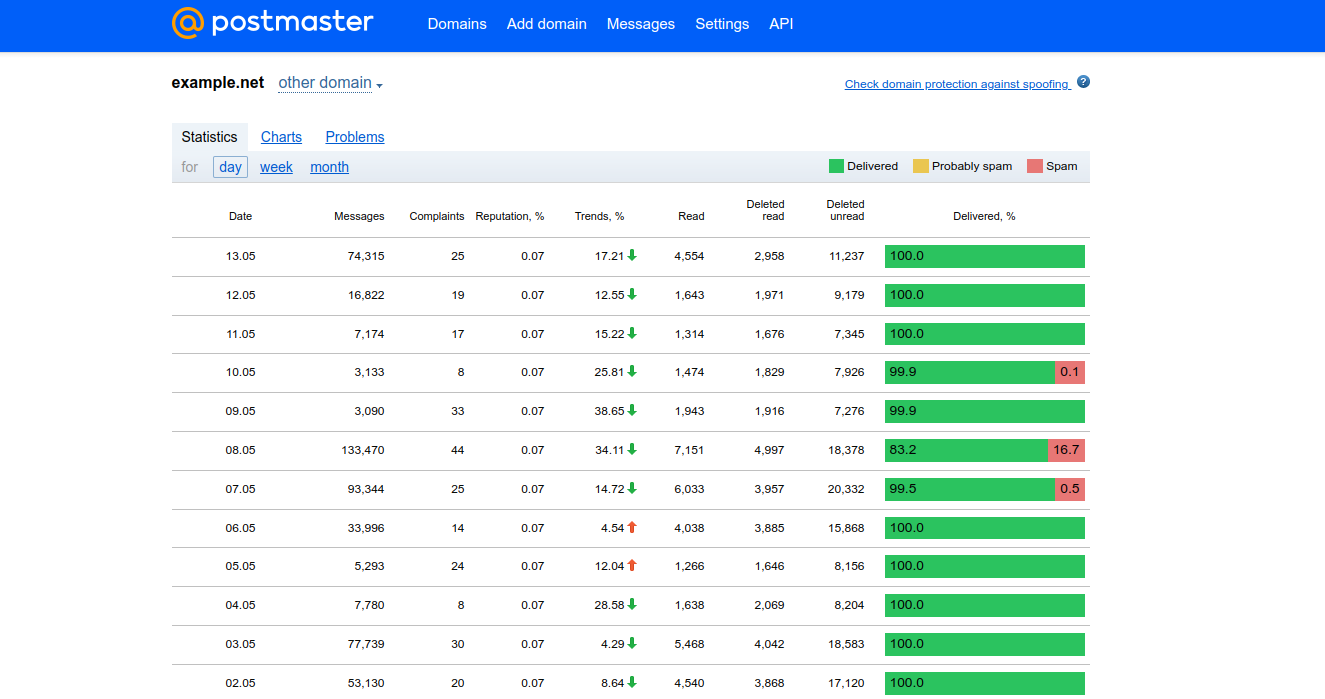
On the settings page for all domains, enter the FBL address. It will receive information about which recipients clicked the "Spam" button after receiving the message. After each mailing, Mail.ru Postmaster will display statistics on the number of emails sent and their status: Delivered, Probably spam, Definitely spam.
How to set up Postmaster Tools by Gmail
Step 1. Sign in to Postmaster Tools using your Google account.
Step 2. In the lower right corner, click the "Add" button.
Step 3. Enter your authentication domain (DKIM or SPF) and click "Next":
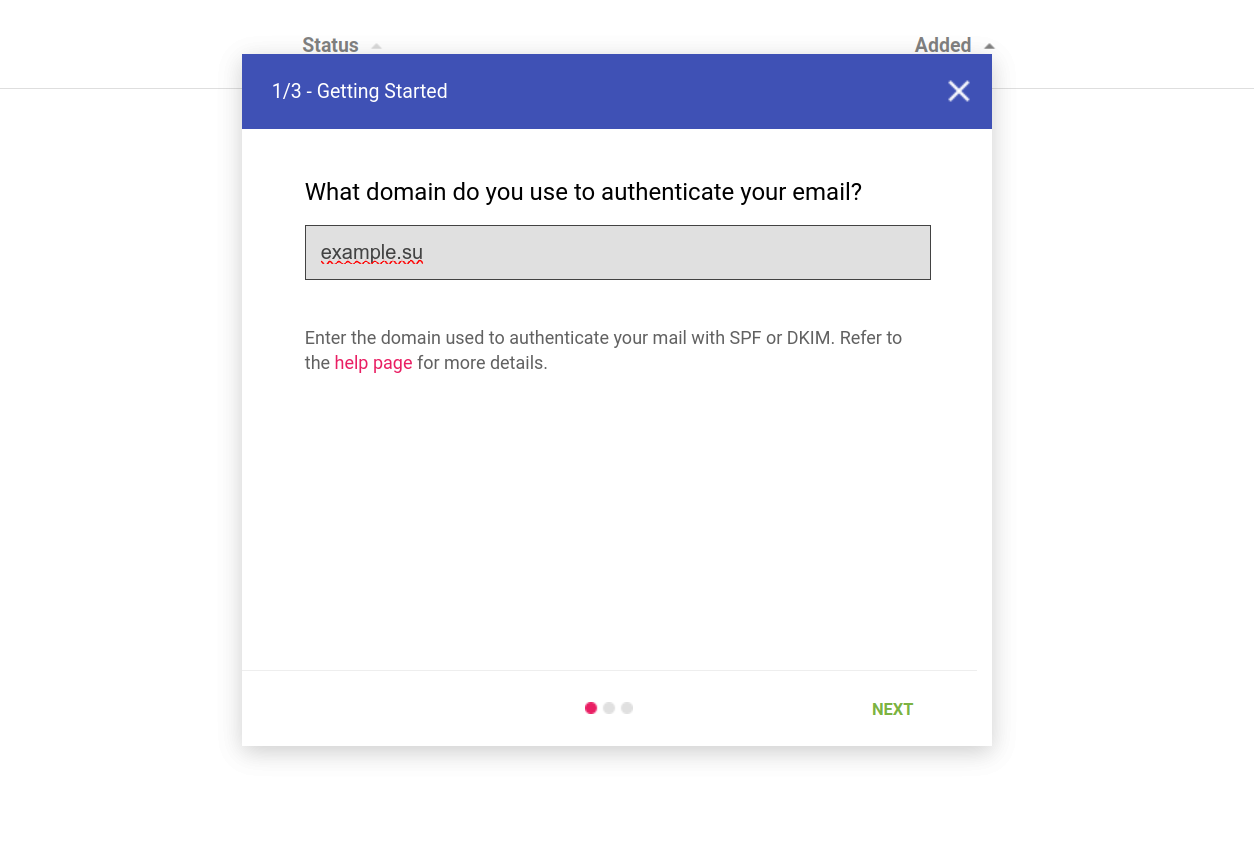
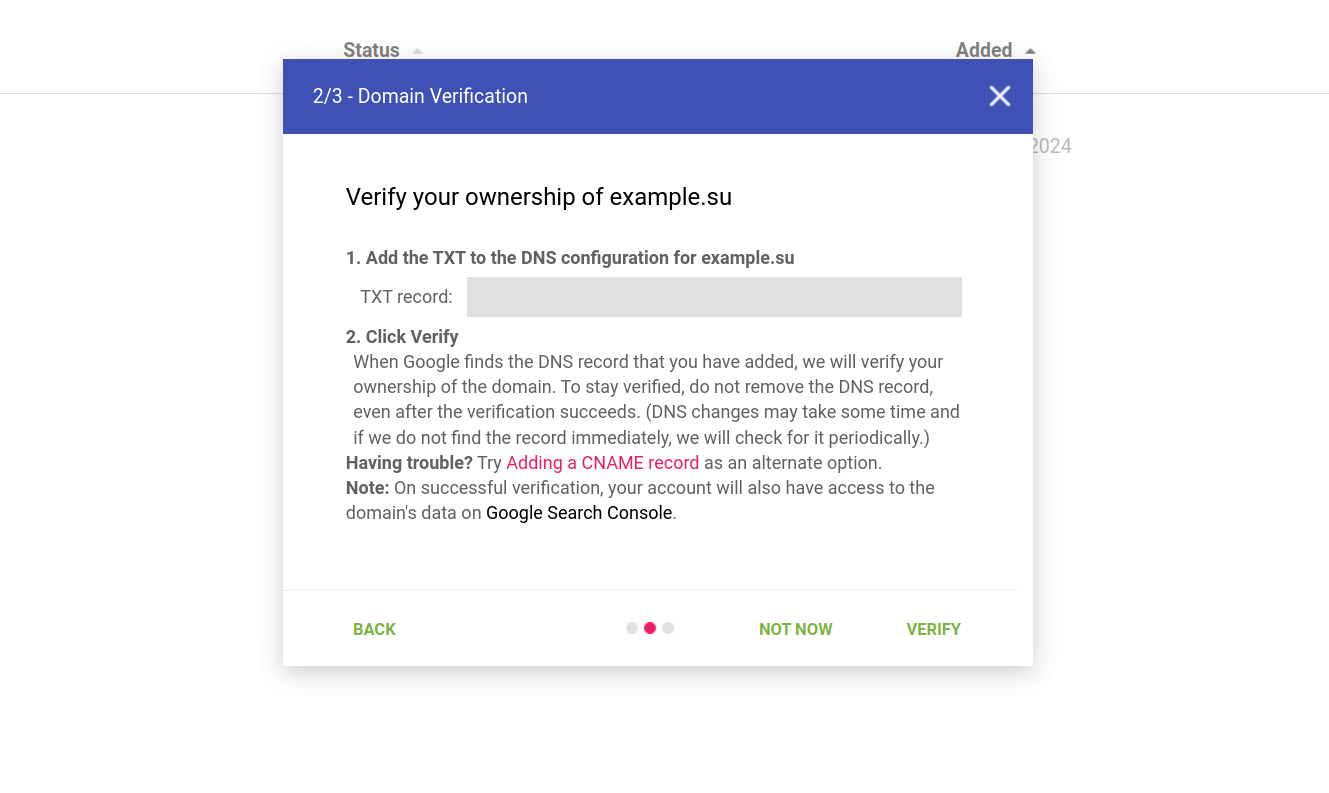
Step 4. Confirm domain ownership. To do this, access your DNS record and add the TXT record provided by Google. Once complete, return to Google Postmaster and select "Verify." If the entry is not found, check that the TXT was added correctly and try again. If you have trouble adding a TXT record, Google offers a second verification method that involves adding a "CNAME" record:
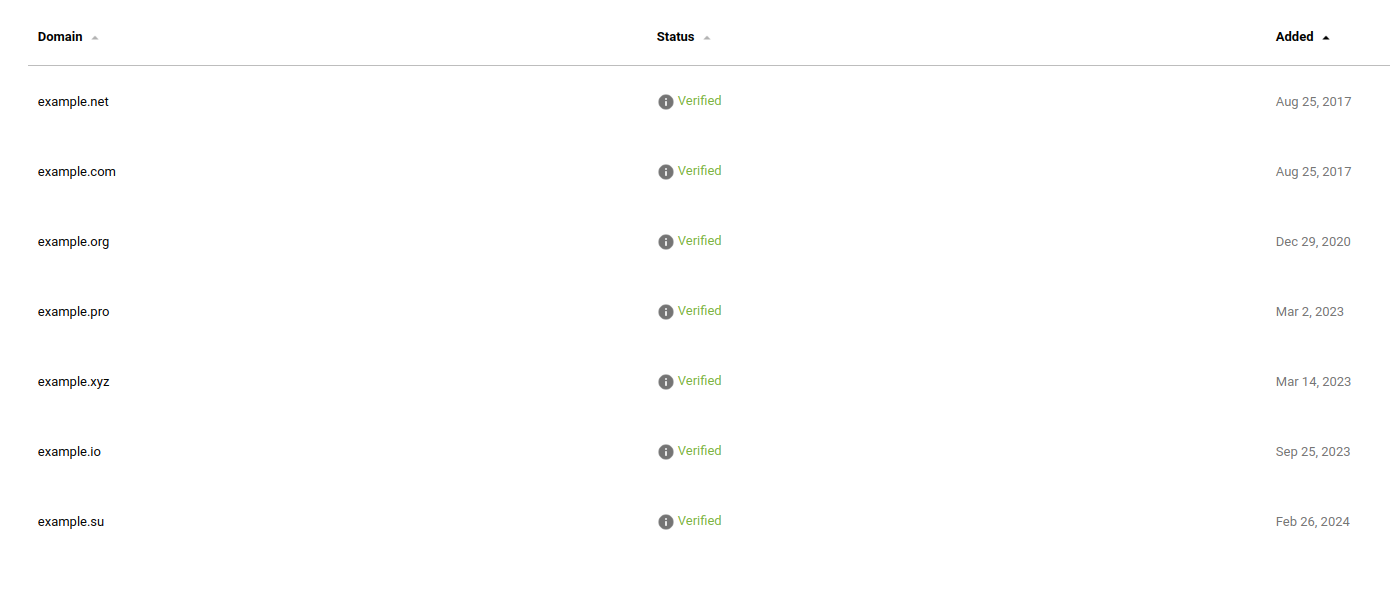
After confirming the rights to the domain, it will be displayed in the Postmaster Tools interface with the status "Verified":
Gmail Postmaster allows you to collect information about your mailings. The following data is tracked:
- percentage of getting into spam;
- IP and domain reputation;
- information about authentication (passing DKIM, SPF and DMARC checks);
- information about traffic encryption (TLS share);
- information about delivery failures.

All reports in Gmail Postmaster are generated in the form of graphs and tables with a selection of data for a period of 7 to 120 days. Information in reports may be missing if there is a small number of sends to Gmail mailboxes. Data will begin to be displayed when there is a sufficient amount of data (a hundred or more records) about daily traffic.
Setting up FBL forwarding
To set up FBL, the sender must add a new Feedback-ID header, consisting of parameters that uniquely identify the mailing. Such parameters are called identifiers. IDs whose messages often end up in spam or have delivery problems are displayed in the FBL panel in Postmaster Tools.
The header format is Feedback-ID: a:b:c:SenderId,
where Feedback-ID: is the name of the header to add, and a, b, c: are optional fields with which the sender can specify up to three identifiers (for example, with the name of a company or client). SenderId – mandatory unique identifier selected by the sender (5–15 characters). It must be the same in all emails.
How to set up Outlook.com Postmaster
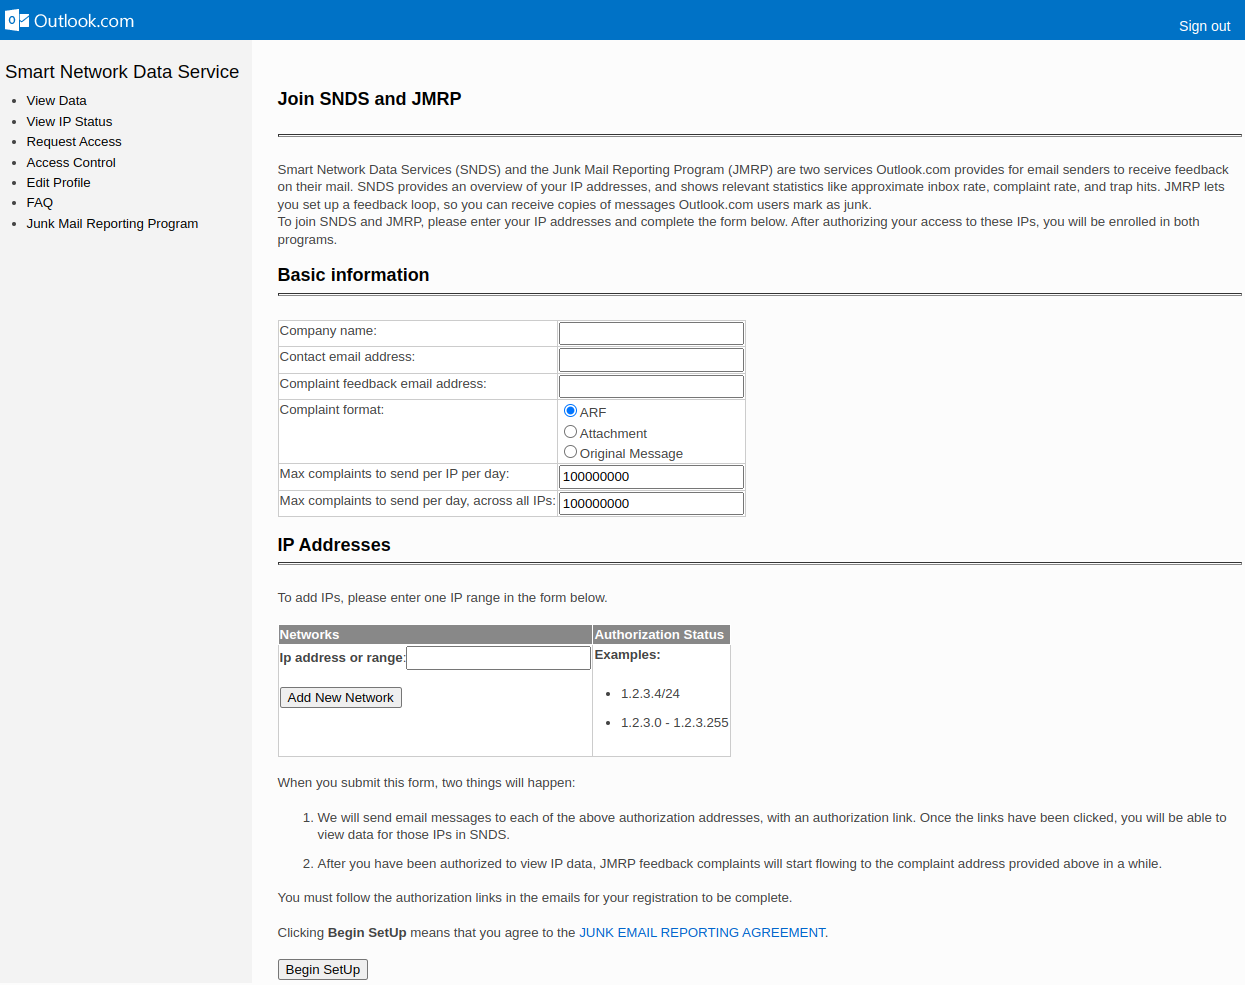
Step 1. Sign in to your Microsoft account and go to service.
Step 2. Complete and submit the form on the Junk Mail Reporting Program page. Here you need to enter all IP addresses for mailings:
Step 3. After entering the IP address, the service asks you to select mailboxes to which, after submitting the form, you will receive a message with a confirmation link. You will need to open this link.
After all requirements are met, notifications about complaints about mailings will begin to arrive at the specified mailbox.
Outlook.com Postmaster Services allows the user to:
- Receive reports on spam incidents reported by Outlook.com users
- recognize potential problems with email distribution methods and content
- improve sender reputation by removing unwanted subscribers from lists
- provide general information about how users rate the email they receive and the reliability of a range of sender IP addresses based on Outlook.com system metrics
- see how your email is rated by spam filters
- track the number of users complaining about your email
How to set up Yahoo FBL
Yahoo provides a tool for senders to unsubscribe users who complain about spam - Yahoo Complaint Feedback Loop Service (YFBL).
Step 1. For YFBL to work, you will need a mailbox like postmaster@(your_domain). Create it on the service where your domain mail is configured.
Step 2. Follow the link and fill out the required fields:
- Company name — name of the organization;
- Contact Name — name of the contact person;
- Contact Email — email of the contact person;
- Reporting Email - address for receiving FBL reports;
- Selector — specify "*";
- Request type — request type: adding, changing or deleting. Specify "Add";
- Domain — the domain for which you are setting up FBL. After filling out the required fields, click the "Get Verification Code" button.
Step 3. Find the email from the service in the created mailbox and copy the confirmation code. Paste the copied code into the appropriate field on the YFBL service page and click "Create Request".
Please note that it takes up to 48 hours to confirm your settings and enable reporting. After successful setup, the service will work as follows: if the recipient clicks the "Spam" button in a letter from your mailing list, an FBL report will be sent to your account, and the recipient will be automatically unsubscribed from mailing lists.