Altcraft Docs LogoAltcraft Docs Logo
User guide iconUser guide
Developer guide iconDeveloper guide
Admin guide iconAdmin guide
English
  • Русский
  • English
Login
    User documentationGetting StartedFAQAltcraft glossary
      Profiles and databasesarrow
    • Subscription resourcesManaging databasesSubscriber profileProfiles import and data updateScheduled customer data importAutomatic data collectionBulk customers profiles updateDouble opt-in subscriptionSuppression listsProfile relationsProfile history exportProfile exportCreating a static segment based on import resultsHow to open a CSV fileMatchingTypes of fields in the databaseGlobal control groupsSubscription Manager
      Communication channelsarrow
      • Email channelarrow
      • Email: ISP interactions best practicesEmail: sending domain configurationEmail: setting up and using postmastersБыстрый старт
        Push channelarrow
        • Mobile Pusharrow
        • Settings & implementation
            Integrate your app with Altcraftarrow
          • Providers: push message structureProcessing and adding a subscriptionEvent registration
          Web pusharrow
        • Preliminary Settings
            Web browser push configurationarrow
          • Firebase Cloud messagingApple SafariMozilla Services
          Connecting Web Push to a WebsiteTransferring Data to the PlatformWeb Push SDK Methods
            Import of subscriptions from third-party push servicesarrow
          • Migrating push subscriptions from third-party servicesHow to transfer push subscriptions configured for Safari?Migration from OneSignal
      SMS channel
        Creating mailing from scratcharrow
      • EmailSMSWeb PushMobile PushWhatsAppViber*™Руководство: SMS-рассылка через VK NotifyMAX BotMAX GroupNotifyTelegram BotTelegram Group
      Communication Channels WorkflowРуководство: SMS-рассылка через УТШРуководство: push-рассылка через сервис от "Согласие"
      Segmentationarrow
    • Static SegmentsDynamic SegmentsUpdatable Segments
        Segmentation Conditionsarrow
      • Segmentation by Profile dataSegmentation by Interactions with EntitiesSegmentation by Activity of the channelSegmentation by external dataSegmentation by external SQL tablesSegmentation by Profile structure
      Best Send Time (BST)Logical operators "AND" and "OR"Recommendations for working with segments
      Message templatesarrow
      • Working with message templatesarrow
      • Working in the editorEmail-templateSMS templatePush templateMAX templateTelegram templateWhatsApp templateViber™ templateNotify template
        Visual editor for email-templatearrow
      • Visual editor interfaceAdding blocksElements and their settingsCustom blocksStyle managerLayer manager
      Template fragmentsImage galleryContent personalizationCreating tables based on array elementsBlock editor for email template
        Altcraft Variables and Functionsarrow
      • Logical expressions in messagesLoops in messagesMarket variables in templatesUsing the JSONPath functionality
        Dynamic content in messagesarrow
      • Dynamic HTML contentDynamic JSON contentContent from SQL database in templatesDynamic API content
      Importing and exporting a message templateImporting a template from a third-party serviceExporting a template from Pixcraft
      Mailingsarrow
    • Mailings calendarBroadcast mailingsRegular mailingTrigger mailingMultivariate testingMailing testingMailing schedulePlacement mailing
      Campaignsarrow
    • Working with CampaignsLocal control groups (LCG)Audience expansionAudience building
      Automation scenariosarrow
    • Managing scenariosNodes of the scenarioClassic marketing scenariosStep-by-step welcome scenario guideScenario for automatic notification of the managerAbandoned cart scenario
      Marketarrow
    • Market settings
        Productsarrow
      • How to create a product manuallyHow to import a product from a fileScheduled product importProduct and SKU SegmentsPreparing the YML file
      OrdersMarket variables in message templateGuide: how to send an order confirmation email
      Loyalty programsarrow
    • Loyalty programsLoyalty integration with external systemsБыстрый стартBasic loyalty program use casesOrder SegmentsPromotion codes
      Reports and analyticsarrow
    • Channel reportTraffic report
        Summary reportarrow
      • Summary report metrics
      Cohorts reportLifetime reportFunnels reportGoals reportAudience growth reportClick map reportLoyalty programs reportBounces reportUndeliveries reportReport on global control groups
      Integrationsarrow
      • Action hooksarrow
      • Altcraft Action HooksAction hooks event typesAction Hook Message StructureJSON batch request (HTTP POST action hook)Message to RabbitMQ brokerMessage to RabbitMQ exchangerMessage to Kafka brokerTest event
        Integration of third-party services using Albatoarrow
      • Connecting Altcraft to Albato Launching the welcome scenario using AlbatoTransmitting event dataSetting app a trigger mailingEvent registrationGoogle Sheets and Altcraft integration AmoCRM and Altcraft integration
      Facebook Ads Manager™Google Ads AudiencesMAXYandex.Audience™VK Ads™Static segment synchronizationYandex AppMetrica™Tilda™Lpgenerator™WhatsAppViber*™ integrationIntegration scopeData Transmitted During SynchronizationNotify
      Weblayersarrow
      • Formsarrow
      • Create a formForm constructorAppearanceActions after form activationData analyticsBinding data channel and formsConditional logic in forms and surveysNPS testing
        Pixelsarrow
      • Goal customer actions and scoring
        Pop-upsarrow
      • Creating and publishing a pop-upSetting up a popup in the code editorManaging pop-ups manually via scriptPopup analyticsGuide: pop-up for push subscriptionsCase: Creating a pop-up with the "Wheel of Fortune" widgetBasic cases of placing a popup via the Tag Manager
        Tag Managerarrow
      • Configuring and installing Tag ManagerTrigger typesVariables typesLinking a pixel and the Tag manager
      Settingsarrow
    • Account settingsCustom linksVirtual sendersSending policiesAudit journalTags FAQ
        Users, groups and accessarrow
      • Two-Factor Authentication (2FA)
        Connectionsarrow
      • Connection to Facebook Ads ManagerConnection to Google AdsConnecting to Yandex.Audience™Connection to 360dialogConnection to EdnaConnection to Devino TelecomConnection to SMSTrafficConnection to VK Ads™Connection to MTS OmniChannelCustom Authentication ConnectionOAuth2 connectionBasic Authentication connectionToken Authentication connectionConnection to RapportoMAX connectionConnection to Notify
      Attribute settings
      API requests: where to startarrow
    • Import or update a profileTrigger mailing launchEngage profile in scenario
      Changelogarrow
    • v2026.1.76v2025.4.75v2025.4.74v2025.3.73v2025.2.72v2025.1.71v2024.4.70v2024.3.69v2024.2.68.2v2024.1.68
    Documentation archivelibrary
  • Segmentation
  • Best Send Time (BST)

Best Send Time (BST)

Best Send Time (BST) is a mechanism that determines the optimal time to send messages for each profile based on its behavior. It is powered by a machine learning algorithm that identifies the time of highest profile activity based on data collected by the platform.

Sending messages at the right time directly impacts communication performance:

  • Open Rate increases as messages arrive when users are most active;
  • engagement grows — users interact with content more frequently;
  • the risk of messages being marked as spam decreases due to higher open rates;
  • customer loyalty improves thanks to more relevant communication;
  • resources are optimized through more efficient campaigns.

How Best Send Time is calculated​

The BST model uses machine learning algorithms to analyze user behavior. The ML service analyzes profile activity and determines the hour when the probability of message opening is highest. For each profile, one or several preferred sending hours are calculated.

During analysis:

  • data from the last 6 months is used;
  • message opens and other behavioral events are processed;
  • the best hour or several hours for sending are determined.

BST data is regularly recalculated (by default, once a day at 00:00 in the account time zone).

caution

By default, the ML model uses profile activity data from the last 6 months to determine the optimal sending time. If a profile has no history of sends and opens within this period, the system cannot calculate BST for it.

Using Best Send Time​

BST-based segmentation allows selecting profiles for which the current or specified time is optimal for sending. Then you can configure a Mailing by selecting the segment audience as recipients — each user will receive the message at the most appropriate time.

info

To use the ML service, it must be activated at the platform level. If you are using the On-premises version, contact the Altcraft support team.

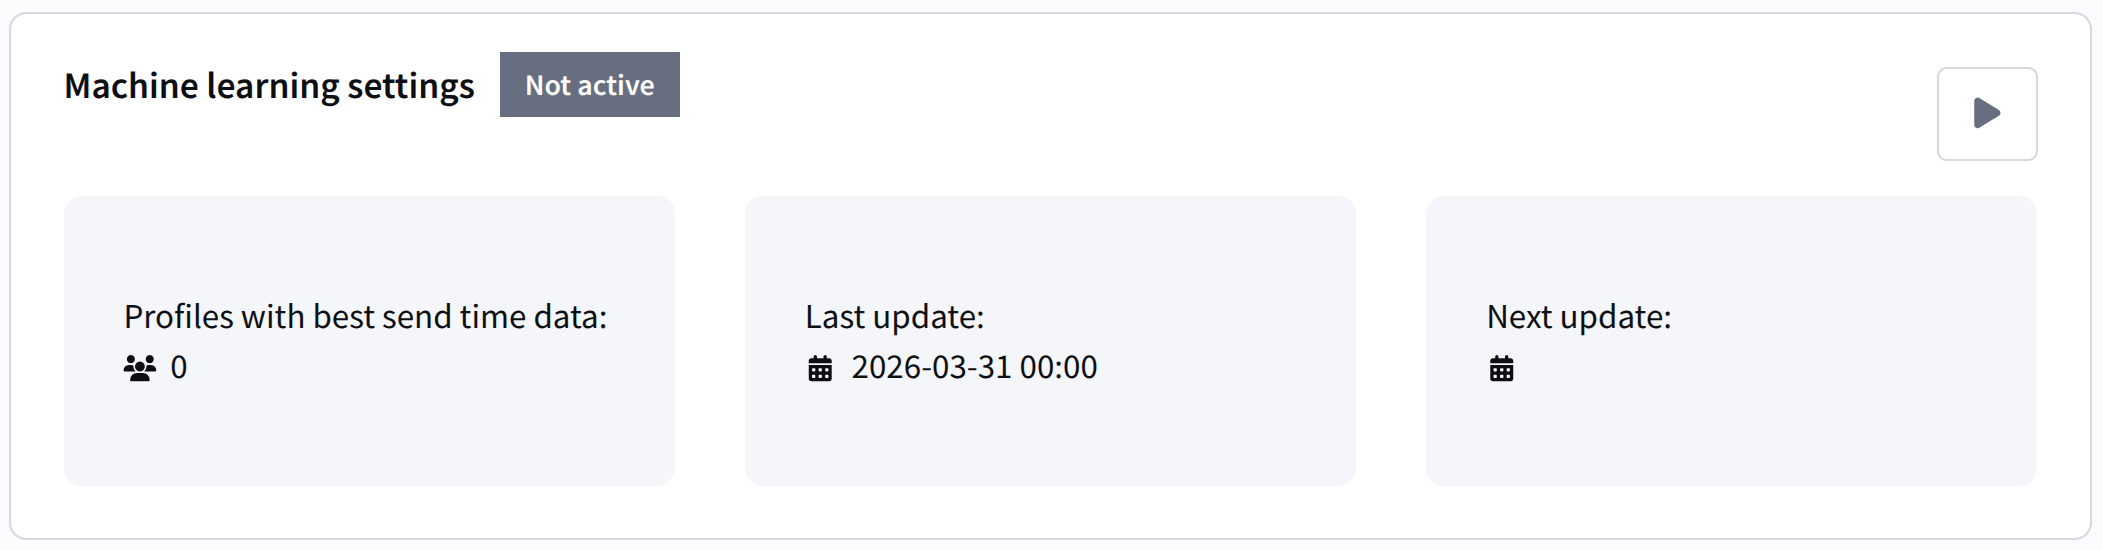
To calculate the best send time, you need to enable ML for the profile database. Go to the database settings, open Machine Learning Settings, and activate the module.

After activation, the model will start collecting and processing data. You can check the next update time in the database settings. If ML was enabled recently, wait for the first recalculation.

slide-0
slide-1

BST can be used as a condition for building a dynamic segment or in an automation Scenario node.


BST Segmentation​

To create a BST segment, go to Segments — Dynamic segment and create a new segment.


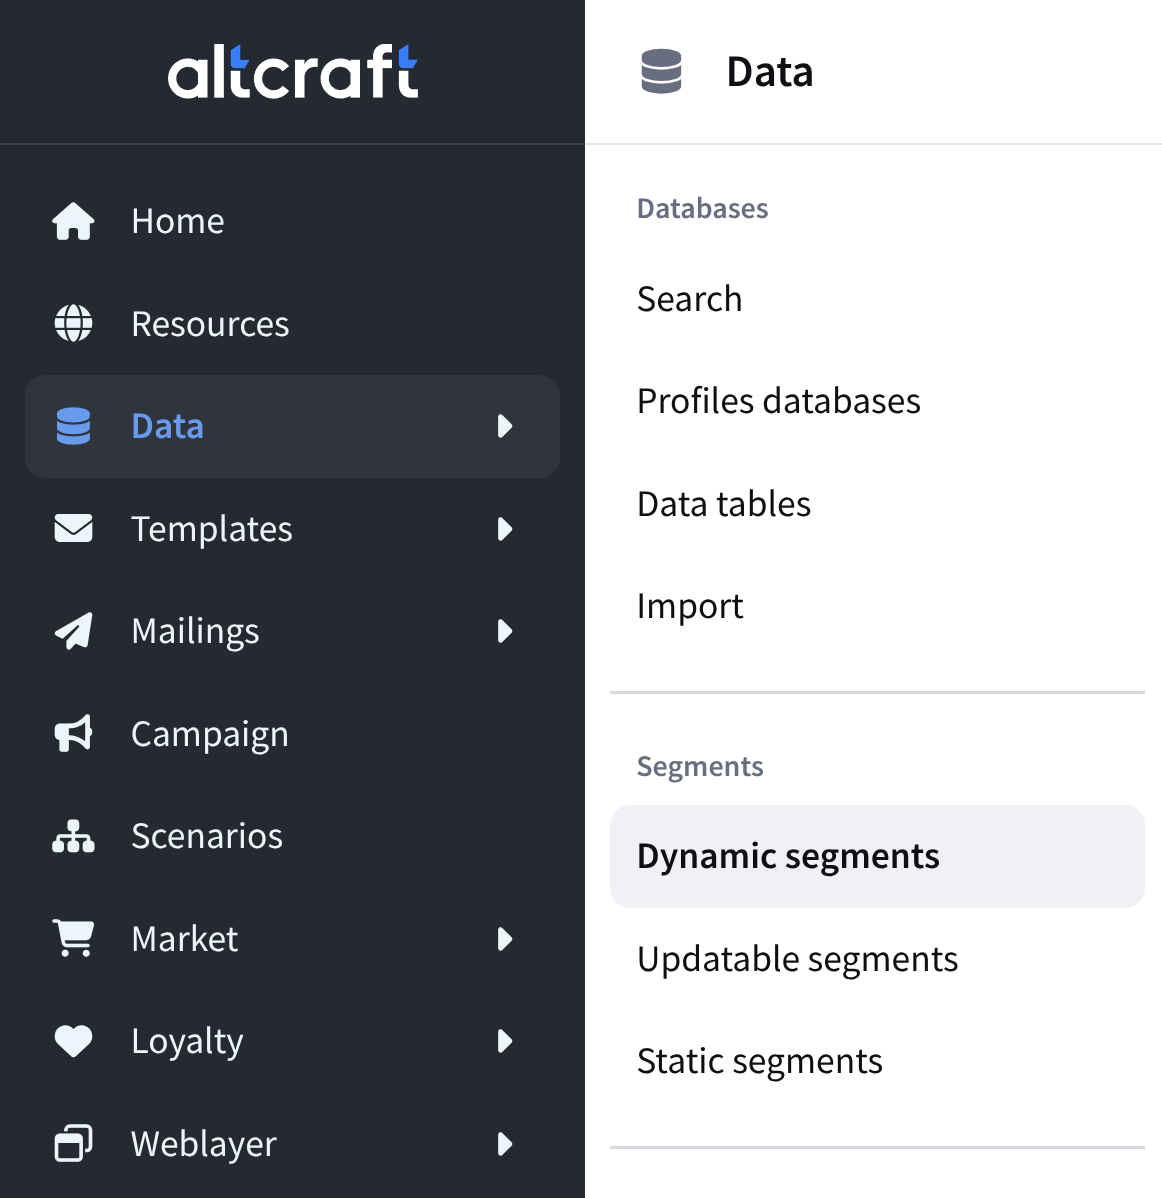
Select a profile database with ML enabled. Add the condition Profile data — Best Send Time.


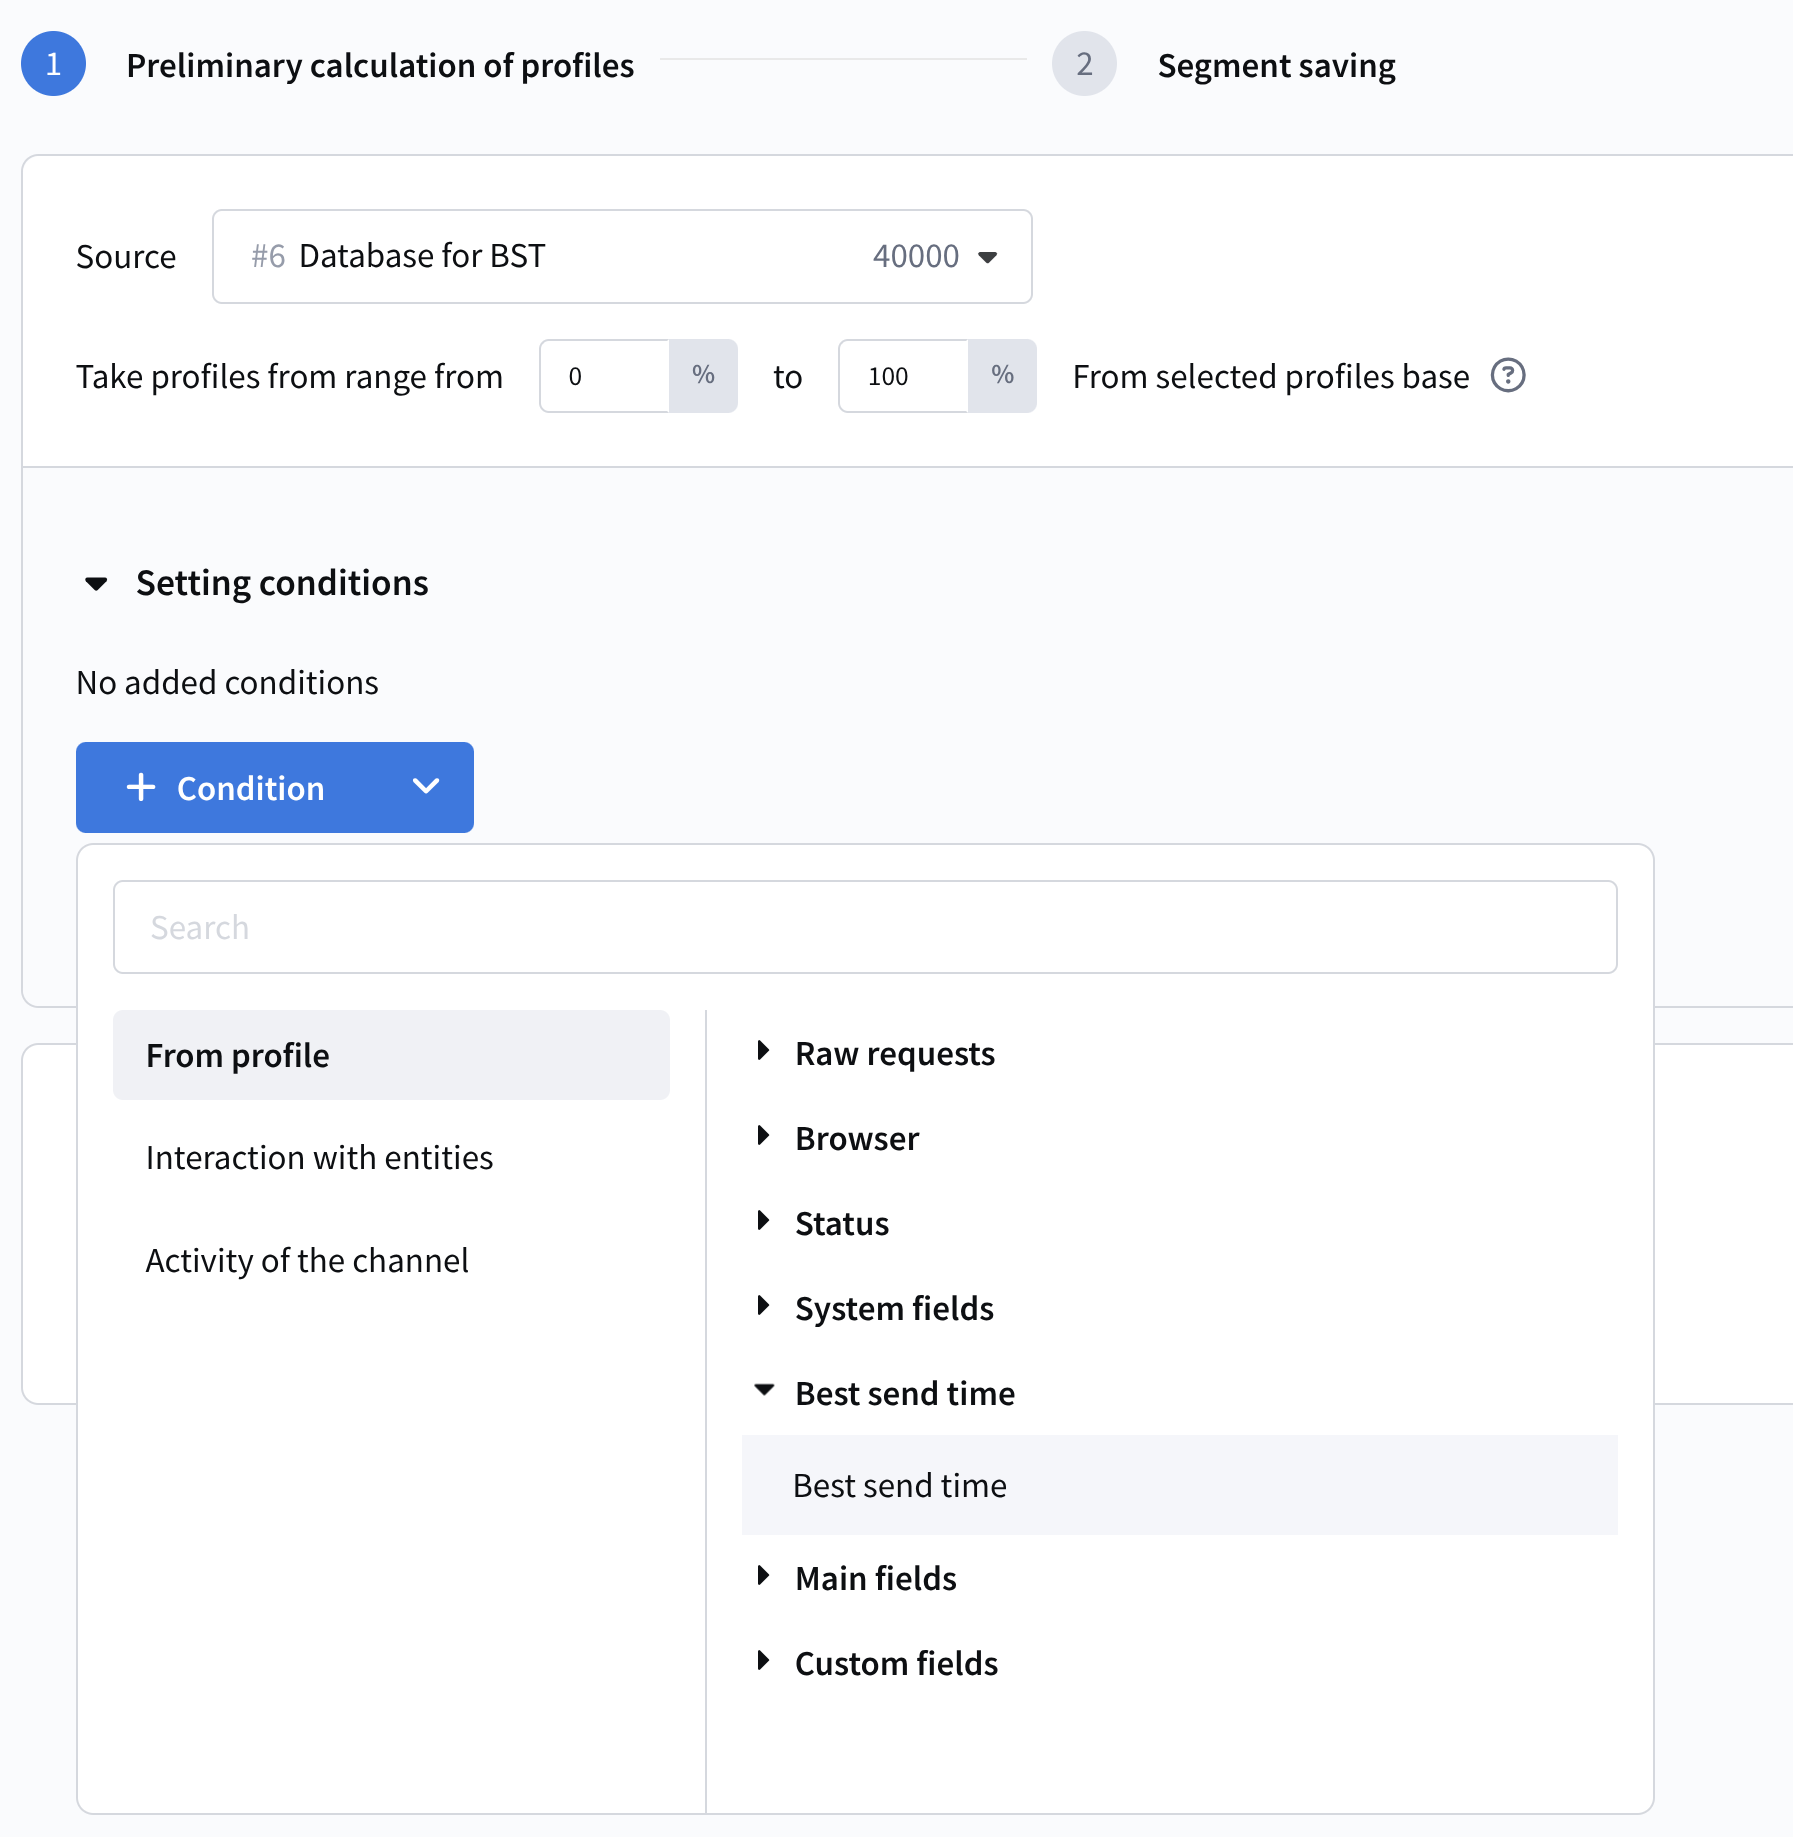
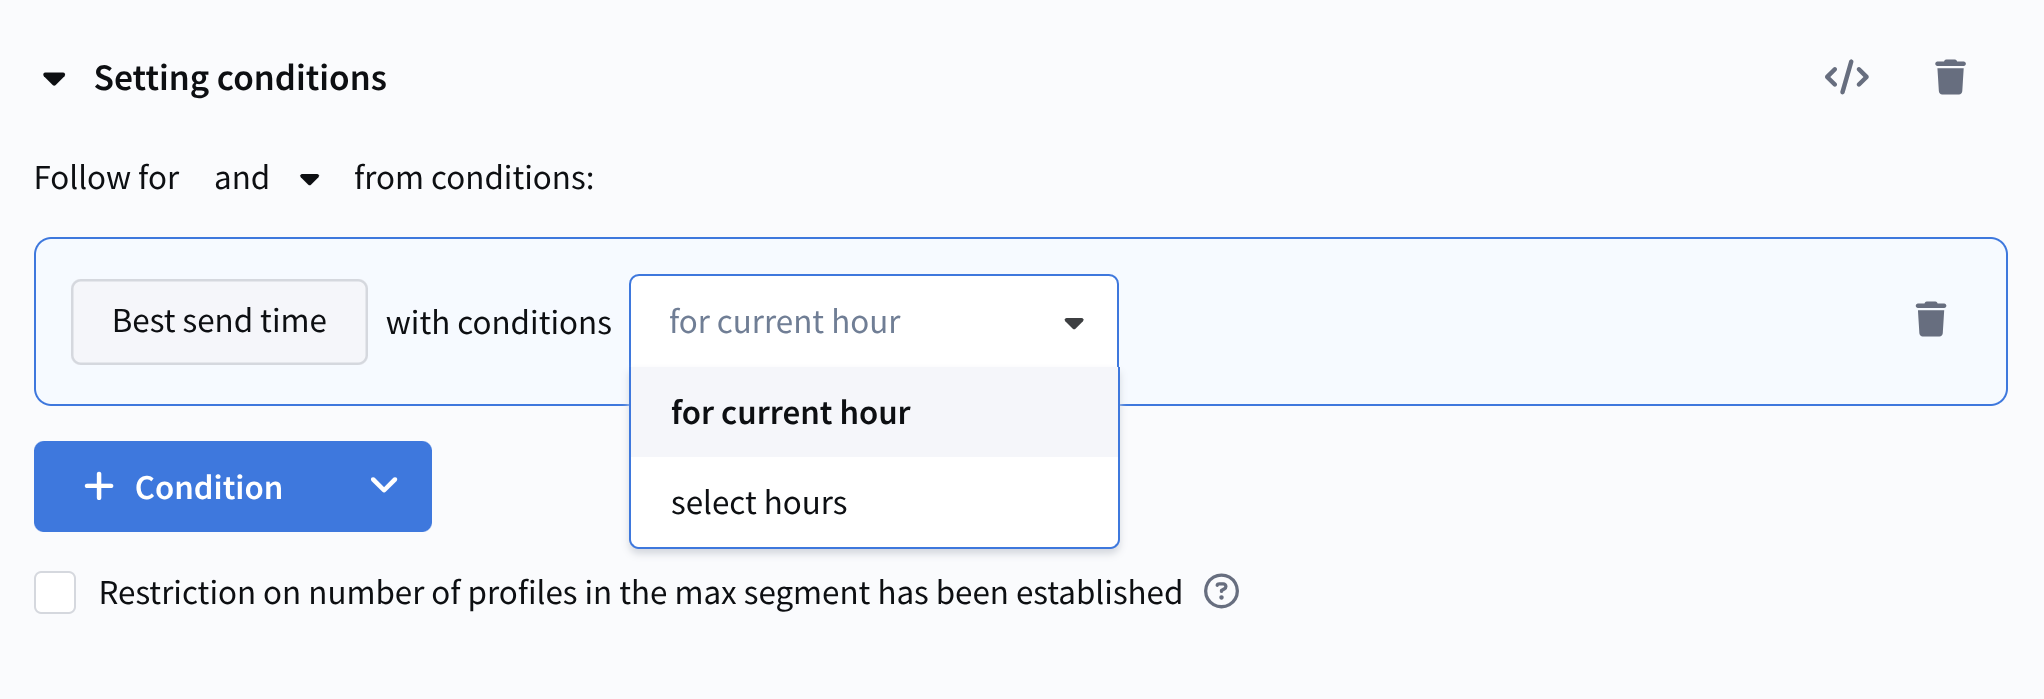
Two operators are available:

  • For the current hour — profiles for which the current hour is optimal will be included in the segment.

    For example, if the segment is calculated at 11:30, users with the best send time in the interval 11:00–12:00 will be selected.

  • Specify hours — you can select one or multiple hours. If a profile’s best hour matches any selected hour, it will be included in the segment.

    For example, you can select 9, 10, and 11 — users with those best send times will be included.

After configuration, name and save the segment. You can now use it in Mailings.

The simplest use case is launching a regular Campaign. Create a campaign, select the BST segment as recipients, and set the sending time to match the segment condition.

For example, you can schedule a daily campaign at 17:00 and create a segment of profiles for which 17:00 is the best send time.
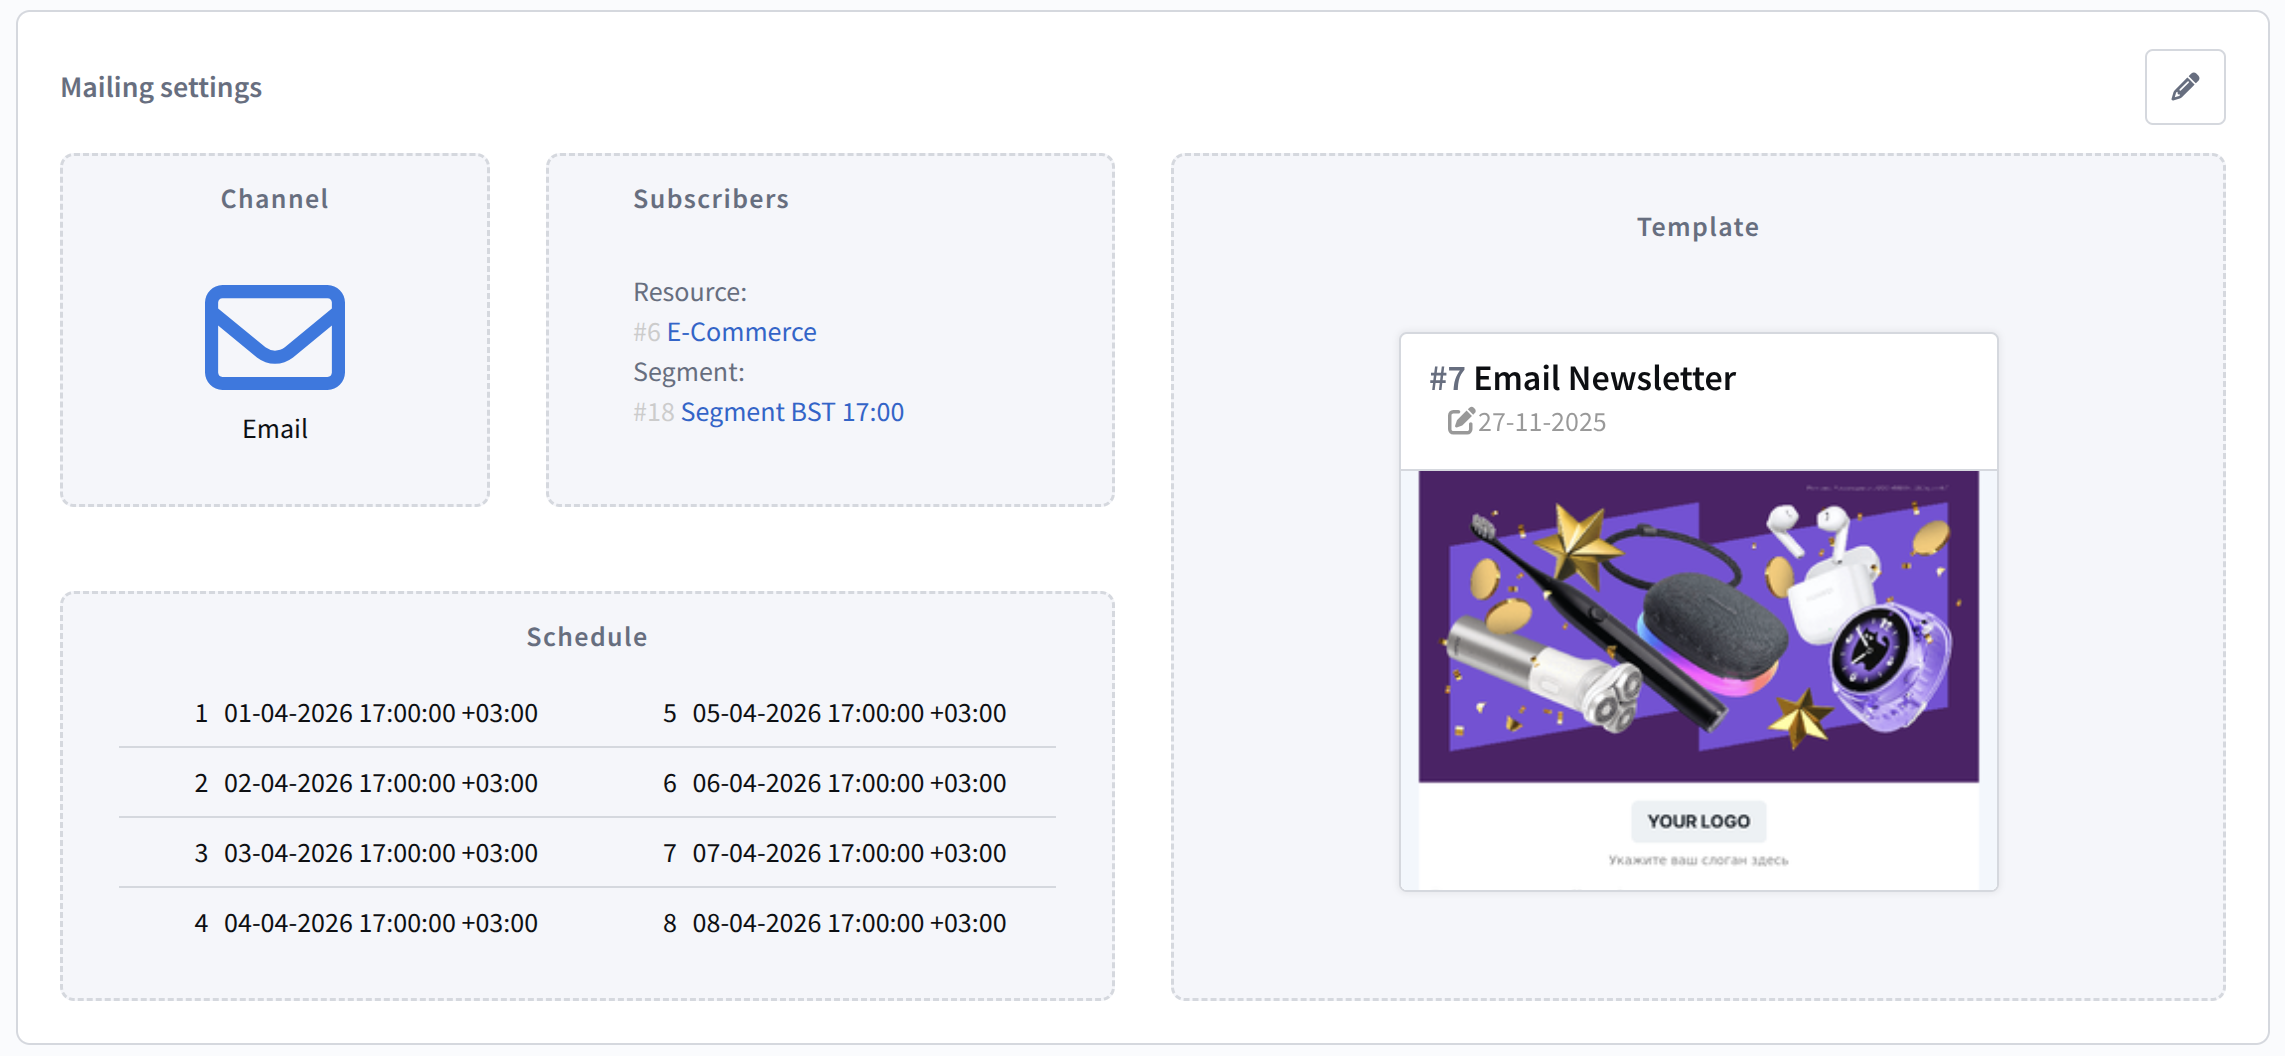


Scenario Node​

This approach in Scenarios is suitable for complex communications with trigger chains and advanced logic.


Add a node from the Channels category and place the Best Send Time operator before it. Add other nodes if needed.


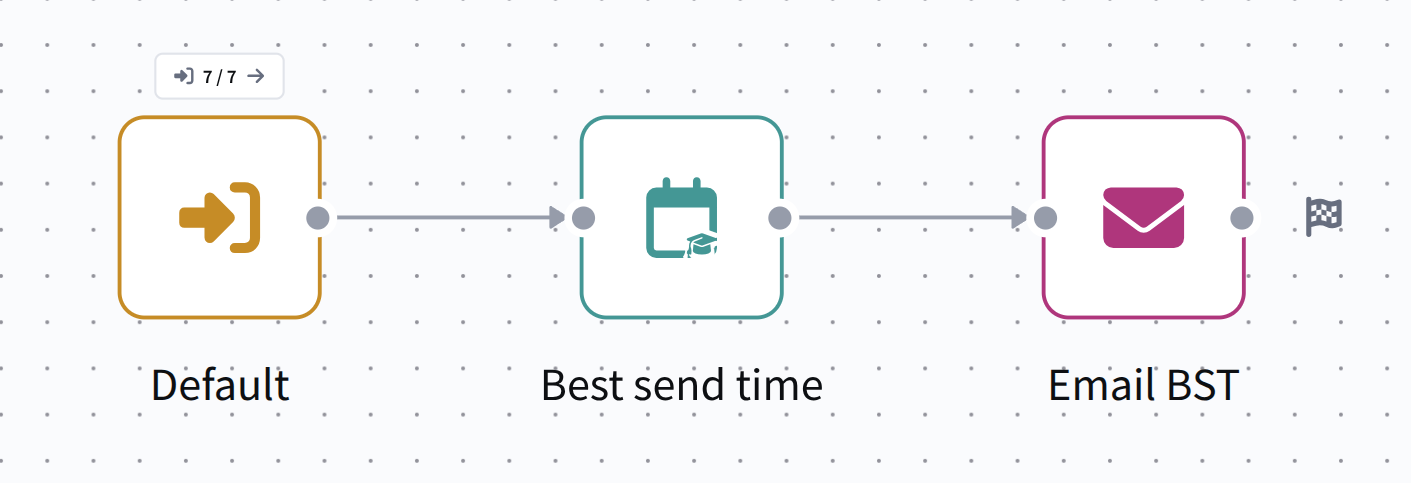
Activate and save the scenario.
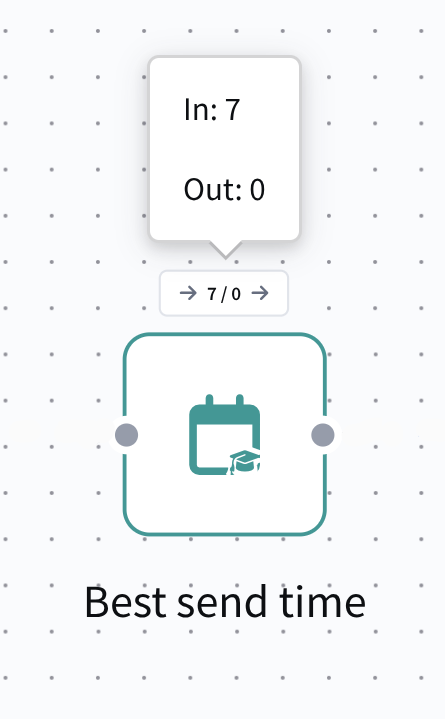
When a profile reaches the BST node, it waits until the nearest suitable send time calculated for it. If the best time has already passed, the system selects the next available interval.

If a profile has no BST data, it immediately proceeds to the next node.


Last updated on Mar 31, 2026
Previous
Segmentation by Profile structure
Next
Logical operators "AND" and "OR"
  • How Best Send Time is calculated
  • Using Best Send Time
    • BST Segmentation
    • Scenario Node
© 2015 - 2026 Altcraft, LLC. All rights reserved.