Altcraft Docs LogoAltcraft Docs Logo
User guide iconUser guide
Developer guide iconDeveloper guide
Admin guide iconAdmin guide
English
  • Русский
  • English
Login
    User documentationGetting StartedFAQAltcraft glossary
      Profiles and databasesarrow
    • Subscription resourcesManaging databasesSubscriber profileProfiles import and data updateScheduled customer data importAutomatic data collectionBulk customers profiles updateDouble opt-in subscriptionSuppression listsProfile relationsProfile history exportProfile exportCreating a static segment based on import resultsHow to open a CSV fileMatchingTypes of fields in the databaseGlobal control groupsSubscription Manager
      Communication channelsarrow
      • Email channelarrow
      • Email: ISP interactions best practicesEmail: sending domain configurationEmail: setting up and using postmastersБыстрый старт
        Push channelarrow
        • Mobile Pusharrow
        • Settings & implementation
            Integrate your app with Altcraftarrow
          • Providers: push message structureProcessing and adding a subscriptionEvent registration
          Web pusharrow
        • Preliminary Settings
            Web browser push configurationarrow
          • Firebase Cloud messagingApple SafariMozilla Services
          Connecting Web Push to a WebsiteTransferring Data to the PlatformWeb Push SDK Methods
            Import of subscriptions from third-party push servicesarrow
          • Migrating push subscriptions from third-party servicesHow to transfer push subscriptions configured for Safari?Migration from OneSignal
      SMS channel
        Creating mailing from scratcharrow
      • EmailSMSWeb PushMobile PushWhatsAppViber*™Руководство: SMS-рассылка через VK NotifyMAX BotMAX GroupNotifyTelegram BotTelegram Group
      Communication Channels WorkflowРуководство: SMS-рассылка через УТШРуководство: push-рассылка через сервис от "Согласие"
      Segmentationarrow
    • Static SegmentsDynamic SegmentsUpdatable Segments
        Segmentation Conditionsarrow
      • Segmentation by Profile dataSegmentation by Interactions with EntitiesSegmentation by Activity of the channelSegmentation by external dataSegmentation by external SQL tablesSegmentation by Profile structure
      Best Send Time (BST)Logical operators "AND" and "OR"Recommendations for working with segments
      Message templatesarrow
      • Working with message templatesarrow
      • Working in the editorEmail-templateSMS templatePush templateMAX templateTelegram templateWhatsApp templateViber™ templateNotify template
        Visual editor for email-templatearrow
      • Visual editor interfaceAdding blocksElements and their settingsCustom blocksStyle managerLayer manager
      Template fragmentsImage galleryContent personalizationCreating tables based on array elementsBlock editor for email template
        Altcraft Variables and Functionsarrow
      • Logical expressions in messagesLoops in messagesMarket variables in templatesUsing the JSONPath functionality
        Dynamic content in messagesarrow
      • Dynamic HTML contentDynamic JSON contentContent from SQL database in templatesDynamic API content
      Importing and exporting a message templateImporting a template from a third-party serviceExporting a template from Pixcraft
      Mailingsarrow
    • Mailings calendarBroadcast mailingsRegular mailingTrigger mailingMultivariate testingMailing testingMailing schedulePlacement mailing
      Campaignsarrow
    • Working with CampaignsLocal control groups (LCG)Audience expansionAudience building
      Automation scenariosarrow
    • Managing scenariosNodes of the scenarioClassic marketing scenariosStep-by-step welcome scenario guideScenario for automatic notification of the managerAbandoned cart scenario
      Marketarrow
    • Market settings
        Productsarrow
      • How to create a product manuallyHow to import a product from a fileScheduled product importProduct and SKU SegmentsPreparing the YML file
      OrdersMarket variables in message templateGuide: how to send an order confirmation email
      Loyalty programsarrow
    • Loyalty programsLoyalty integration with external systemsБыстрый стартBasic loyalty program use casesOrder SegmentsPromotion codes
      Reports and analyticsarrow
    • Channel reportTraffic report
        Summary reportarrow
      • Summary report metrics
      Cohorts reportLifetime reportFunnels reportGoals reportAudience growth reportClick map reportLoyalty programs reportBounces reportUndeliveries reportReport on global control groups
      Integrationsarrow
      • Action hooksarrow
      • Altcraft Action HooksAction hooks event typesAction Hook Message StructureJSON batch request (HTTP POST action hook)Message to RabbitMQ brokerMessage to RabbitMQ exchangerMessage to Kafka brokerTest event
        Integration of third-party services using Albatoarrow
      • Connecting Altcraft to Albato Launching the welcome scenario using AlbatoTransmitting event dataSetting app a trigger mailingEvent registrationGoogle Sheets and Altcraft integration AmoCRM and Altcraft integration
      Facebook Ads Manager™Google Ads AudiencesMAXYandex.Audience™VK Ads™Static segment synchronizationYandex AppMetrica™Tilda™Lpgenerator™WhatsAppViber*™ integrationIntegration scopeData Transmitted During SynchronizationNotify
      Weblayersarrow
      • Formsarrow
      • Create a formForm constructorAppearanceActions after form activationData analyticsBinding data channel and formsConditional logic in forms and surveysNPS testing
        Pixelsarrow
      • Goal customer actions and scoring
        Pop-upsarrow
      • Creating and publishing a pop-upSetting up a popup in the code editorManaging pop-ups manually via scriptPopup analyticsGuide: pop-up for push subscriptionsCase: Creating a pop-up with the "Wheel of Fortune" widgetBasic cases of placing a popup via the Tag Manager
        Tag Managerarrow
      • Configuring and installing Tag ManagerTrigger typesVariables typesLinking a pixel and the Tag manager
      Settingsarrow
    • Account settingsCustom linksVirtual sendersSending policiesAudit journalTags FAQ
        Users, groups and accessarrow
      • Two-Factor Authentication (2FA)
        Connectionsarrow
      • Connection to Facebook Ads ManagerConnection to Google AdsConnecting to Yandex.Audience™Connection to 360dialogConnection to EdnaConnection to Devino TelecomConnection to SMSTrafficConnection to VK Ads™Connection to MTS OmniChannelCustom Authentication ConnectionOAuth2 connectionBasic Authentication connectionToken Authentication connectionConnection to RapportoMAX connectionConnection to Notify
      Attribute settings
      API requests: where to startarrow
    • Import or update a profileTrigger mailing launchEngage profile in scenario
      Changelogarrow
    • v2026.1.76v2025.4.75v2025.4.74v2025.3.73v2025.2.72v2025.1.71v2024.4.70v2024.3.69v2024.2.68.2v2024.1.68
    Documentation archivelibrary
  • Communication channels
  • Creating mailing from scratch
  • Telegram Group

Telegram Group: a Guide for the First Mailing

Telegram channel is a feed of text messages, which are complemented by media files and emoji. Channel members can comment on posts and participate in polls. In groups, unlike channels, two-way communication is available. This means that each group user can send a message to the chat.

The Telegram Group channel will allow you to set up automatic publication of posts in channels and groups of the messaging app using placement mailings.

Step 1. Create a bot and get a token​

1. Log in to Telegram, enter @BotFather in the search box and select the desired bot.

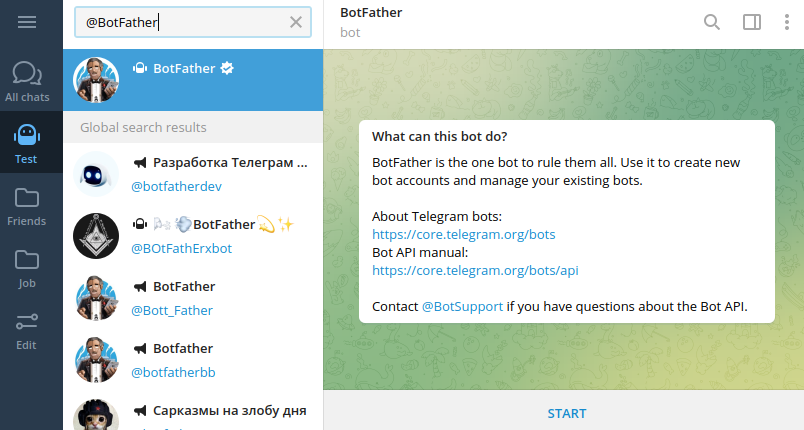
2. Start a dialogue with the bot by clicking the START button in the chat. Then send the /newbot command to it. Enter the name and then the username for your new bot. Please note that the username must end with "bot" or "Bot". Copy the received bot token:

Step 2. Add the bot to the group or channel and get a chat_id.​

1. 1. Create a group or channel. You will find more detailed information on how to do this in the Telegram documentation.

2. Add the bot to a group or channel. Assign admin rights to the bot.

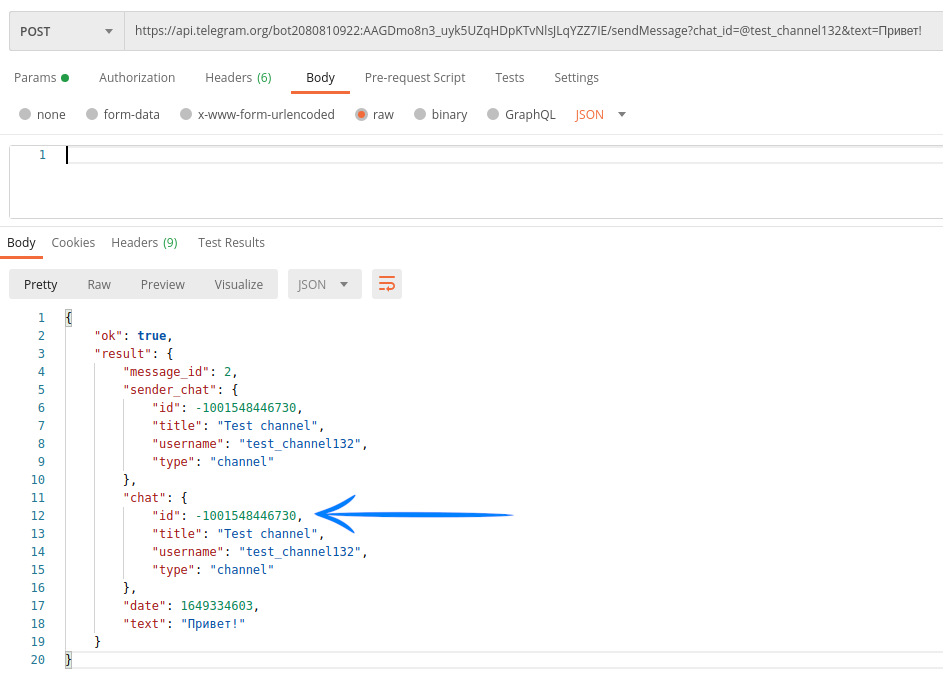
3. Send a test message to chat using an API request. This can be done through Postman or any other API testing tool.

Method: POST

URL: https://api.telegram.org/bot[BOT_API_KEY]/sendMessage?chat_id=[CHANNEL_NAME]&text=[MESSAGE_TEXT]

  • [BOT_API_KEY] — the bot token received in the conversation with @BotFather.
  • [CHANNEL_NAME] — channel or group name using @.
  • [MESSAGE_TEXT] — message text.

Example:

https://api.telegram.org/bot2080910120:AAGfho8n3_uyk5trh4DpKTvNlsJLkadsZ7IE/sendMessage?chat_id=@new_test_group132&text=Hey!

info

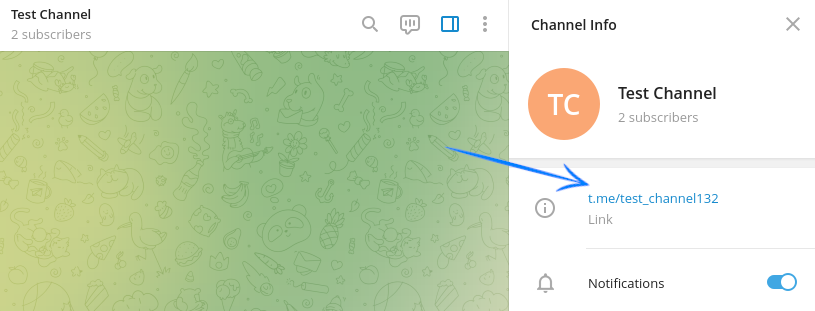
Where can I find the name of the channel or group?

The name is embedded in the link to the channel or group. For example, if the link is t.me/test_channel132, then the part after the slash will become the name of the channel — test_channel132.

Response:

In the body of the response, you will receive the chat_id. It must start with -100.

Step 3. Create a resource​

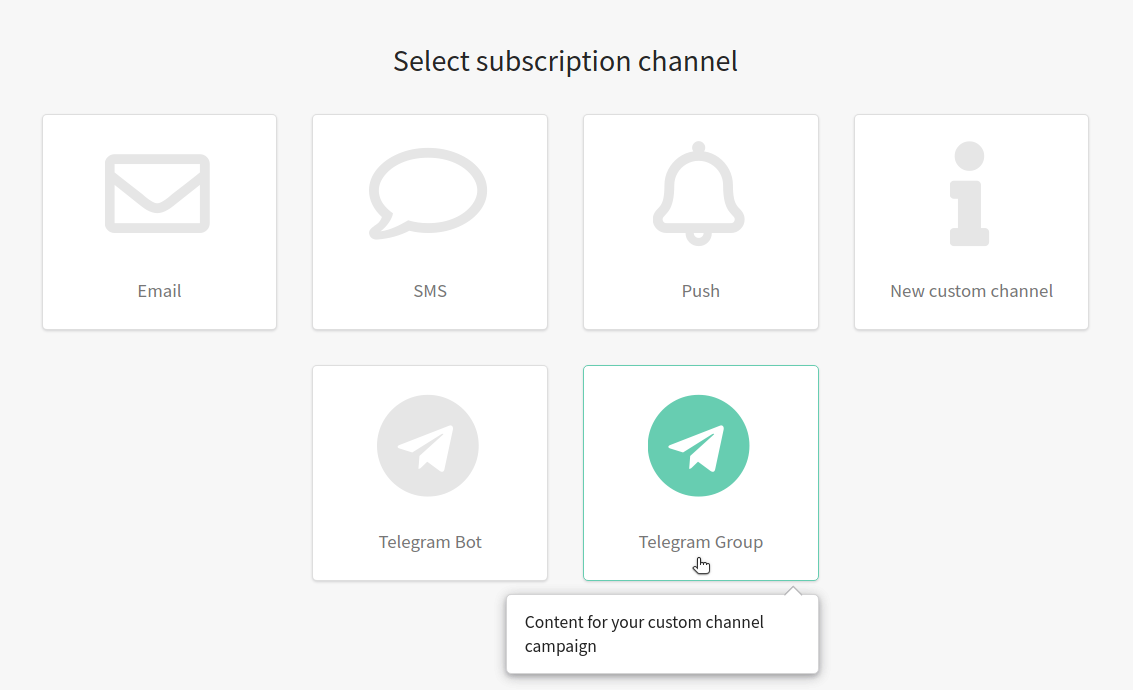
Go to the "Resources" section create a new resource or select a pre-existing one. Use Telegram Group as a channel:

Add the necessary databases in the basic settings. Specify the default tracking domain that will process subscribers' clicks on the links in your Telegram Bot messages.

Add the bot token and group/channel ID copied from Telegram and save the resource:

Now you need to import user data into the database by subscribing them to the resource.

Please note that the platform only sends messages. Subscriber data is collected and transmitted to the platform on the client side.

Step 4. Create a template​

Go to the "Templates" section. When creating a new template, select the Telegram Bot channel and add this channel to a pre-existing template. Select the content type in the Telegram version of the template:

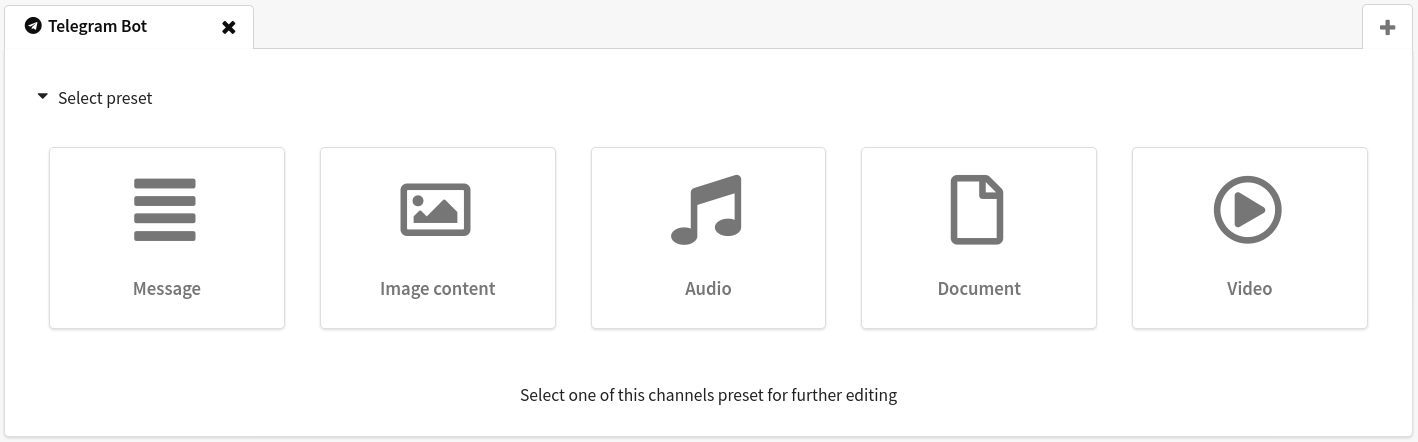
You can add data of a particular customer, as well as dynamic text content from external sources.

Step 4. Configure and launch a placement mailing​

Open the section "Mailings" and select "Placements". Create a new mailing.

After filling in the basic settings, you need to:

  1. Choose Telegram Group as a communication channel.

  2. Select a previously configured subscription resource.

  3. Add a message template.

  4. Add the date and time the post will be posted to the group.

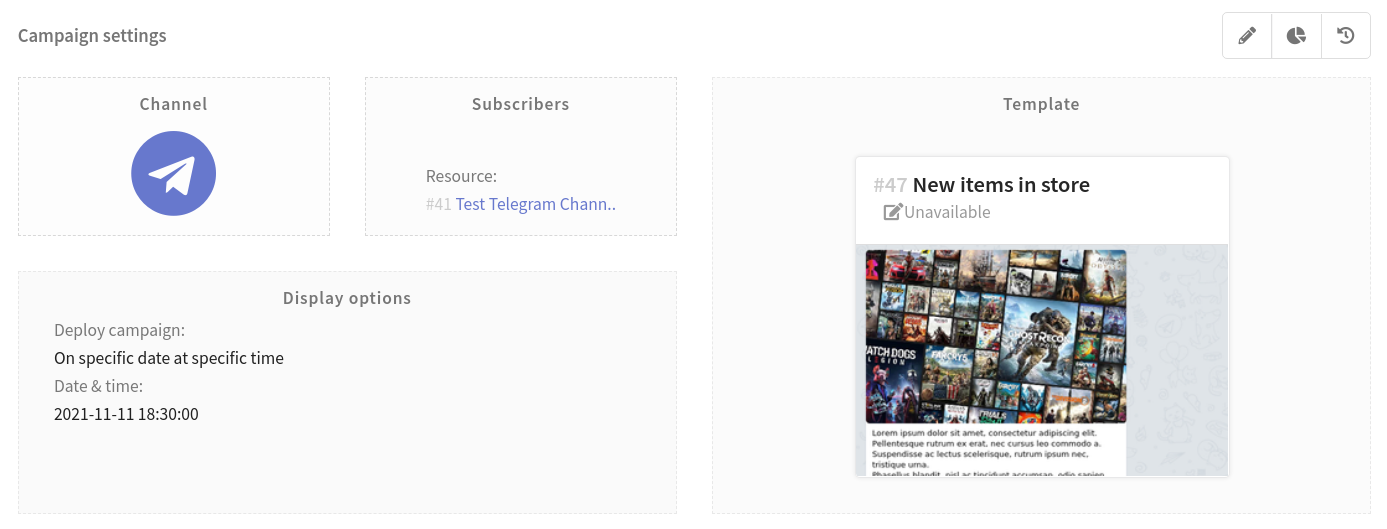
When the mailing is fully configured, save it. It will be displayed in the list of mailings of the corresponding type. There is a quick action menu on the right side of each entry. By its means, you can activate your actual newsletter :

Step 5. Evaluate the effectiveness of your newsletter​

To evaluate the result of your newsletters, use the "Analytics" section in the main menu of the platform. A channel report provides the analysis of one or more mailings.

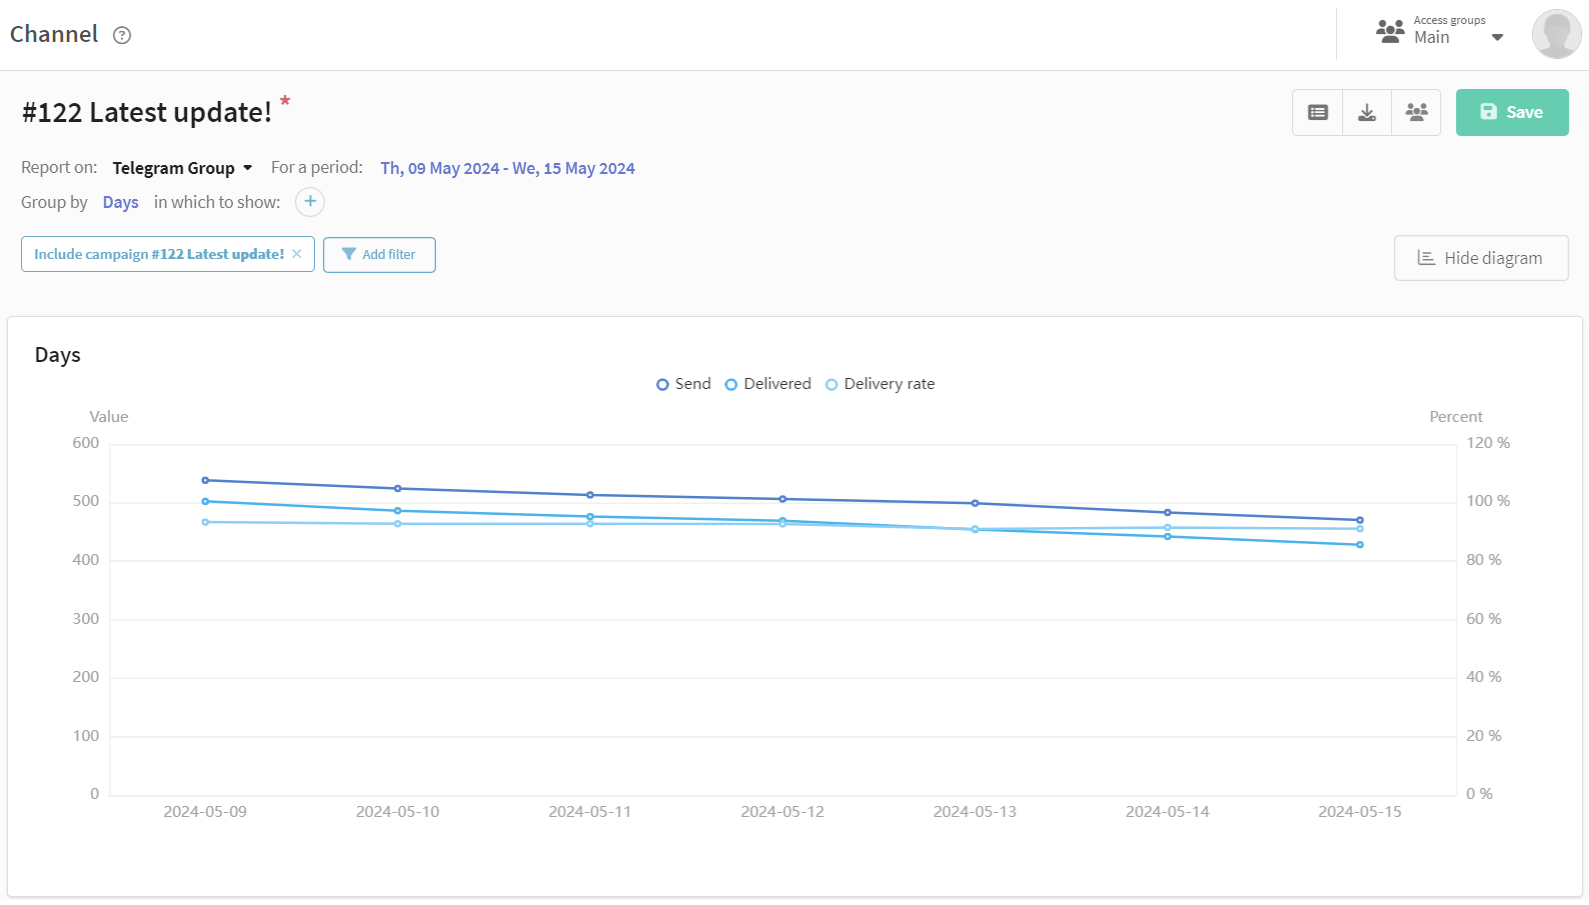
To make grouping easier, you can select a preset of indicators for Telegram Group. You will see the data on the number of sent, delivered or undelivered messages in the table, as well as information on clicks and openings.

Last updated on Mar 12, 2026
Previous
Telegram Bot
Next
Communication Channels Workflow
  • Step 1. Create a bot and get a token
  • Step 2. Add the bot to the group or channel and get a chat_id.
  • Step 3. Create a resource
  • Step 4. Create a template
  • Step 4. Configure and launch a placement mailing
  • Step 5. Evaluate the effectiveness of your newsletter
© 2015 - 2026 Altcraft, LLC. All rights reserved.