Guide: how to send an order confirmation email
Description
This guide will show you the algorithm for working in the Altcraft Platform market.
Let's imagine that we have an online store for smartphones. A buyer visits a website, adds the product to the cart and places the order. Our task is to send them an order confirmation email with the order number and price.
The guide comprises the following steps:
- Creating a sales channel and touchpoins
- Importing product and SKU data using a yml file
- Setting up an API request to add order data to the market
- Creating a template and substituting order data using variables
- Setting up a trigger campaign
Step 1. Set up a sales channel
You need a sales channel to start working in the market. This channel defines a profile database and touchpoints.
A profile database contains the contact details of customers who place orders in a certain channel. You need to import their data into a new or existing database. To do this, use import from a file or via API.
A touchpoint is a platform or a tool using which you sell products and services to your customers (a website, a store, a parcel terminal, a social network, a call center and so on). A touchpoint connects a sales channel a an order.
To create a channel, go to Market → Settings in the main menu. Create a new channel on the Sales channels tab. Specify:
- a channel name
- an additional identifier
- a profile database
- a channel type: online or retail
Next, save the channel and go back to its settings. Create touchpoints.
Please note that each touchpoint can only be linked to one channel. The touchpoint ID will be used in the API request to import the order.

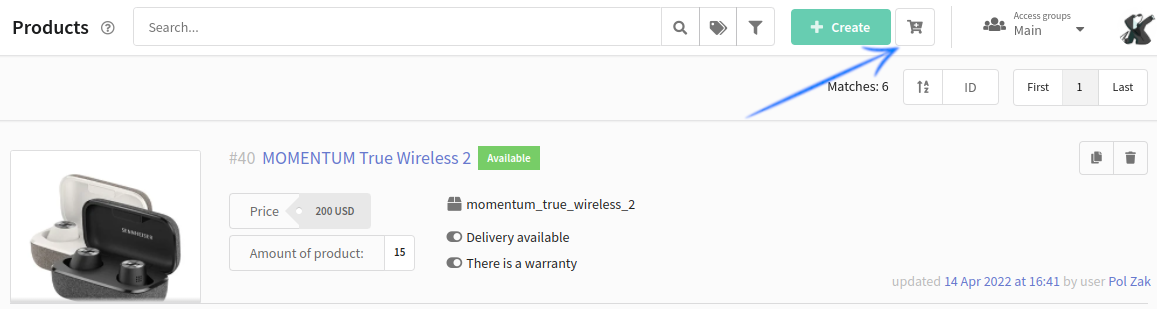
Step 2. Upload product data to the platform
Products in the market are represented by two entities: products and SKU.
A product is goods or services for sale. SKU is a product modifier, it is used for variations of one product (such characteristics as colour, size, weight, model, configuration and so on can vary).
SKU is connected to a certain product and cannot exist without it. For example, Apple iPhone 12 is a product, but Apple iPhone 12 128GB and Apple iPhone 12 256GB are its SKUs.
There are three ways to add product data to the platform:
Let's import product data from a file. To do this, you need a yml file.
If you have any questions about import, read this detailed guide.
Below you can see examples of yml files:
Product
A file with such content will add two products to the market: Apple iPhone 12 and Xiaomi 12X.
<?xml version="1.0" encoding="UTF-8"?>
<yml_catalog date="2017-02-05 17:22">
    <shop>
    <name>BestSeller</name>
    <company>Tne Best inc.</company>
    <url>http://best.seller.ru</url>
    <categories>
      <category id="10">Смартфоны</category>
      <category id="101" parentId="10">Apple</category>
      <category id="102" parentId="10">Xiaomi</category>
    </categories>
    <offers>
      <offer id="iphone12" available="true">
        <name>Apple iPhone 12</name>
        <vendor>Apple</vendor>
        <url>http://best.seller.ru/product_page.asp?pid=12348</url>
        <price>83990</price>
        <oldprice>89990</oldprice>
        <currencyId>RUB</currencyId>
        <categoryId>101</categoryId>
        <picture>https://example.com/img/apple_phone.png</picture>
        <delivery>true</delivery>
        <manufacturer_warranty>true</manufacturer_warranty>
        <barcode>0156789012</barcode>
	  </offer>
      <offer id="xiaomi12" available="true">
		<name>Xiaomi 12X</name>
        <vendor>Xiaomi</vendor>
        <url>http://best.seller.ru/product_page.asp?pid=12345</url>
        <price>62990</price>
        <oldprice>69990</oldprice>
        <currencyId>RUB</currencyId>
        <categoryId>102</categoryId>
        <picture>https://example.com/img/xiaomi_phone.png</picture>
        <delivery>true</delivery>
        <manufacturer_warranty>true</manufacturer_warranty>
        <barcode>0123456789379</barcode>
	  </offer>
    </offers>
  </shop>
</yml_catalog>
SKU
A file will add two SKUsfor Apple iPhone 12: Apple iPhone 12 128GB and* Apple iPhone 12 256GB*.
<?xml version="1.0" encoding="UTF-8"?>
<yml_catalog date="2017-02-05 17:22">
    <shop>
    <name>BestSeller</name>
    <company>Tne Best inc.</company>
    <url>http://best.seller.ru</url>
    <offers>
      <offer id="apple12_128gb" group_id="iphone12" available="true">
        <name>Apple iPhone 12 128GB</name>
        <vendor>Apple</vendor>
        <url>http://best.seller.ru/product_page.asp?pid=12358</url>
        <price>71990</price>
        <oldprice>72990</oldprice>
        <currencyId>RUB</currencyId>
        <categoryId>101</categoryId>
        <picture>https://example.com/img/apple_phone_128.png</picture>
        <delivery>true</delivery>
        <manufacturer_warranty>true</manufacturer_warranty>
        <barcode>0156789012</barcode>
	  </offer>
      <offer id="apple12_256gb" group_id="iphone12" available="true">
		<name>Apple iPhone 12 256GB</name>
        <vendor>Apple</vendor>
        <url>http://best.seller.ru/product_page.asp?pid=12359</url>
        <price>83990</price>
        <oldprice>89990</oldprice>
        <currencyId>RUB</currencyId>
        <categoryId>102</categoryId>
        <picture>https://example.com/img/apple_phone_256.png</picture>
        <delivery>true</delivery>
        <manufacturer_warranty>true</manufacturer_warranty>
        <barcode>0156789012</barcode>
	  </offer>
    </offers>
  </shop>
</yml_catalog>
A list of all products and SKUs is stored in the offers element. One product or SKU is stored in a separate offer element.
The id attribute, which is unique for each product, is specified for the offer element.
The structure of the yml file is almost the same for products and SKUs. The only difference is the following: when importing SKU for the offer element you need to specify not only id, but also group_id — a product identifier.
Please note that SKUs are different variations of one product, so the value of the group_id attribute must be the same for all SKUs of this product.
To import a file with a list of products, go to Market → Products. Click on the icon on the top toolbar, and then select what exactly you want to import — a product.
Click on the download area and select a file on your device:

Start the import process by clicking «Import» on the top toolbar.
Then import SKUs. To do this, follow all the steps described in this paragraph.
Step 3. Set up sending an API request when adding an order
When a visitor of an online store places an order, an API request with the order data must be sent to the platform.
URL
Method: POST
https://example.com/api/v1.1/market/orders/import
Request parameters
| Parameter | Type | Example | Required | Description |
|---|---|---|---|---|
| token | string | "abcdefghijklmnqrstuvwxyz" | Да | API token. Make sure that roles that allow you to work with the market are available for the token. |
| data | array of objects | [ | Да | Order data. Learn more. |
| Data object | ||||
| external_id | string | "1234001" | Yes | Order ID |
| matching | string | "email" | Subscriber search mode. By default — email. For each type of matching, certain fields must be passed in the request body. You can learn more about these fieldshere. | |
| endpoint | string | "website" | Yes | Touchpoint ID |
| status | string | "new" "delivered" "paid" "canceled" "part_refunded" | Yes | Order status ID |
| total_price | string | "71990" | Yes | Total cost of the order. It consists of the price of each line in the order and the cost of delivery. |
| currency | string | "RUB" | Yes | Currency of the order price. |
| create_time | string | "2022-04-29T12:48:23Z" | No | Order creation time |
| update_time | string | "2022-04-29T12:48:23Z" | No | Order update time |
| lines | array | [ | Yes | Order lines data. At least one item. |
| Lines object | ||||
| external_id | string | "line_01" | Yes | Line ID |
| product | string | "iphone12" | Must not be present in the request if sku is specified | Product ID |
| sku | string | "apple12_128gb" | Must not be present in the request if product is specified | SKU ID |
| base_price_per_item | string | "71990" | Yes | Base price |
| min_price_per_item | string | "71990" | Yes | Minimum price |
| final_price_per_item | string | "71990" | Yes | Final price |
| count | int | 1 | Yes | Quantity of goods per item |
Request example
{
  "token": "abcdefghijklmnqrstuvwxyz",
  "data": [
    {
      "external_id": "1234001",
      "matching": "email",
      "email": "johndoe@example.com",
      "endpoint": "website",
      "status": "new",
      "total_price": "71990",
      "create_time": "2022-04-29T12:48:23Z",
      "update_time": "2022-04-29T12:48:23Z",
      "currency": "RUB",
      "lines": [
        {
          "external_id": "line_01",
          "product": "iphone12",
          "base_price_per_item": "71990",
          "min_price_per_item": "71990",
          "final_price_per_item": "71990",
          "count": 1
        }
      ]
    }
  ]
}
Response example
{
  "error": 0,
  "error_text": "",
  "result": [
    {
      "error": 0,
      "external_id": "1234000"
    }
  ]
}
Response parameters
| Parameter | Type | Description |
|---|---|---|
| error | int | Error code |
| error_text | string | Error text |
| result | array | IDs of orders that were successfully imported |
Step 4. Create an email template
Go to the Templates section. Add a new template for the email channel.
Add the market variables to the email template to use the order information in your campaign. To do this, click </> in the editor. In the list, select «Market» and insert the «Orders» variable.
Theordersfunction pattern will be added to the editor. This function selects orders from the list of profile orders.
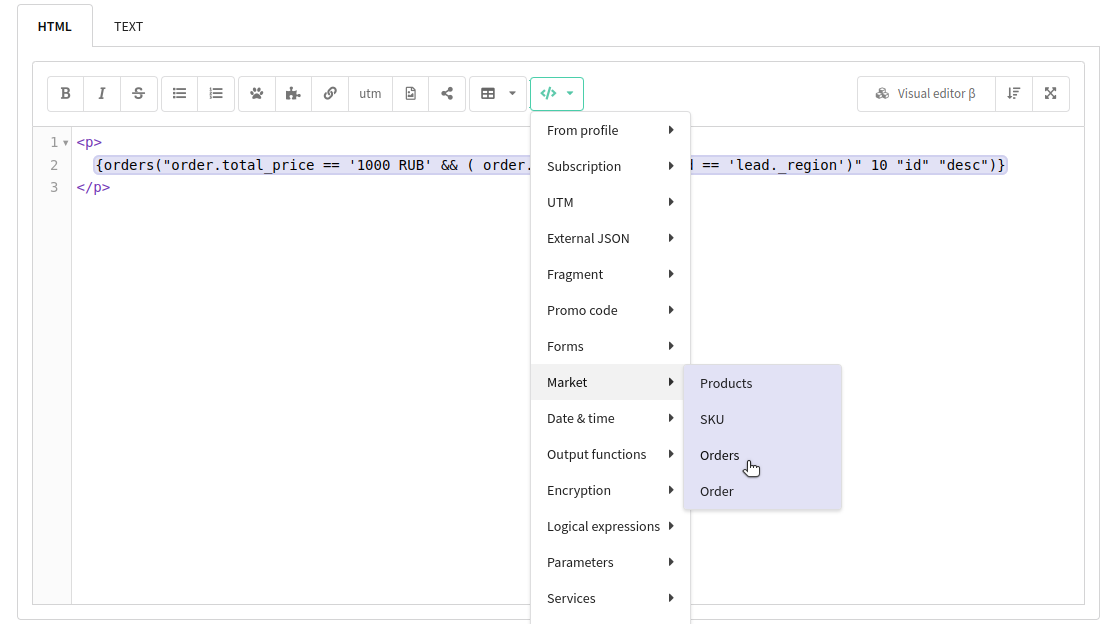
We only need to add information about the last order with the status «New» to our email. To do this, we will need to change the arguments of a function:
{orders("order.status == '1'" 1 "create_time" "desc")}
The function consists of four arguments:
| Argument | Example | Description |
|---|---|---|
| Filter | "order.status == '1'" | The function will select only those orders that match the condition «order status is new». |
| Limit | 1 | The function will select only the first element in the list of orders. |
| Sorting field | "create_time" | Selected elements will be sorted by the "create_time" field (order creation time). |
| Sorting direction | "desc" | The elements will be sorted in descending order of the value in the "create_time" field. |
An array of orders is the result of the orders function.In this case, it will be an array with one item. Use loop to iterate an array.
In the email template, substitute two variables:
{$el.external_id}— additional order ID.{$el.total_price}— total order price.
{for $index $el = orders("order.status == '1'" 1 "create_time" "desc")}
Thanks! Your order no.{$el.external_id} is confirmed.
Order total: {$el.total_price}
{else}
if empty array
{end}
Read more about market variables in this article. There you will find information about fields that can be used in the filter or inserted into the template.
Step 5. Set up a trigger campaign
Open the Campaigns section → Triggers. Create a new campaign. Don't forget to activate it.

Select the email channel and add the desired email template. On the Trigger tab specify:
Event type: when changing an order → adding an order. The trigger will be activated as soon as a new order is added to the market.
Sales channel: here specify the profile database with customer data of your online store.
Order status: new. The trigger will be activated if an order with the status «new» will be added to the market.
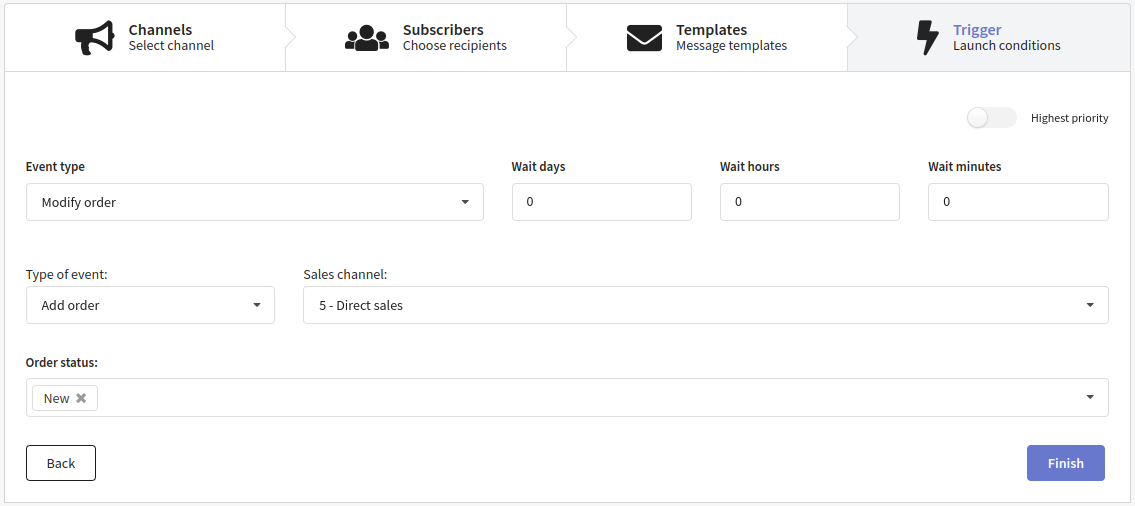
Click Finish and save the campaign.
To test how the trigger works, you can add an order manually.