Altcraft Docs LogoAltcraft Docs Logo
User guide iconUser guide
Developer guide iconDeveloper guide
Admin guide iconAdmin guide
English
  • Русский
  • English
Login
    User documentationGetting StartedFAQAltcraft glossary
      Profiles and databasesarrow
    • Subscription resourcesManaging databasesSubscriber profileProfiles import and data updateScheduled customer data importAutomatic data collectionBulk customers profiles updateDouble opt-in subscriptionSuppression listsProfile relationsProfile history exportProfile exportCreating a static segment based on import resultsHow to open a CSV fileMatchingTypes of fields in the databaseGlobal control groupsSubscription Manager
      Communication channelsarrow
      • Email channelarrow
      • Email: ISP interactions best practicesEmail: sending domain configurationEmail: setting up and using postmastersБыстрый старт
        Push channelarrow
        • Mobile Pusharrow
        • Settings & implementation
            Integrate your app with Altcraftarrow
          • Providers: push message structureProcessing and adding a subscriptionEvent registration
          Web pusharrow
        • Preliminary Settings
            Web browser push configurationarrow
          • Firebase Cloud messagingApple SafariMozilla Services
          Connecting Web Push to a WebsiteTransferring Data to the PlatformWeb Push SDK Methods
            Import of subscriptions from third-party push servicesarrow
          • Migrating push subscriptions from third-party servicesHow to transfer push subscriptions configured for Safari?Migration from OneSignal
      SMS channel
        Creating mailing from scratcharrow
      • EmailSMSWeb PushMobile PushWhatsAppViber*™Руководство: SMS-рассылка через VK NotifyMAX BotMAX GroupNotifyTelegram BotTelegram Group
      Communication Channels WorkflowРуководство: SMS-рассылка через УТШРуководство: push-рассылка через сервис от "Согласие"
      Segmentationarrow
    • Static SegmentsDynamic SegmentsUpdatable Segments
        Segmentation Conditionsarrow
      • Segmentation by Profile dataSegmentation by Interactions with EntitiesSegmentation by Activity of the channelSegmentation by external dataSegmentation by external SQL tablesSegmentation by Profile structure
      Best Send Time (BST)Logical operators "AND" and "OR"Recommendations for working with segments
      Message templatesarrow
      • Working with message templatesarrow
      • Working in the editorEmail-templateSMS templatePush templateMAX templateTelegram templateWhatsApp templateViber™ templateNotify template
        Visual editor for email-templatearrow
      • Visual editor interfaceAdding blocksElements and their settingsCustom blocksStyle managerLayer manager
      Template fragmentsImage galleryContent personalizationCreating tables based on array elementsBlock editor for email template
        Altcraft Variables and Functionsarrow
      • Logical expressions in messagesLoops in messagesMarket variables in templatesUsing the JSONPath functionality
        Dynamic content in messagesarrow
      • Dynamic HTML contentDynamic JSON contentContent from SQL database in templatesDynamic API content
      Importing and exporting a message templateImporting a template from a third-party serviceExporting a template from Pixcraft
      Mailingsarrow
    • Mailings calendarBroadcast mailingsRegular mailingTrigger mailingMultivariate testingMailing testingMailing schedulePlacement mailing
      Campaignsarrow
    • Working with CampaignsLocal control groups (LCG)Audience expansionAudience building
      Automation scenariosarrow
    • Managing scenariosNodes of the scenarioClassic marketing scenariosStep-by-step welcome scenario guideScenario for automatic notification of the managerAbandoned cart scenario
      Marketarrow
    • Market settings
        Productsarrow
      • How to create a product manuallyHow to import a product from a fileScheduled product importProduct and SKU SegmentsPreparing the YML file
      OrdersMarket variables in message templateGuide: how to send an order confirmation email
      Loyalty programsarrow
    • Loyalty programsLoyalty integration with external systemsБыстрый стартBasic loyalty program use casesOrder SegmentsPromotion codes
      Reports and analyticsarrow
    • Channel reportTraffic report
        Summary reportarrow
      • Summary report metrics
      Cohorts reportLifetime reportFunnels reportGoals reportAudience growth reportClick map reportLoyalty programs reportBounces reportUndeliveries reportReport on global control groups
      Integrationsarrow
      • Action hooksarrow
      • Altcraft Action HooksAction hooks event typesAction Hook Message StructureJSON batch request (HTTP POST action hook)Message to RabbitMQ brokerMessage to RabbitMQ exchangerMessage to Kafka brokerTest event
        Integration of third-party services using Albatoarrow
      • Connecting Altcraft to Albato Launching the welcome scenario using AlbatoTransmitting event dataSetting app a trigger mailingEvent registrationGoogle Sheets and Altcraft integration AmoCRM and Altcraft integration
      Facebook Ads Manager™Google Ads AudiencesMAXYandex.Audience™VK Ads™Static segment synchronizationYandex AppMetrica™Tilda™Lpgenerator™WhatsAppViber*™ integrationIntegration scopeData Transmitted During SynchronizationNotify
      Weblayersarrow
      • Formsarrow
      • Create a formForm constructorAppearanceActions after form activationData analyticsBinding data channel and formsConditional logic in forms and surveysNPS testing
        Pixelsarrow
      • Goal customer actions and scoring
        Pop-upsarrow
      • Creating and publishing a pop-upSetting up a popup in the code editorManaging pop-ups manually via scriptPopup analyticsGuide: pop-up for push subscriptionsCase: Creating a pop-up with the "Wheel of Fortune" widgetBasic cases of placing a popup via the Tag Manager
        Tag Managerarrow
      • Configuring and installing Tag ManagerTrigger typesVariables typesLinking a pixel and the Tag manager
      Settingsarrow
    • Account settingsCustom linksVirtual sendersSending policiesAudit journalTags FAQ
        Users, groups and accessarrow
      • Two-Factor Authentication (2FA)
        Connectionsarrow
      • Connection to Facebook Ads ManagerConnection to Google AdsConnecting to Yandex.Audience™Connection to 360dialogConnection to EdnaConnection to Devino TelecomConnection to SMSTrafficConnection to VK Ads™Connection to MTS OmniChannelCustom Authentication ConnectionOAuth2 connectionBasic Authentication connectionToken Authentication connectionConnection to RapportoMAX connectionConnection to Notify
      Attribute settings
      API requests: where to startarrow
    • Import or update a profileTrigger mailing launchEngage profile in scenario
      Changelogarrow
    • v2026.1.76v2025.4.75v2025.4.74v2025.3.73v2025.2.72v2025.1.71v2024.4.70v2024.3.69v2024.2.68.2v2024.1.68
    Documentation archivelibrary
  • Communication channels
  • Push channel
  • Web push
  • Connecting Web Push to a Website

Connecting Web Push to a Website

Downloading the Toolkit​

Once the necessary resource settings are filled in, you can save it and download the Toolkit, parts of which are then placed on your website. The Toolkit is a set of files designed to enable Web Push notifications on your site. It helps configure user subscriptions and send notifications via browsers.

info

The Toolkit itself does not trigger the subscription prompt; it only contains the necessary files and scripts for working with notifications. To show the subscription prompt to users, you need to add code to your website that calls the corresponding function from ak-push.js.

The Toolkit will appear in the Install section, replacing the warning message "Save the resource to download the toolkit":

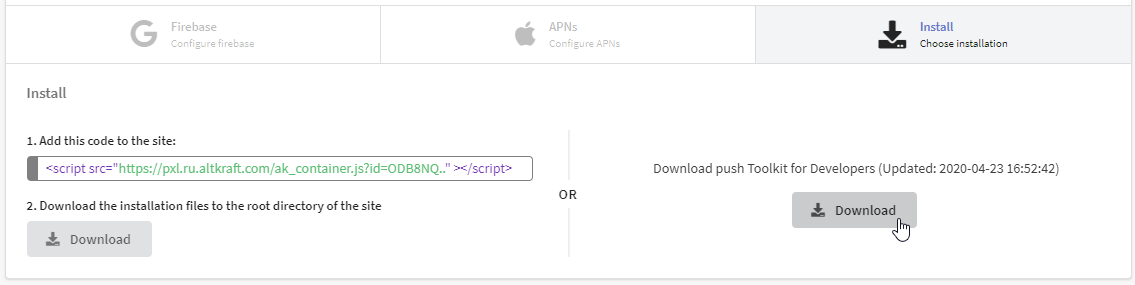
There are two ways to install the required files on your website:

  1. Adding code to the site and uploading installation files to the root directory of the site;
  2. Downloading the developer toolkit.

Method 1: Adding Code to the Site and Uploading Installation Files to the Root Directory​

The steps for this method are shown on the left side of the interface. Add the specified code to the website, then save and upload the installation files to the root directory of your site:

  • manifest.json — project data for sending push notifications via Google Chrome;
  • service-worker.js — a service worker that is registered in users' browsers and receives push messages.

The service-worker.js file is dynamic. It automatically updates each time you make changes to the resource settings.

Example service-worker.js
    
importScripts('https://pxl.test.com/service-worker.js?id=MXw3');

Method 2: Downloading the Developer Toolkit​

The steps for this method are shown on the right side of the interface. Click the "Download" button to download the Toolkit archive. Extract the archive and place the Toolkit files in the root directory of your site.

The Toolkit consists of four files:

  • README.txt — installation instructions for the Toolkit;
  • ak-push.js — a script that displays the subscription prompt to users;
  • manifest.json — project data for sending push notifications via Google Chrome;
  • service-worker.js — a service worker that is registered in users' browsers and receives push messages.

Here, the service-worker.js and ak-push.js files are static. When using this method, you must re-download the Toolkit and update the files on the site after making changes to the resource settings.

tip

When using the developer toolkit, you can change the path to the service-worker.js file. To do this, open the ak-push.js file, find the swPath property, and edit it to specify the correct path to the file.

Adding Scripts to the Website​

Once the Toolkit is uploaded to the site, add the code that will display the subscription prompt when needed.

Below is an example code snippet for a "Subscribe" button. This code initializes the library and starts the subscription process:

    
<button id="init_sub">Subscribe to notifications</button> // Subscription button

// ..Main part of the code..

<script>
document.getElementById('init_sub').addEventListener('click', function() { // On button click..
try {
const akPush = new AKPush();
akPush.initSubscription() // ..show the subscription form
}
catch (e) {
console.log(e); // ..or log the error to the browser console
}
});
</script>

tip

Through the Altcraft platform, you can create a custom popup prompting users to subscribe. Learn more in this article.

The code described above works as follows:

  • The user clicks the button;
  • The initSubscription method is called;
  • A browser system window pops up, asking the user to subscribe to notifications for this site.

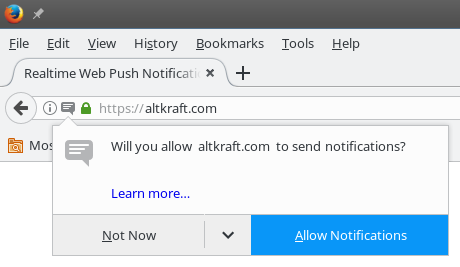
Users can customize the logic and decide how visitors will reach the system subscription window. The styles of the system browser window requesting push notification permissions cannot be changed.

Once everything is set up, users can visit the site and subscribe to push notifications. When confirmed, a Service Worker is installed in the client's browser, allowing messages to be displayed even when the browser window is minimized.

Note that a subscription to the same resource will be created separately for each browser (or account) the user operates. The identifier for the subscription is the browser token or account token. This means that a single profile may have multiple active push subscriptions if the user subscribed from different browsers.

When subscribing to notifications, the script can also transmit additional user data or register event information. Learn more about configuring this in this article.

Last updated on Jan 24, 2025
Previous
Mozilla Services
Next
Transferring Data to the Platform
  • Downloading the Toolkit
    • Method 1: Adding Code to the Site and Uploading Installation Files to the Root Directory
    • Method 2: Downloading the Developer Toolkit
  • Adding Scripts to the Website
© 2015 - 2026 Altcraft, LLC. All rights reserved.