Keycloak Integration with Altcraft
Access to Altcraft can be provided via the Keycloak centralized authentication system. This allows using a single user and access management service to sign in to the platform, with groups and roles assigned according to the configuration in Keycloak.
Keycloak supports modern authentication and authorization protocols (OpenID Connect, OAuth 2.0, SAML) and provides centralized management of user accounts, groups, and access permissions.
Keycloak Installation
Install Keycloak. For a quick start, you can use the official Docker image.
Option 1. Running a container
docker run -p 8080:8080 \
  -e KC_BOOTSTRAP_ADMIN_USERNAME=admin \
  -e KC_BOOTSTRAP_ADMIN_PASSWORD=admin \
  -v keycloak_data:/opt/keycloak/data \
  quay.io/keycloak/keycloak:26.0.6 start-dev
Option 2. Creating a container
docker create --name keycloak \
  -p 8080:8080 \
  -e KC_BOOTSTRAP_ADMIN_USERNAME=admin \
  -e KC_BOOTSTRAP_ADMIN_PASSWORD=admin \
  -e KC_LOG_LEVEL=DEBUG \
  -e KC_LOG_LEVEL_ORG_KEYCLOAK_PROTOCOL_OIDC=TRACE \
  -v keycloak_data:/opt/keycloak/data \
  quay.io/keycloak/keycloak:26.0.6 start-dev
The Keycloak administrative console is available at the following addresses:
http://localhost:8080 (locally)
http://10.200.0.100:8080 (via VM IP address)
Realm Configuration
Create a new realm named oauth_app
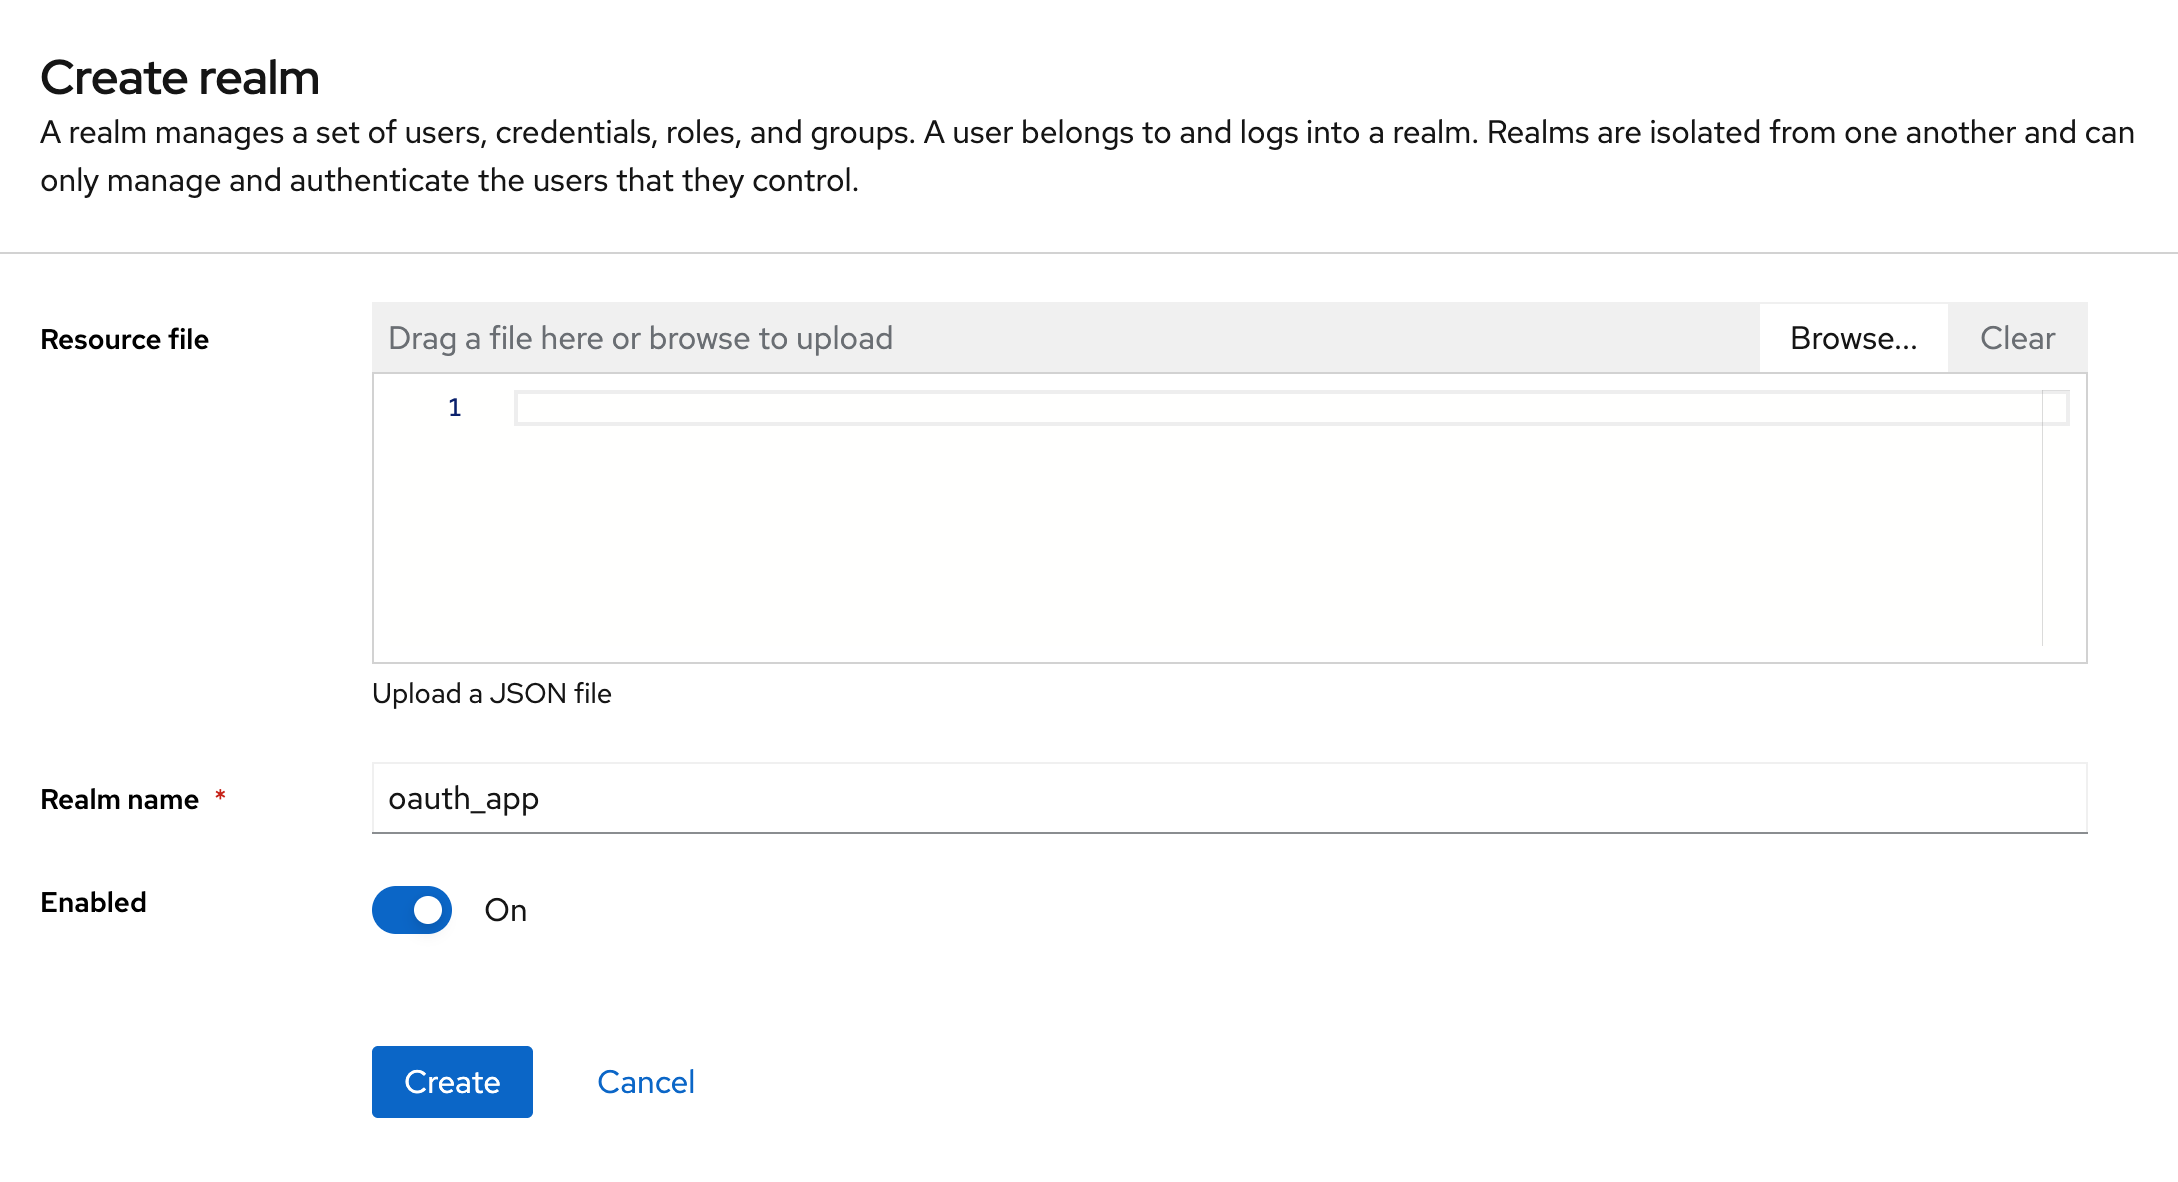
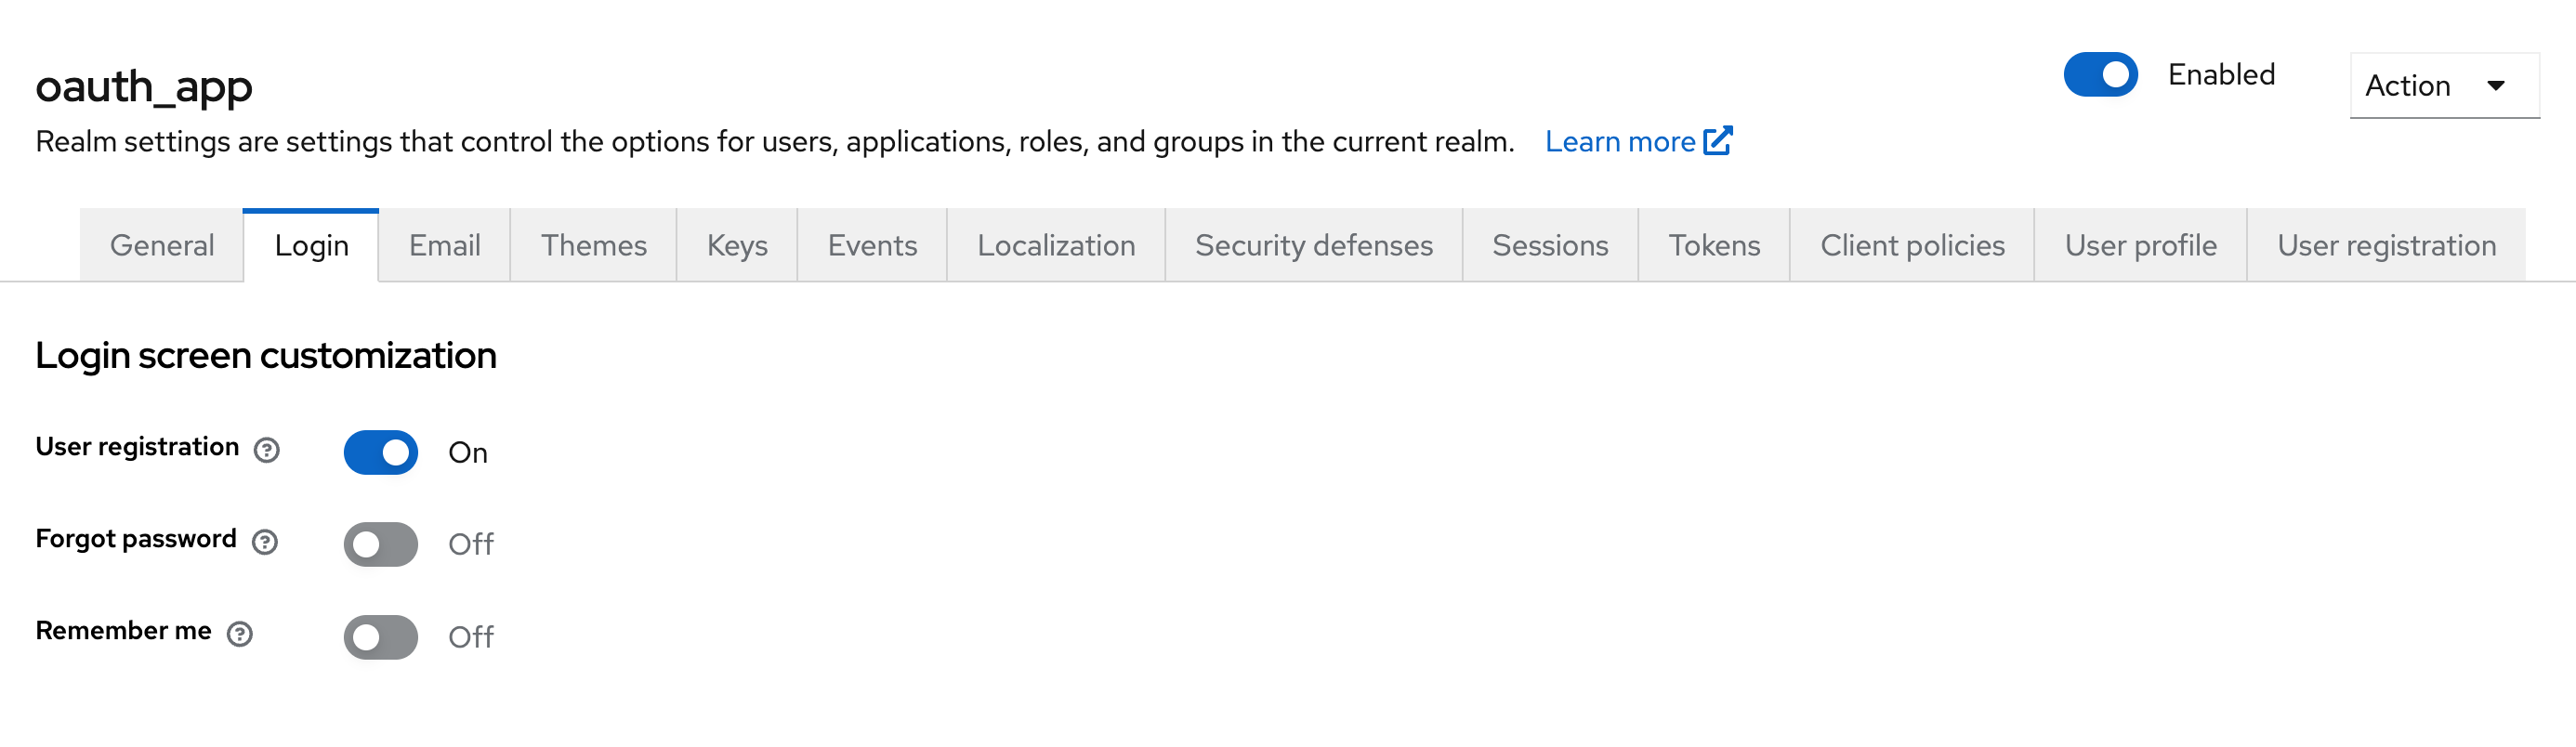
For isolated testing, enable user registration. In Realm Settings → Login, enable the User Registration parameter to allow user self-registration.
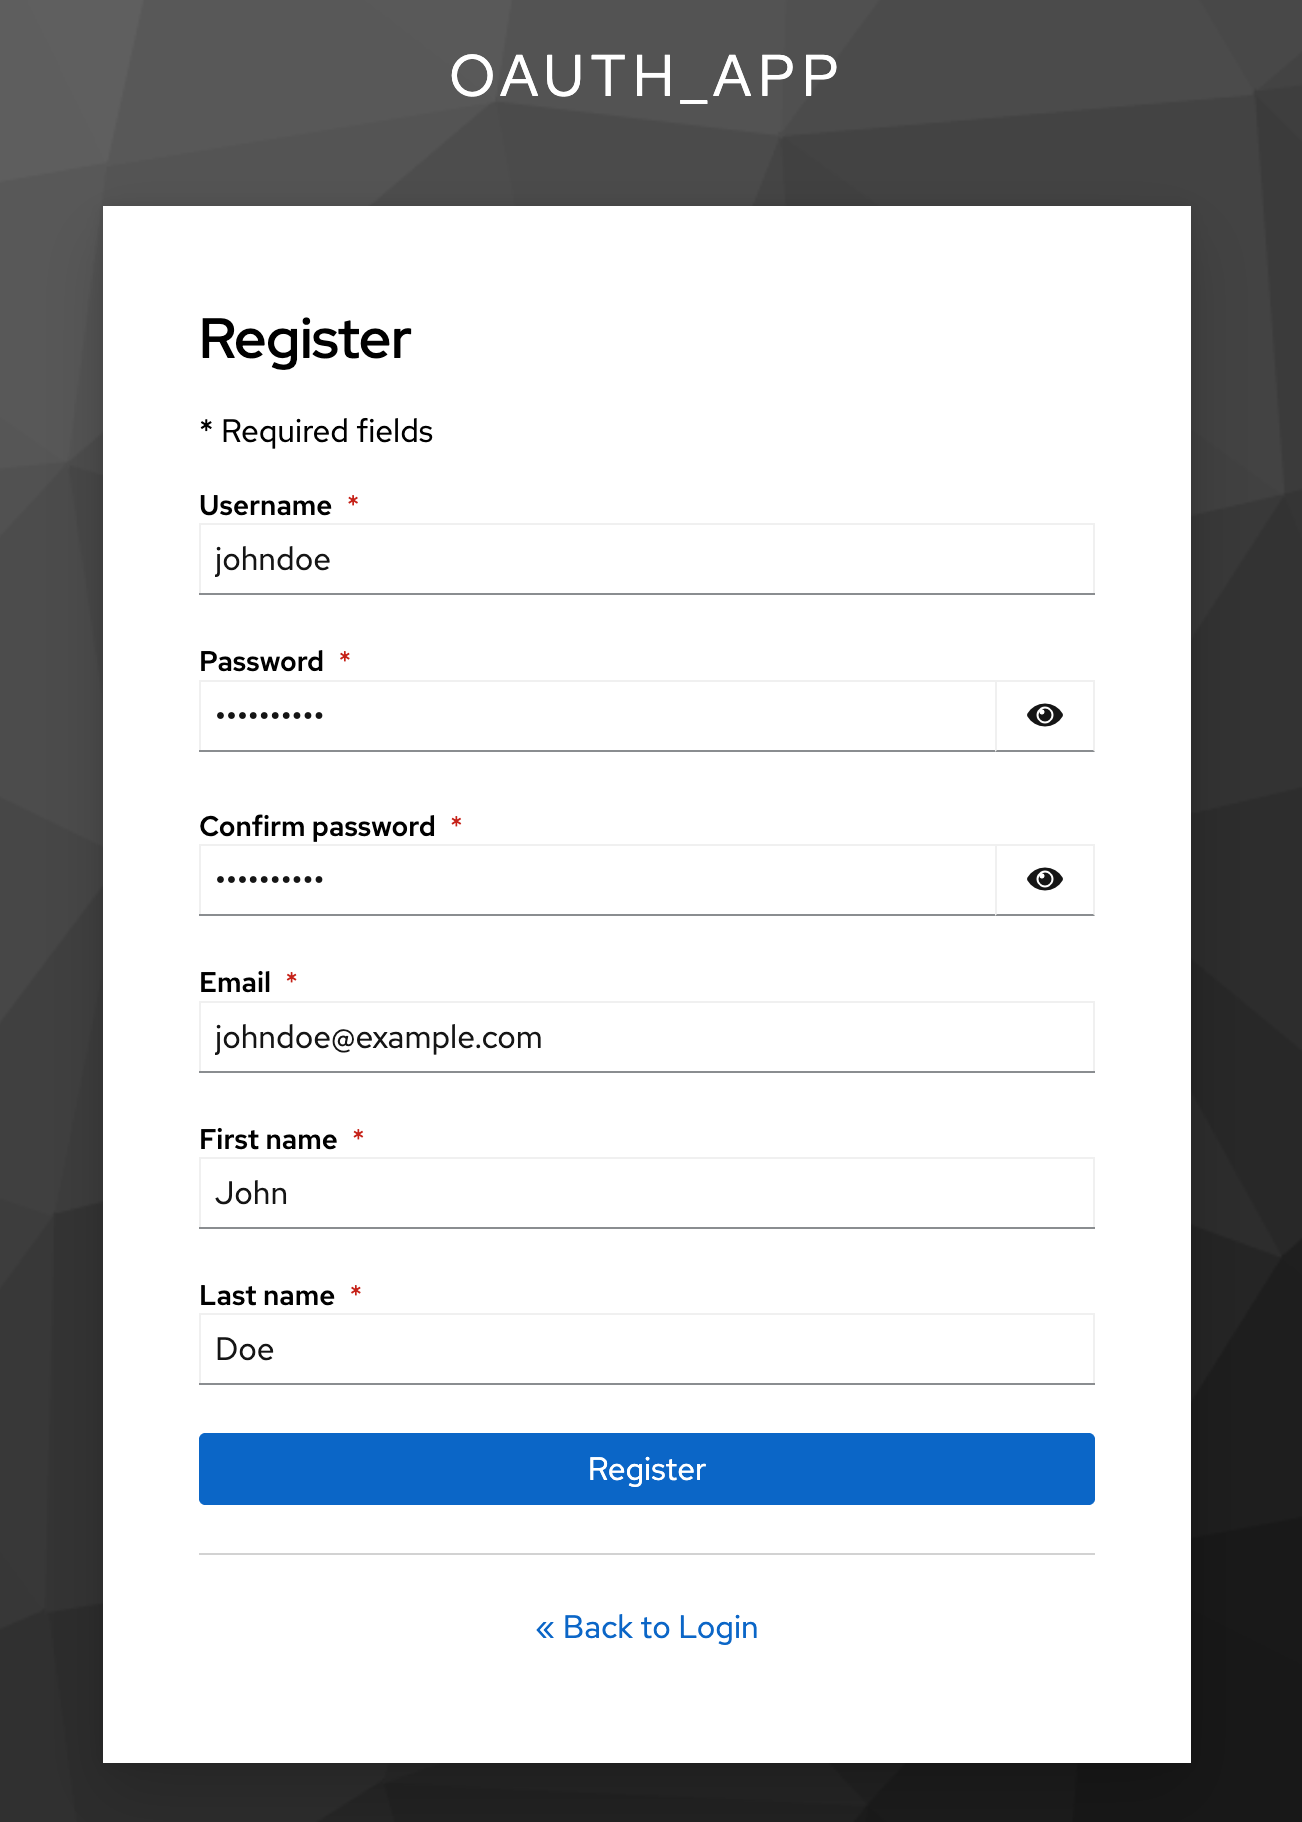
Create a user via the realm account page: http://localhost:8080/realms/oauth_app/account
Client Configuration
Altcraft uses two separate clients:
altcraft_admin — administrator panel
altcraft_platform — platform
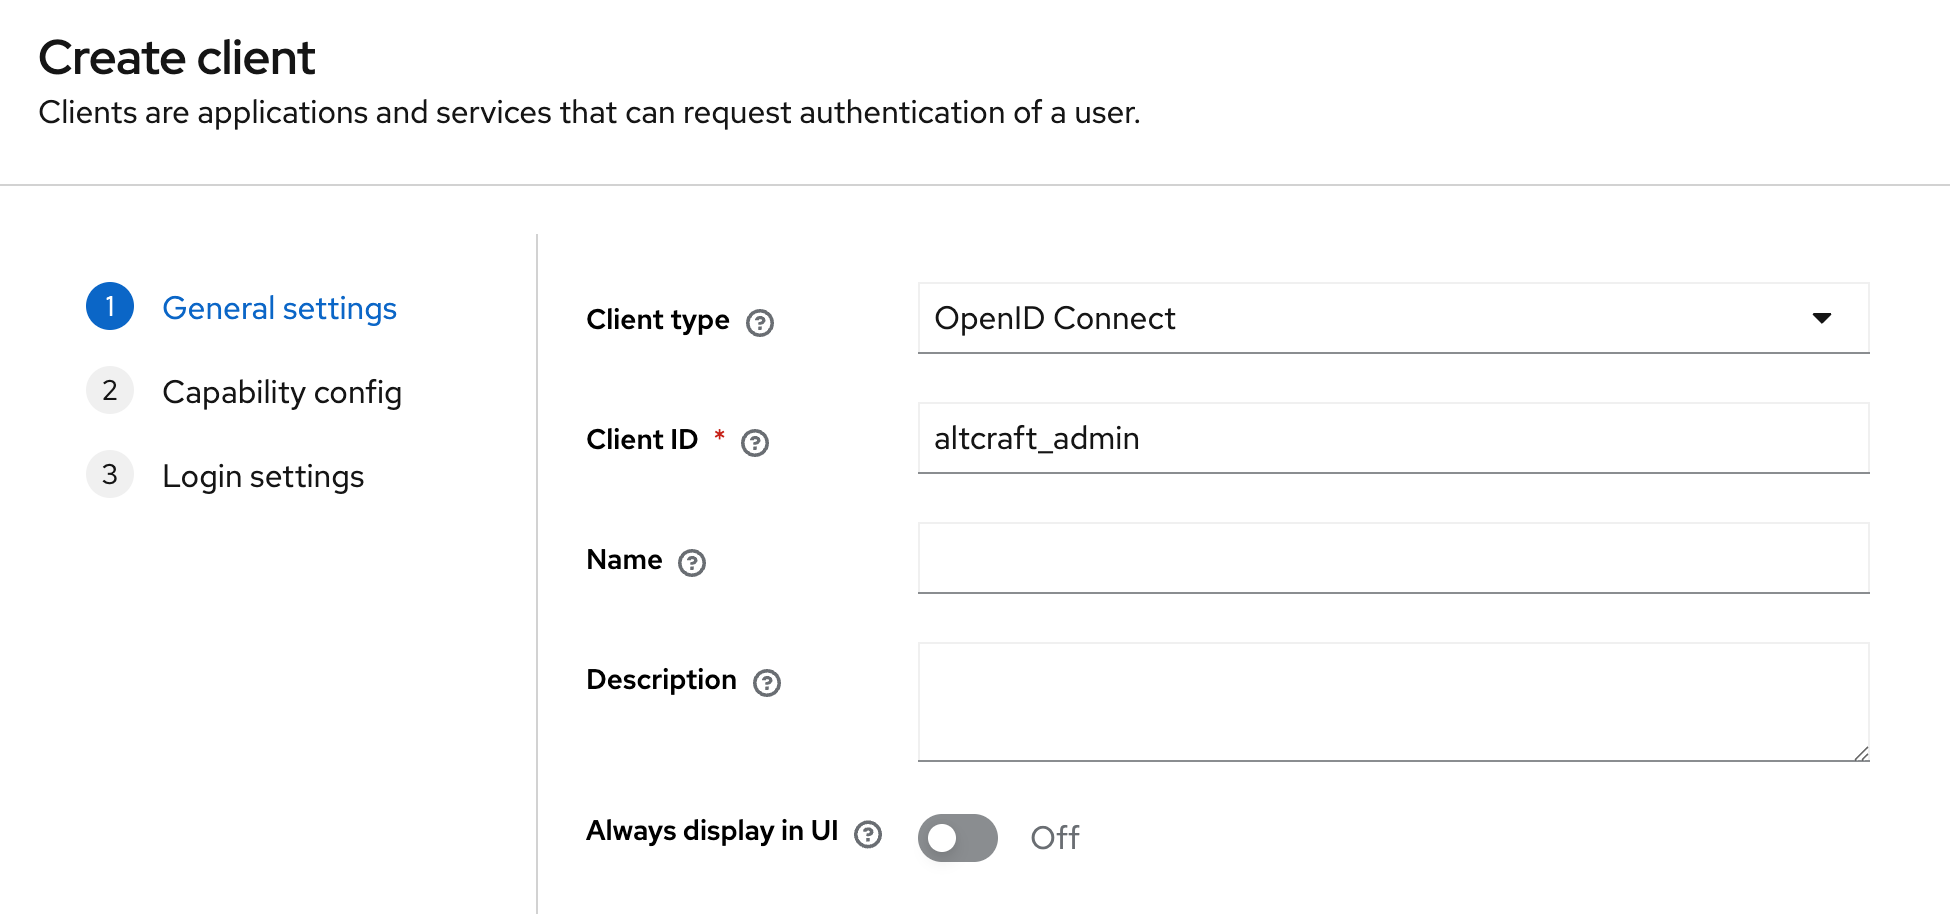
Create a client with the following parameters:
-
Client ID:
altcraft_adminoraltcraft_platform -
Client Protocol:
openid-connect
- Enable the
Client authenticationparameter:
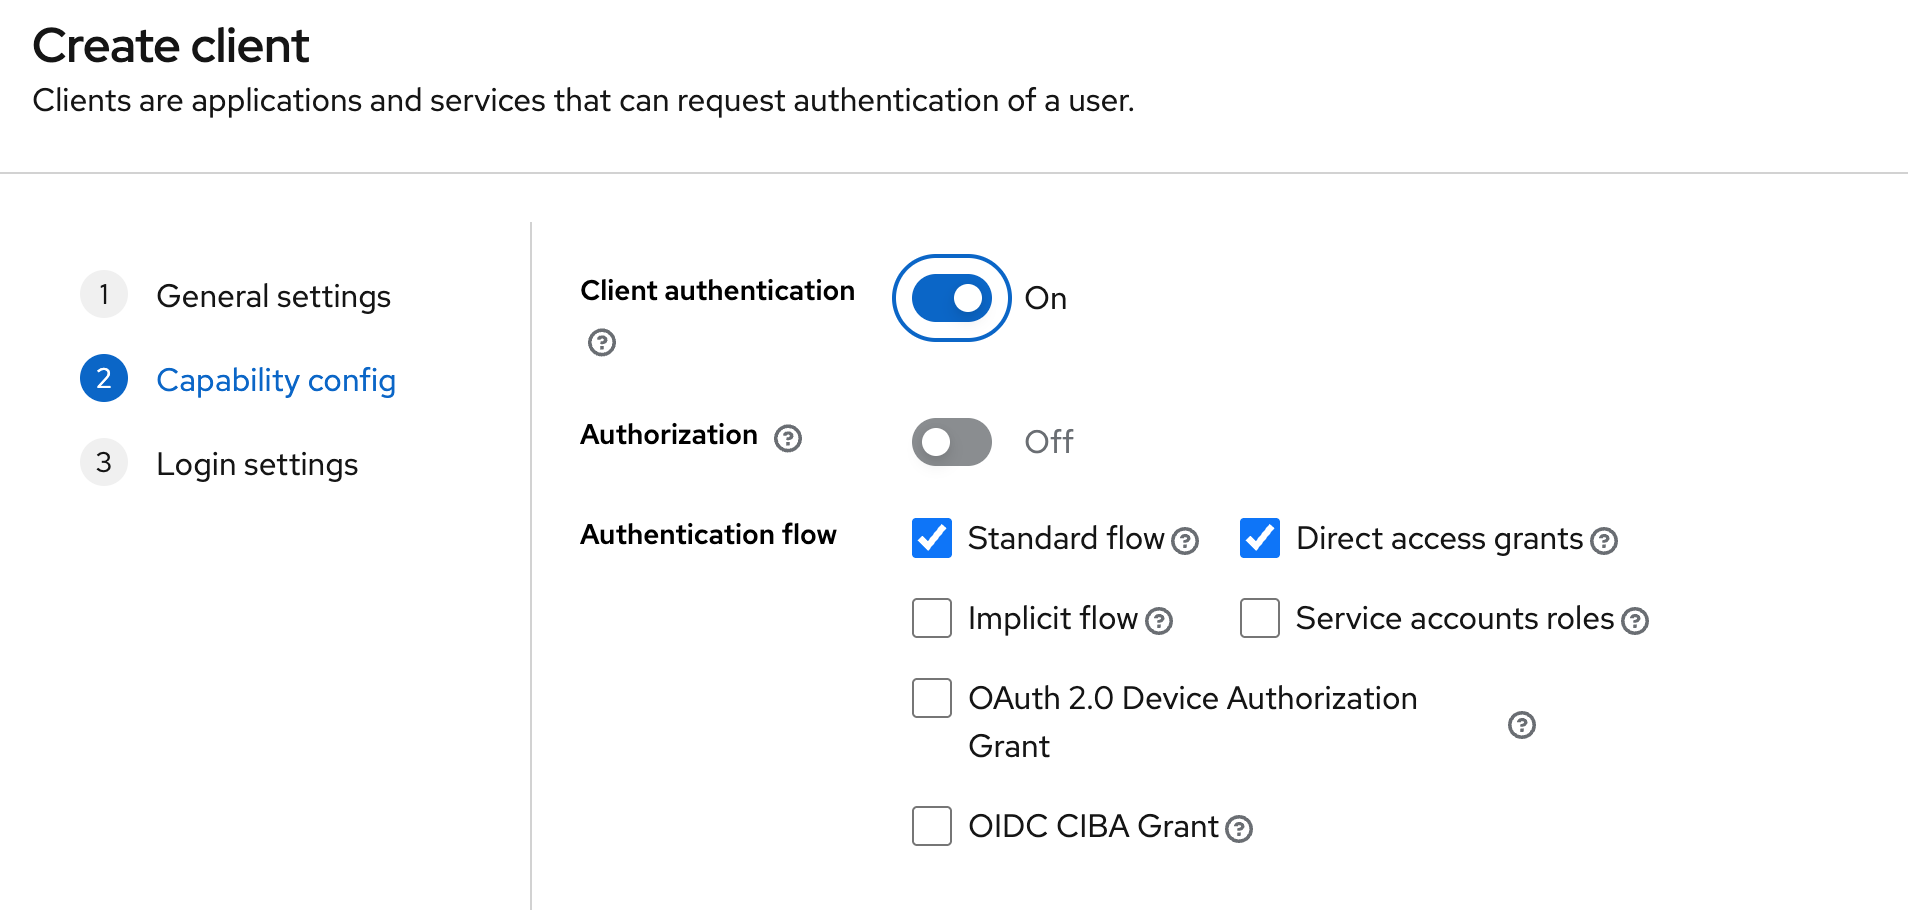
Configure the dependent fields accordingly (for the platform client, use the platform domain).
Roles and Groups
The following role types are available in Keycloak:
-
Realm Roles — global roles within the realm
-
Client Roles — roles associated with a specific client (not used in the current integration)
-
Composite Roles — roles that include other roles (not used in the current integration)
-
Default Roles — roles automatically assigned to new users
Assign roles to a user:
Option 1. Using Realm Roles
-
Create a role in the Realm Roles section.
-
Open the user.
-
In the Role mapping section, select Realm roles in the Filter by clients parameter and assign the required role to the user.
Option 2. Using Groups
-
Create a group.
-
Assign a Realm Role to the group.
-
Add the user to the group.
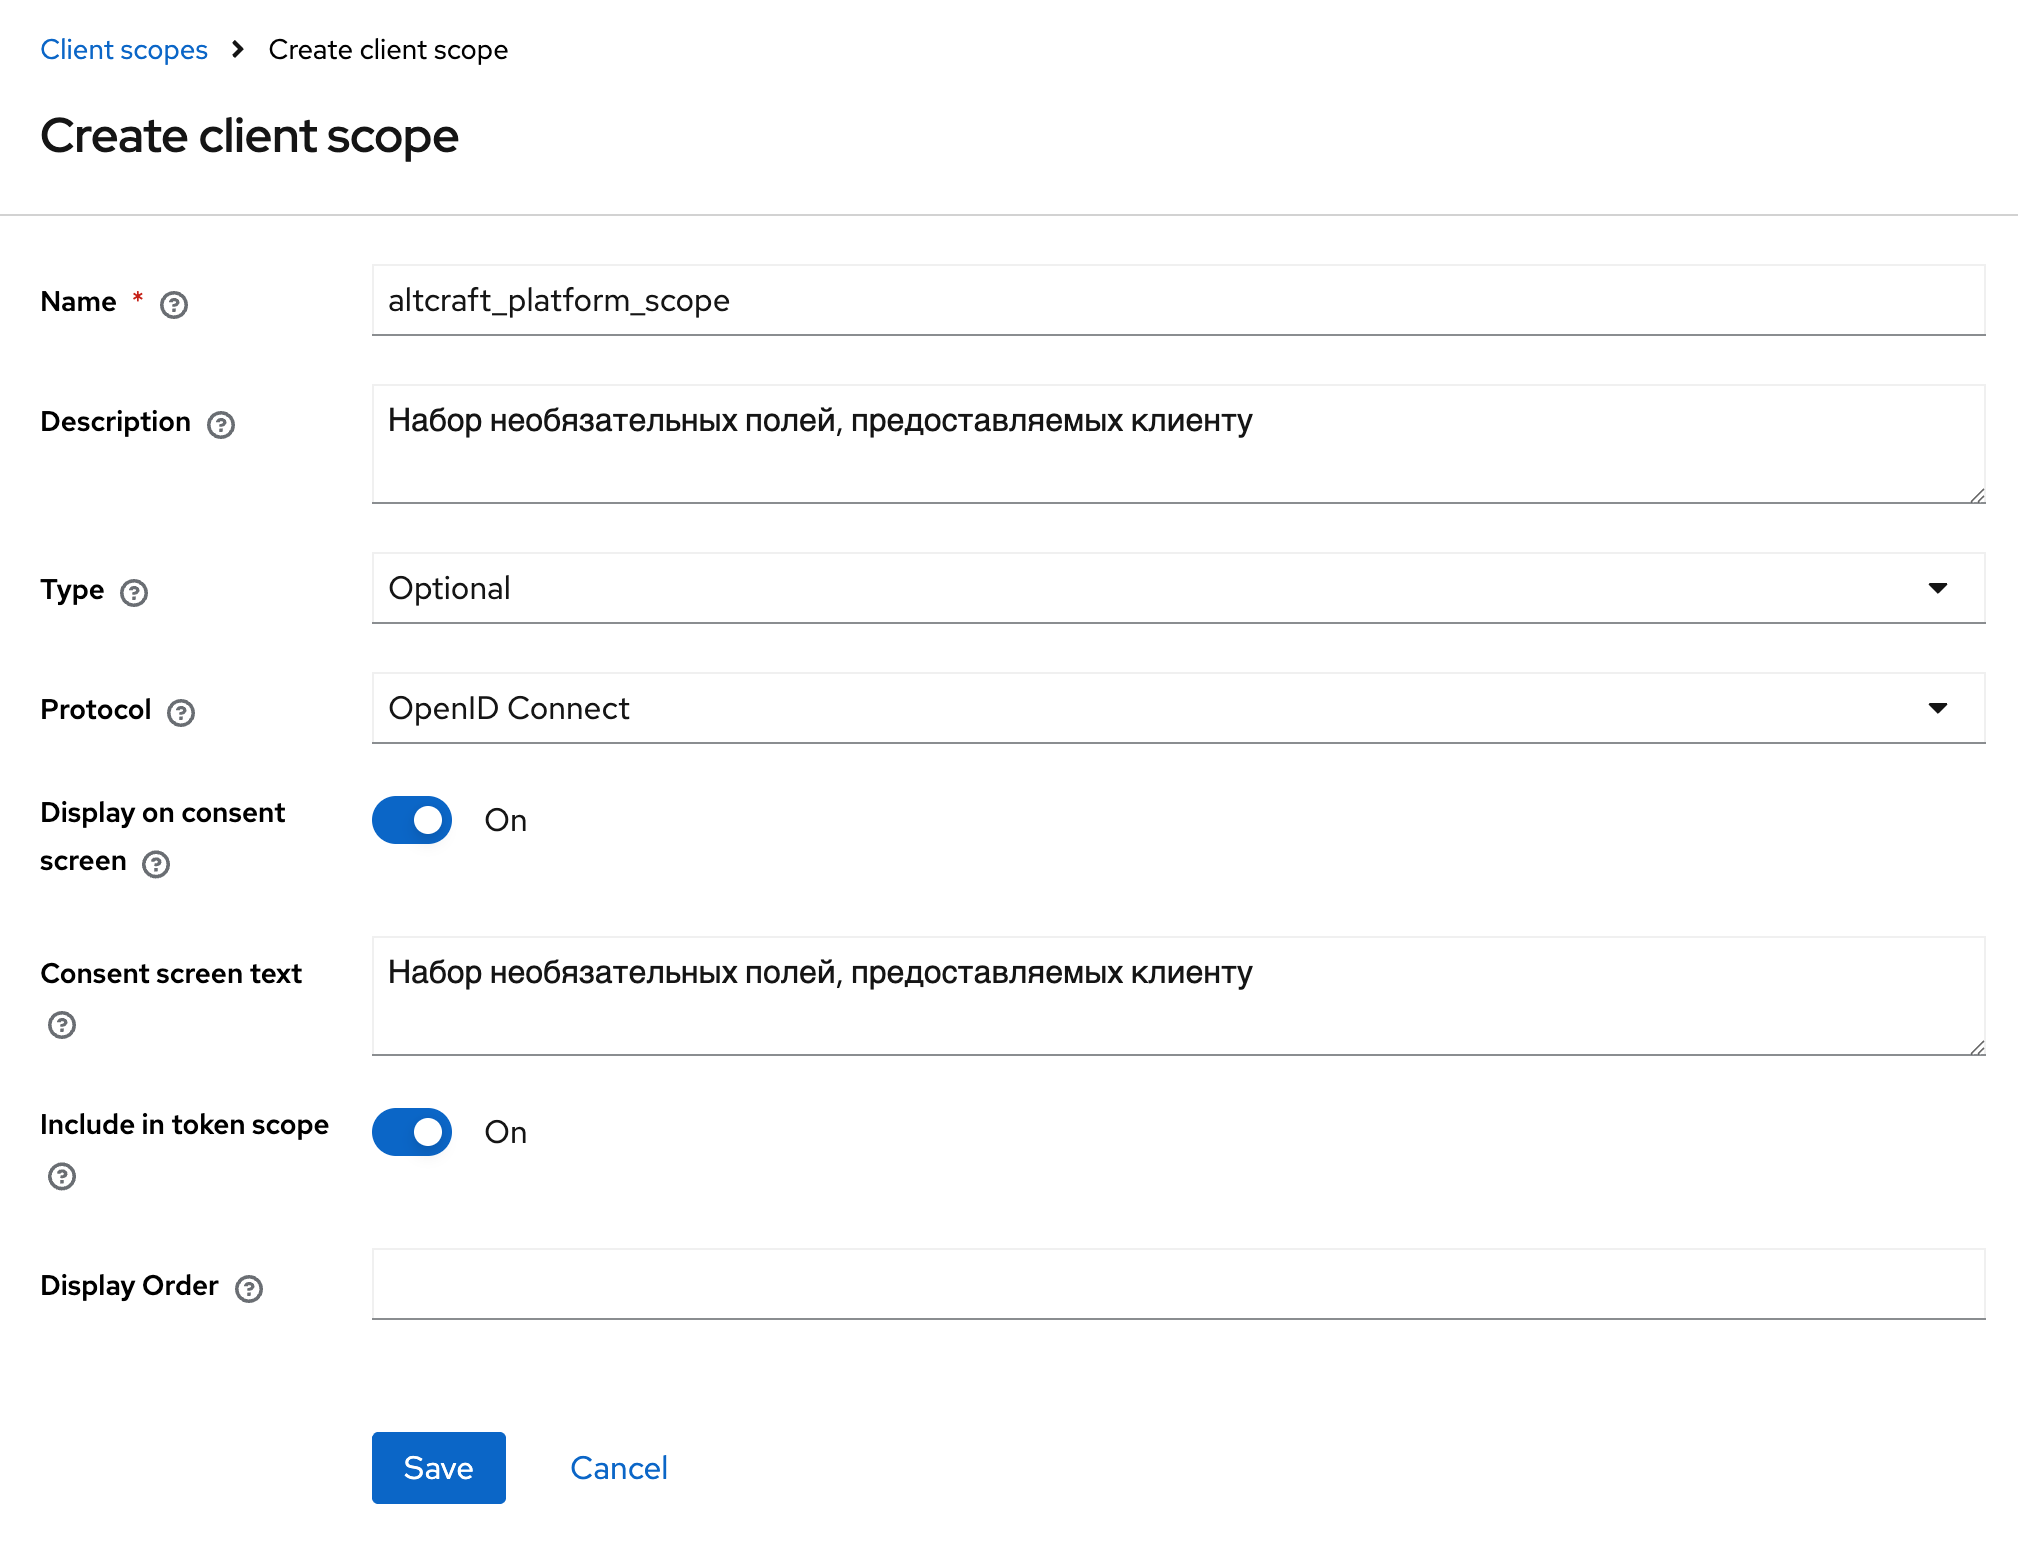
Client Scopes
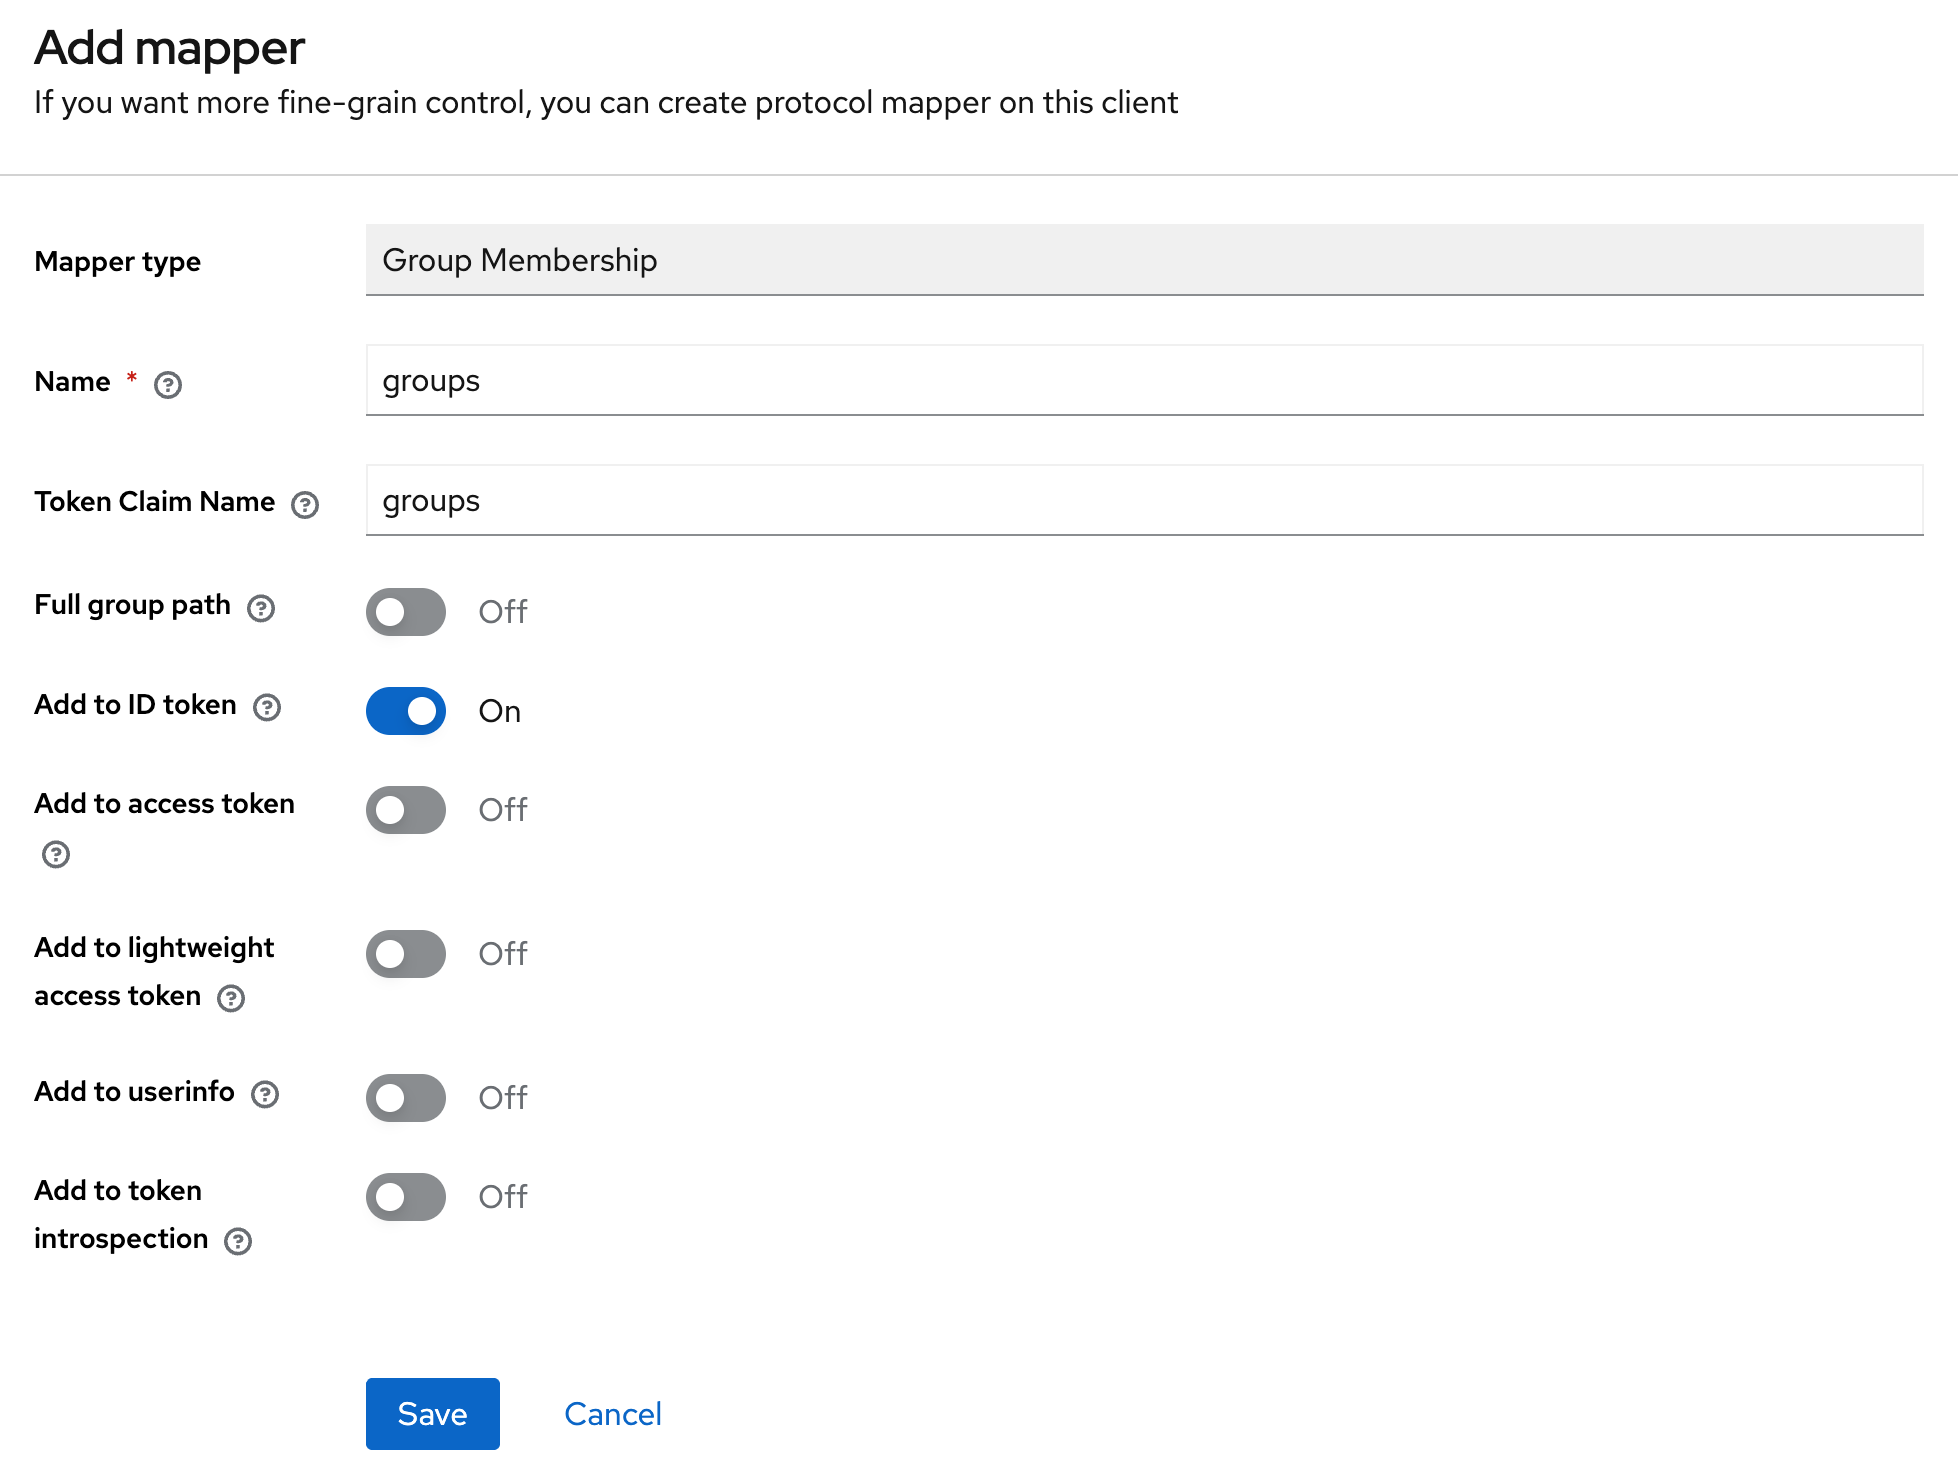
Altcraft requires the groups parameter to be present in the token. This parameter is used to determine whether a user has access to the platform or the administrator panel.
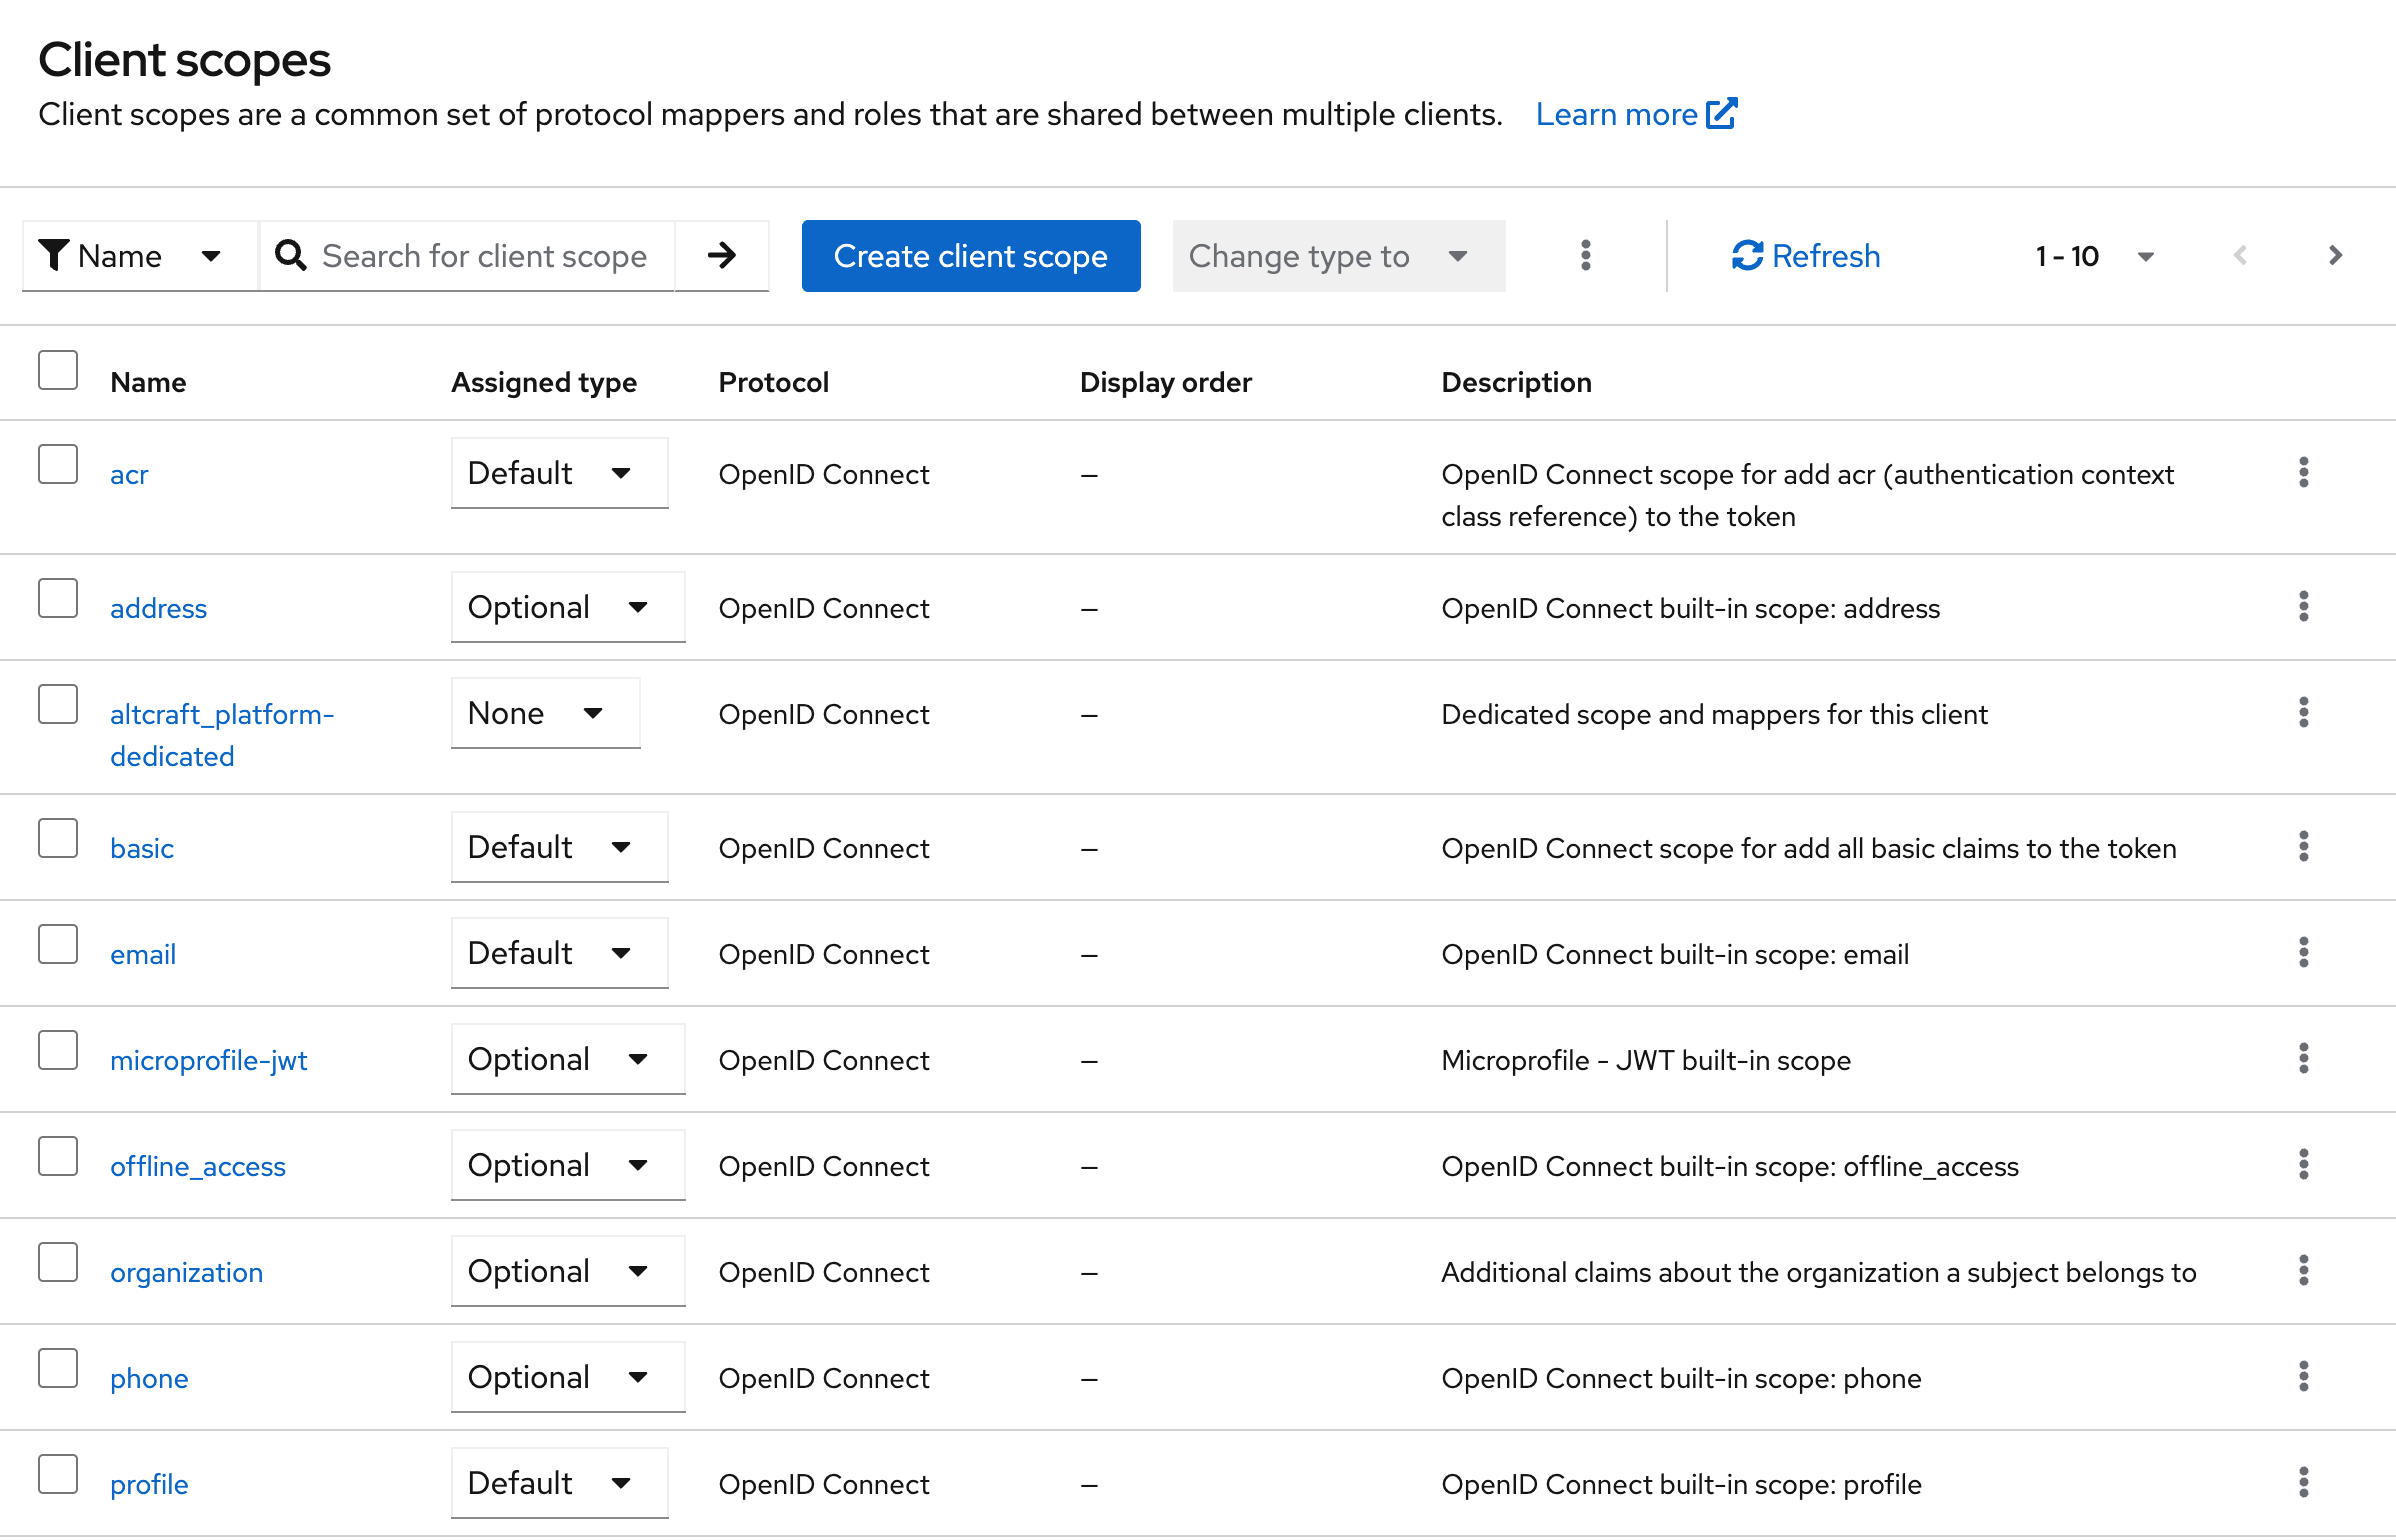
To add this parameter to the token, it is recommended to use the predefined dedicated client scope (<client-name>-dedicated) by adding a mapper that passes the user’s groups.
User Attributes
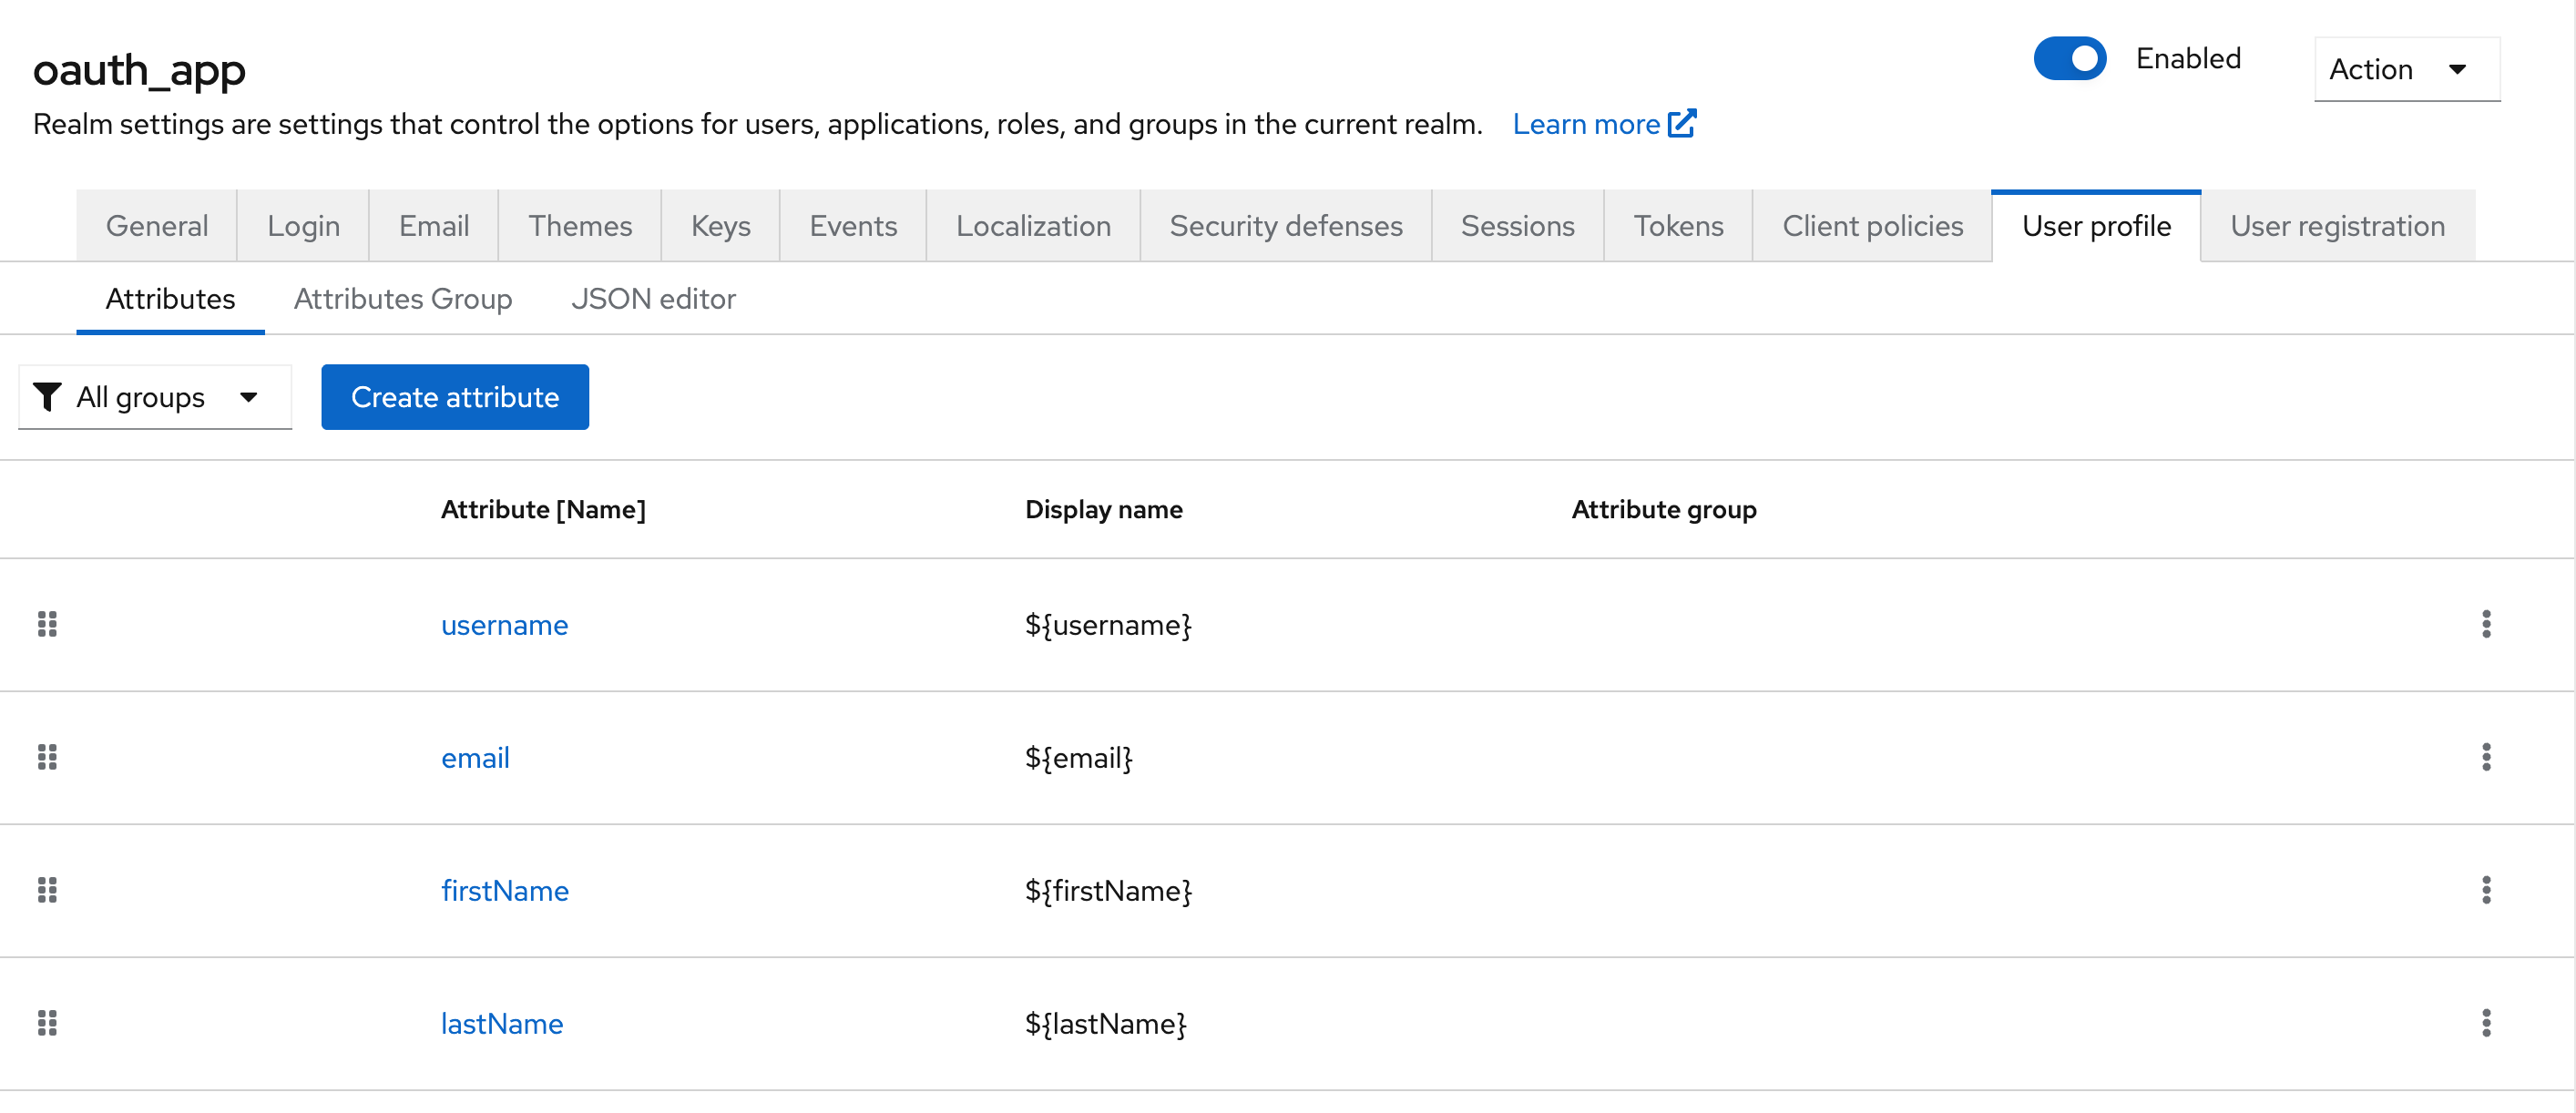
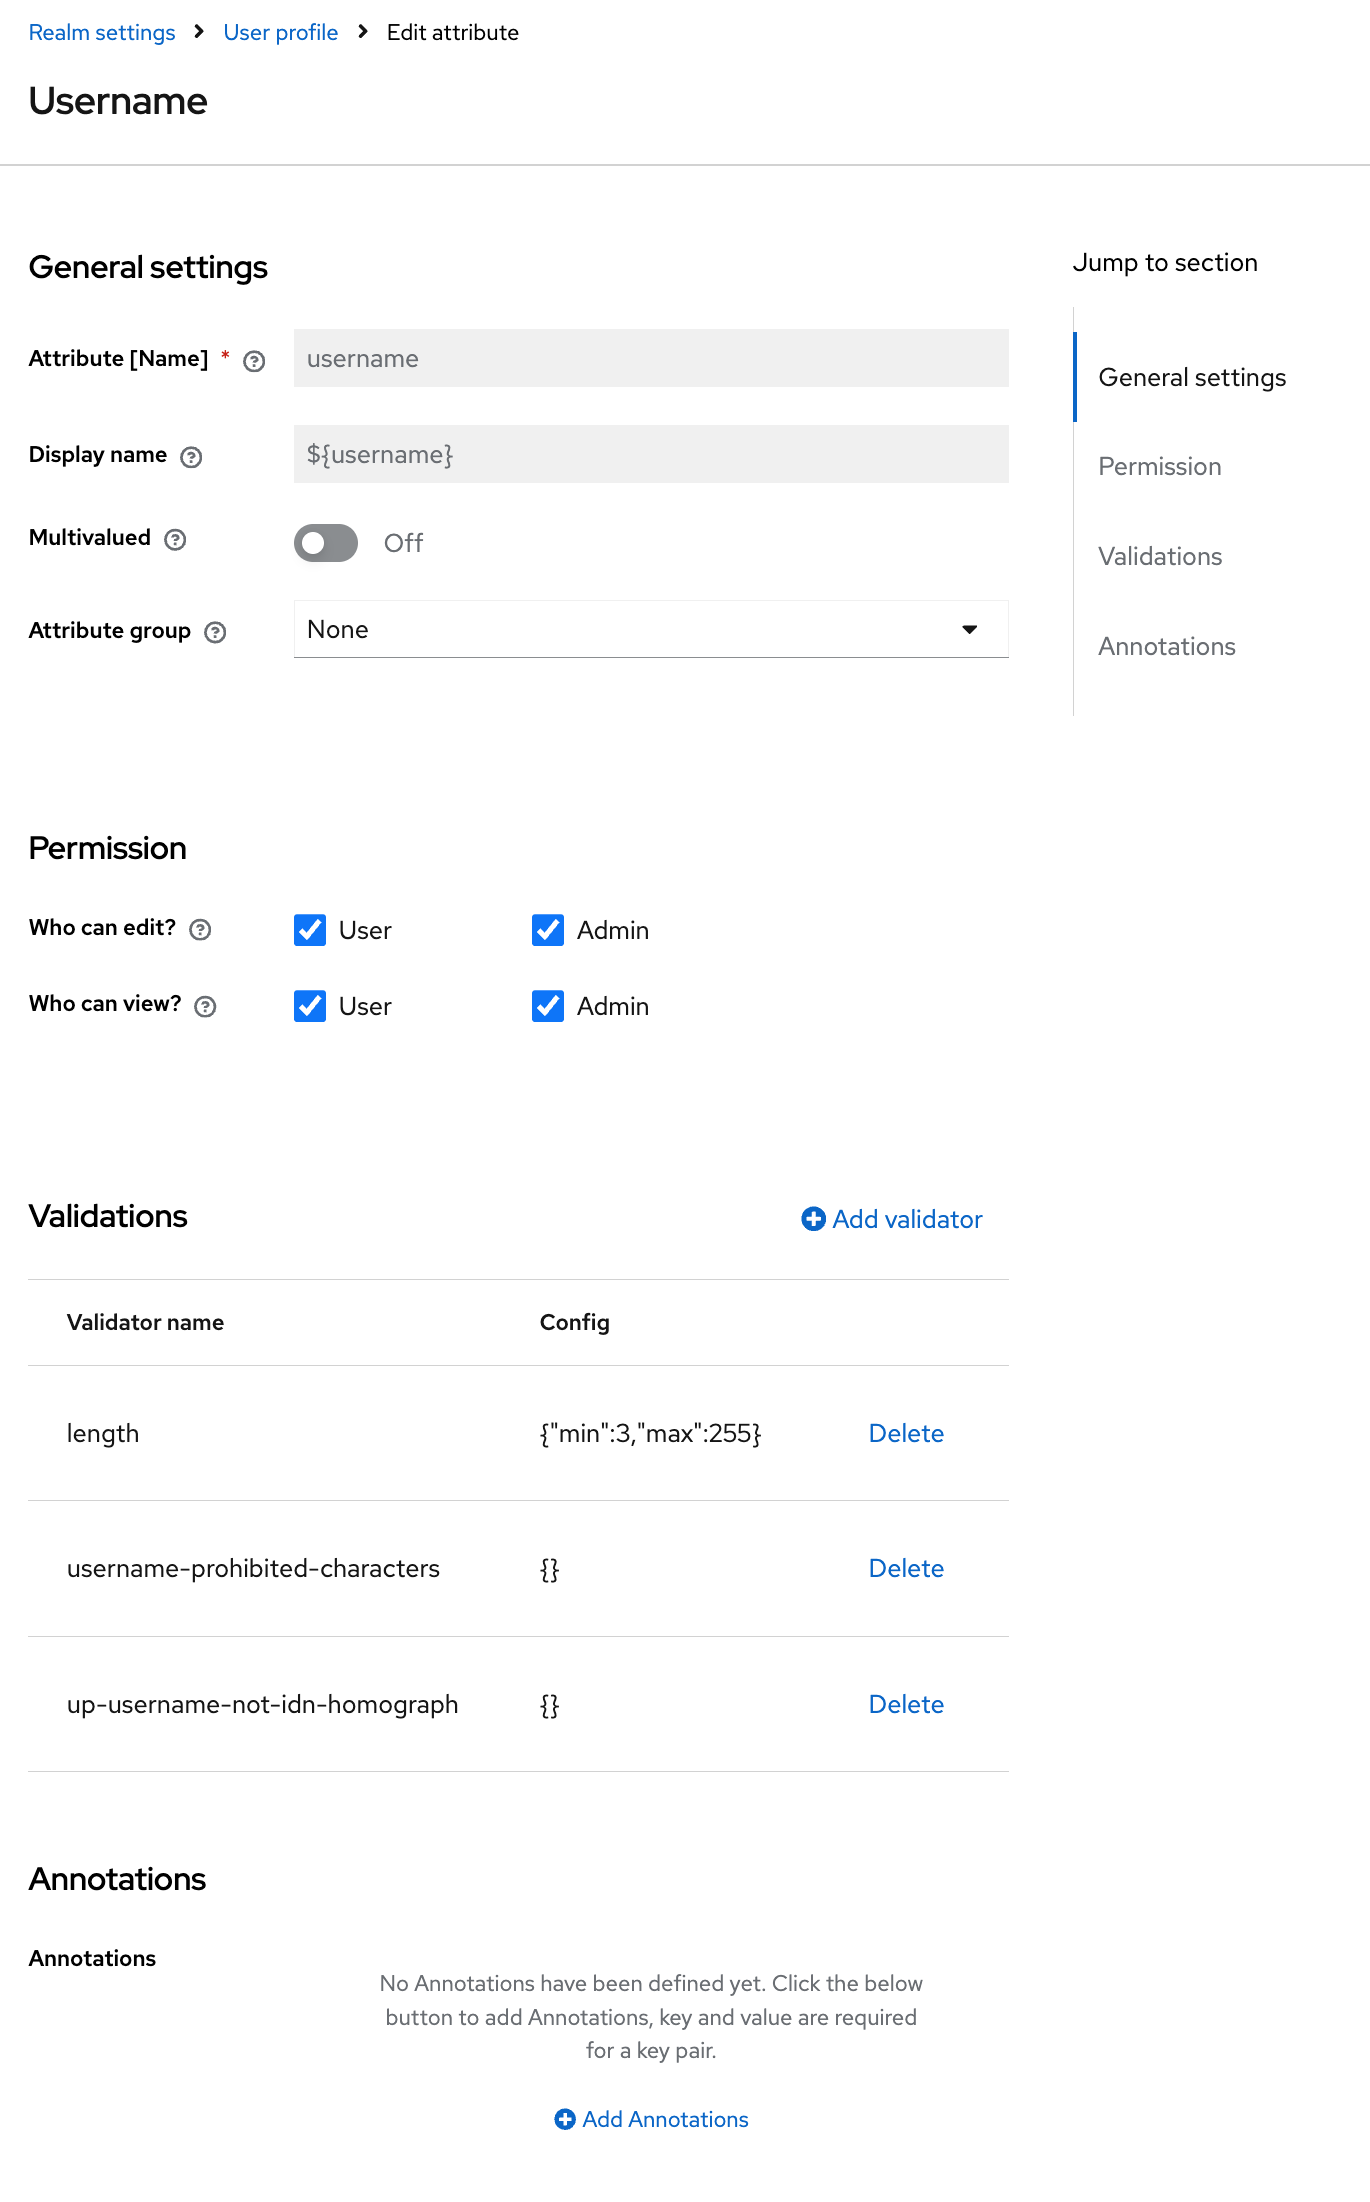
An attribute is created (or imported) at the realm level: Realm Settings → User profile → Attributes
-
Attribute (Name) — the technical name of the attribute. Used in code, tokens, and APIs. Must be unique within the realm;
-
Display name — the human-readable name of the attribute (optional);
-
Multivalued — enables support for multiple values;
-
Attribute group — the group used to display the attribute in the UI (for example, Contact, Personal Info);
-
Who can edit / Who can view — defines which user categories are allowed to view and modify the attribute value;
-
Validations — a set of rules for validating the attribute value when saving data;
-
Annotations — arbitrary metadata.
After creating a user attribute, it must be added to a client scope so that its value is included in the token. To do this, in the Client Scopes section, select an existing scope used by the client and enable the Include in token scope parameter.
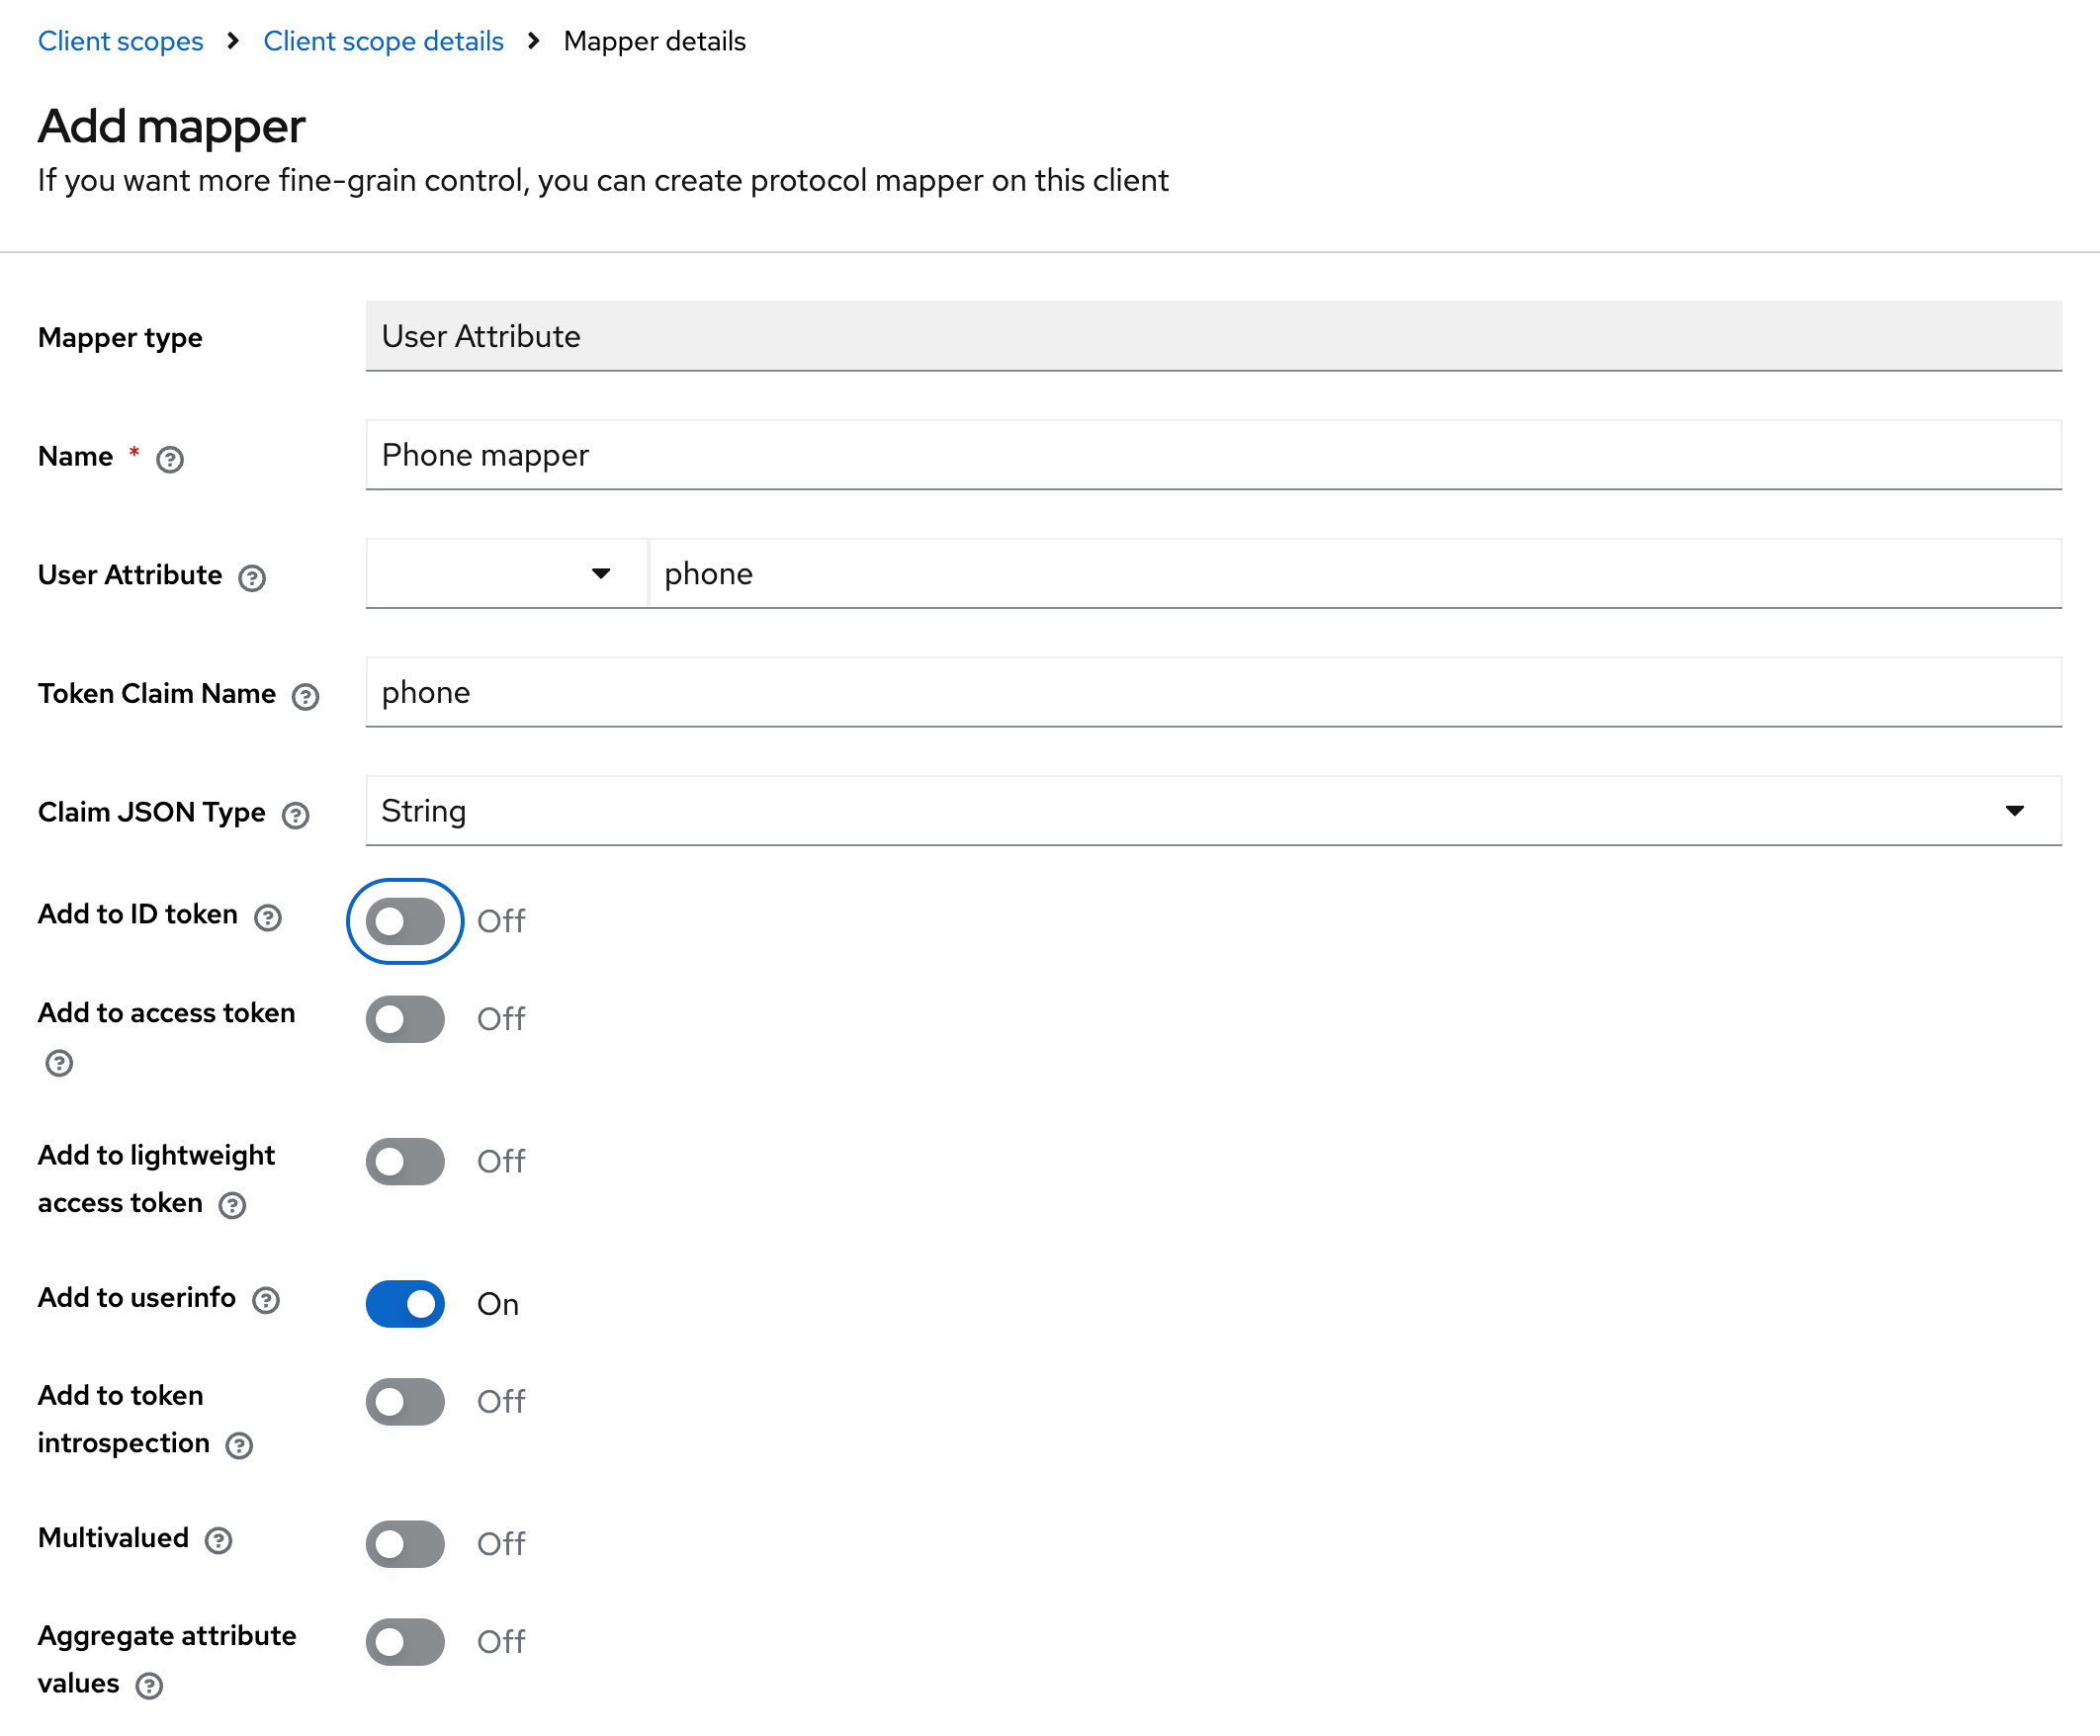
To pass the attribute value into the token, add a mapper with the following parameters:
-
Mapper type: User Attribute — maps a custom user attribute into tokens;
-
Name — a unique mapper name in the configuration;
-
User Attribute — the attribute key from the user profile (for example, "phone", "department");
-
Token Claim Name — the name of the claim in the JWT token where the attribute value will be placed;
-
Claim JSON Type — the data type of the value in the token (String, int, boolean, JSON);
-
Add to ID token: On — include the attribute in the ID token (for client applications);
-
Add to access token: On — include the attribute in the access token (for backend APIs);
-
Add to userinfo: On — include the attribute in the /userinfo endpoint response;
-
Add to token introspection: On — include the attribute in the token introspection response;
-
Multivalued: Off — the attribute contains a single value, not an array;
-
Aggregate attribute values: Off — do not aggregate values from multiple sources.
Configuring Keycloak Access in the Administrator Panel
Configuring access via Keycloak in Altcraft is performed similarly to configuring access via LDAP and is done from the administrator panel.
To configure access, log in to the Altcraft Administrator Panel and navigate to Account Area → Auth Connectors. In this section, create a new authentication connector with the Keycloak type.
When creating the connector, specify the following parameters: connector name, Keycloak host and port, realm name, client identifier (Client ID), and Client Secret. These values must match the settings of the client previously created in Keycloak.
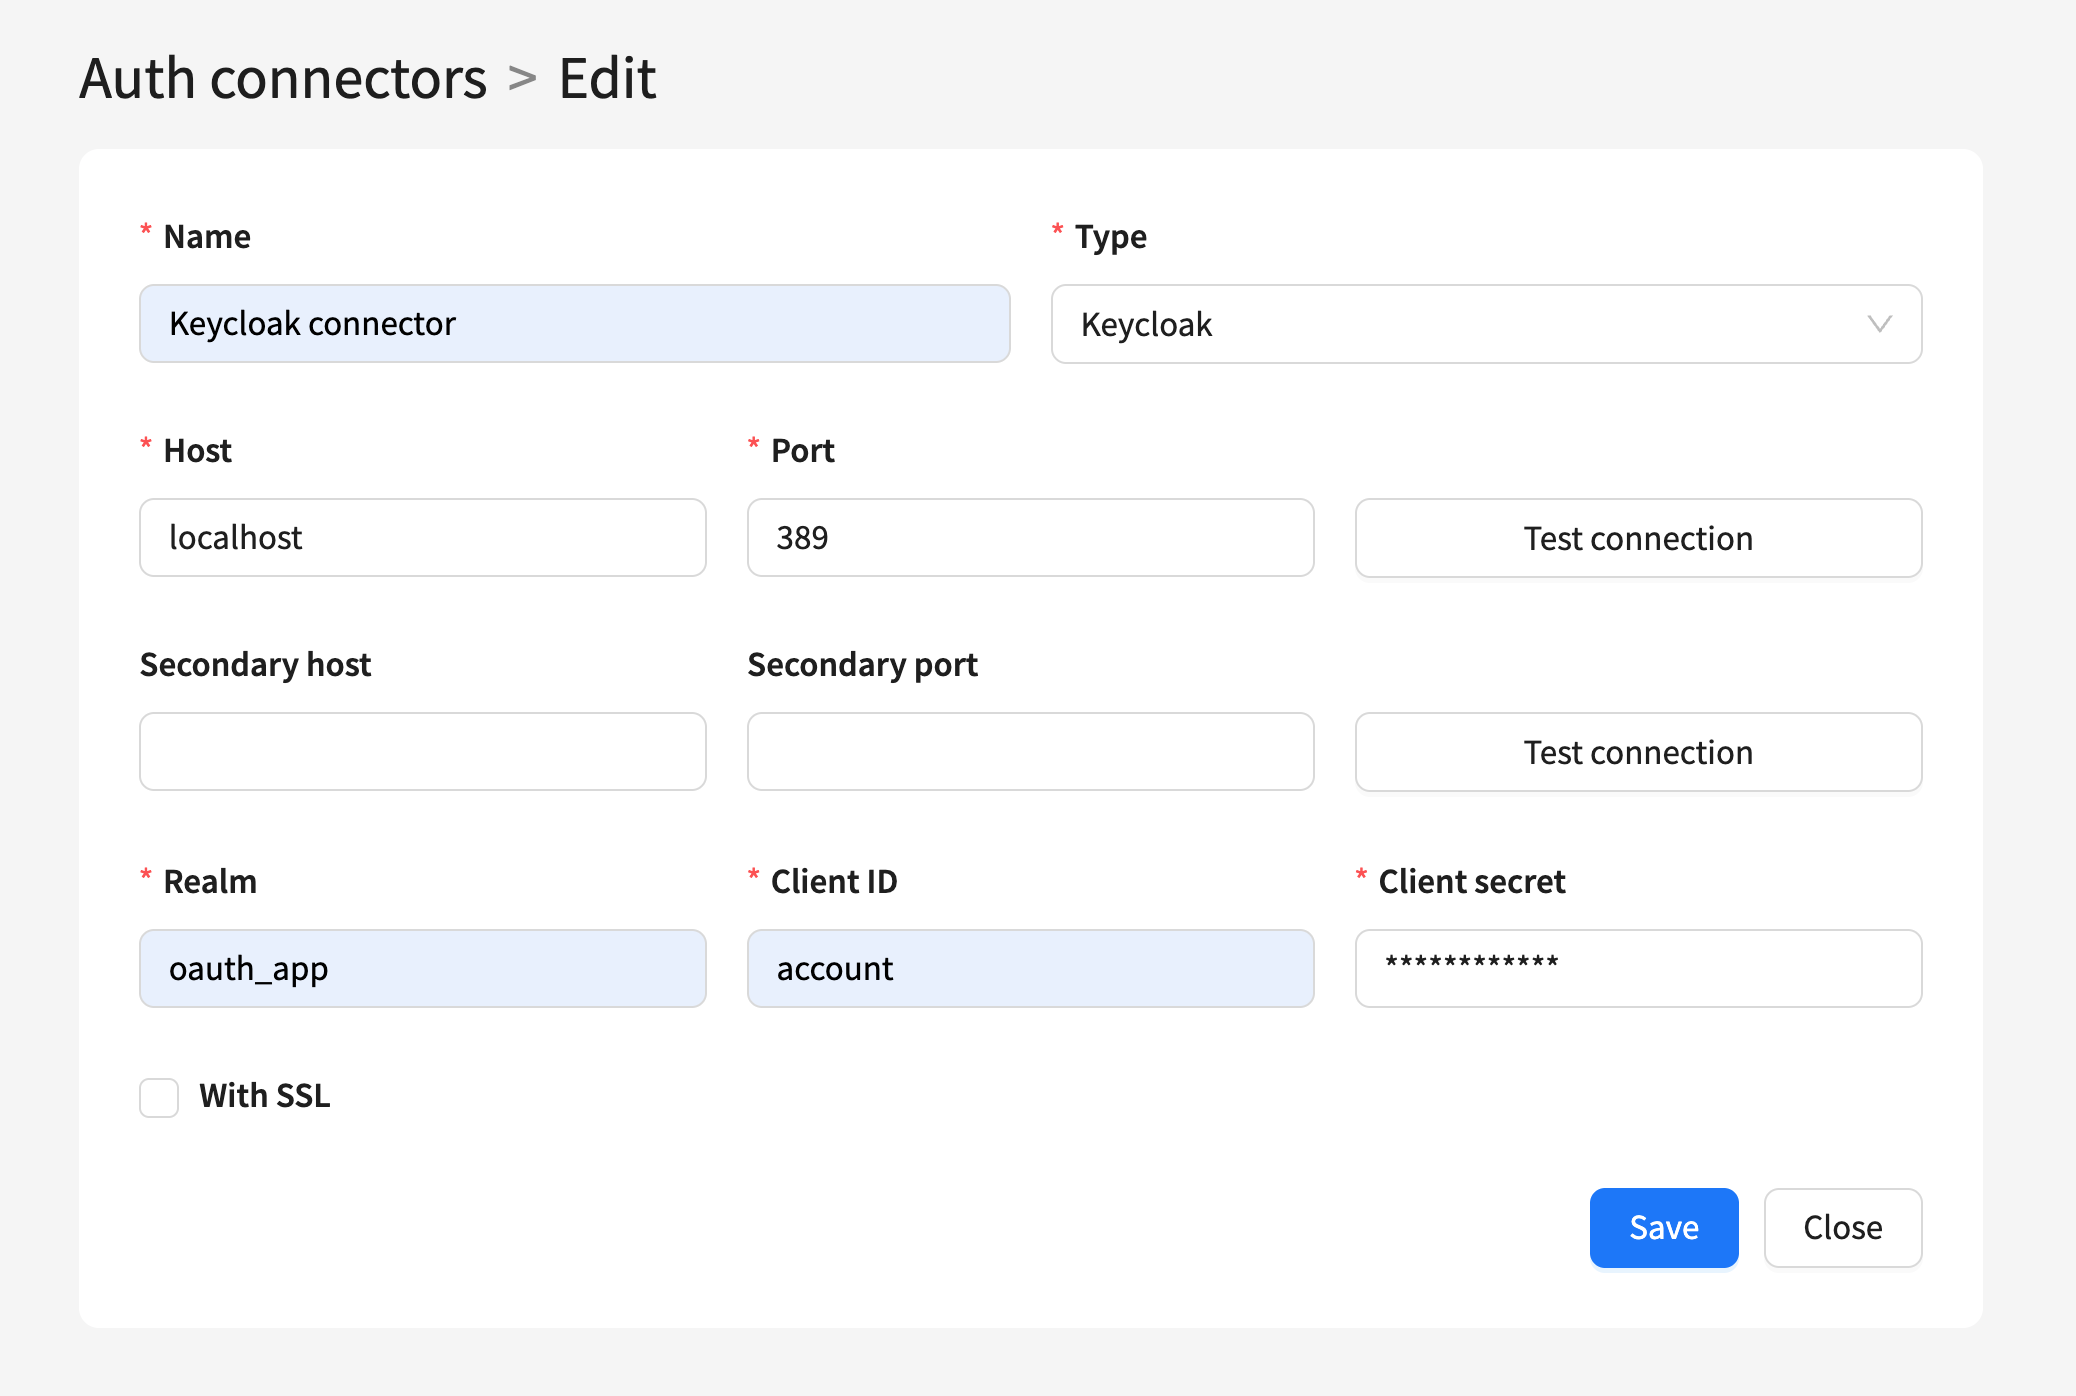
After saving the connector, it becomes available for selection in the account settings and can be used for user authentication via Keycloak.
User Authorization Flow via Keycloak
User authorization via Keycloak in Altcraft is implemented using the standard OIDC redirect flow.
When signing in, the user enters their login in the Altcraft authentication form. At this stage, the platform determines which authentication type is associated with the user’s account (local, LDAP, or Keycloak). If a Keycloak connector is configured and active for the account, the user is automatically redirected to the Keycloak login page.
On the Keycloak side, the user enters their credentials and completes authentication. After successful verification, Keycloak redirects the user back to Altcraft with authentication tokens.
Altcraft validates the received token, extracts the user’s groups and attributes, and determines access rights to the platform or the administrator panel based on this data. If validation is successful, the user is granted access to the system with the appropriate roles and groups.