Automatic installation
We recommend that you install the platform manually. For details on how to do this, see this article.
By default, AKD is provided as an executable file.
Package integrity verification
Installation package is distributed with an .md5 control sum file:
ls -lh
-rwxr-xr-x 1 root root 136M Sep 18 16:04 AKD_Auto_Installer
-rwxr-xr-x 1 root root 136M Sep 18 16:04 AKD_Auto_Installer
Run the following command (Change file name if it happens to be different):
md5sum AKD_Auto_Installer | grep -q $(<AKD_Auto_Installer.md5) && echo "OK" || echo "Incorrect checksum"
If the response is OK, the checksum is correct and thus you can proceed with installation.
Marketing platform installation
The script can be run with the following flags:
-h --help- shows the script help;-i --install /path/to/akd/- installs the platform at the specified path;-u --update /path/to/akd/- updates the platform located at the specified path;-e --extract /path/to/akd/- extracts the platform files to the specified path;-l --less-verbose- skips informational messages during the installation process;-sr --skip-requirments- skips dependency checking and OS version checking;-skip-backup- skip backup creation (only when upgrading).
Add execute permissions to AKD_Auto_Installer file and then run it:
chmod +x AKD_Auto_Installer
./AKD_Auto_Installer --install
First, several installer program dependencies will be installed from Ubuntu repository. Then minimum system requirements will be verified and in case of success - language selection menu will appear. In this article all the screenshots refer to English version (EN).
After language is selected you can proceed with installation.
Several platform dependencies will be installed including MongoDB database and RabbitMQ message broker. If your server has already an instance of MongoDB with a different version, the installation program will offer to reinstall it.
You can abort the installation process at any time by pressing Control + C.
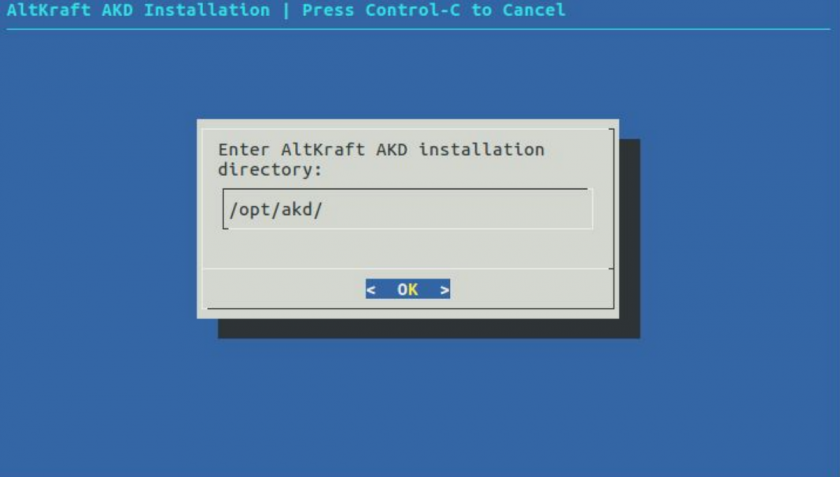
After the main dependencies are set up the installer will ask you to specify platform base directory. By default it is /opt/akd.
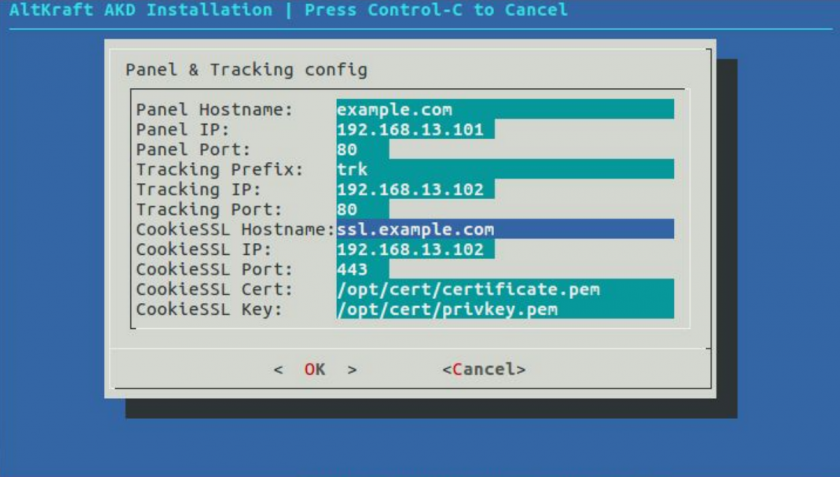
Then you will see Panel & Tracking configuration screen. Specify domains, IP addresses and ports for user interface, tracking and cookiesaver — along with SSL certificate for the latter. Technology description can help you with default ports and domains description.
The next step is General configuration options screen. Here you can reconfigure previous parameters and have access to additional settings. On this step you are setting connections to databases and message broker, that can be installed on the same server or on a remote one. If they are accessible — the settings will be accepted. If you are using the same server — the installation program will suggest you to set up these components.
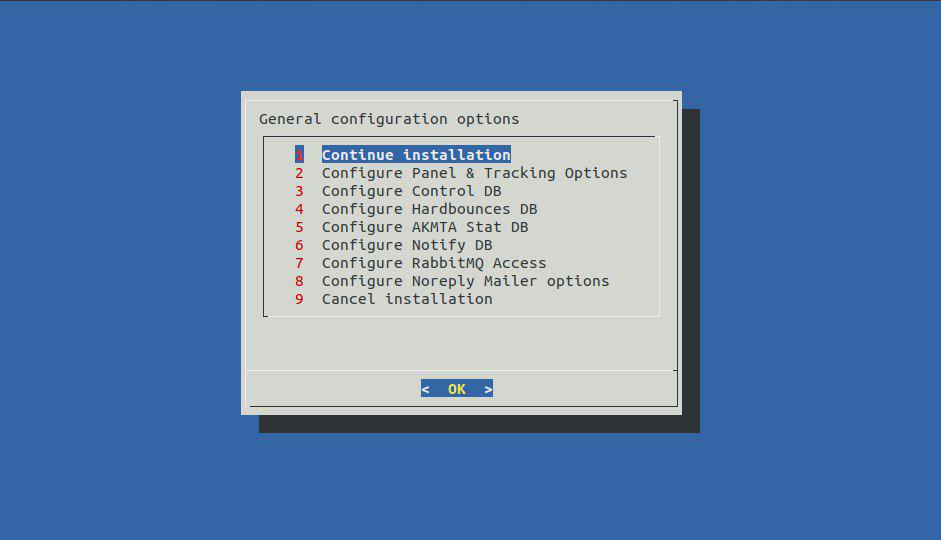
1. Continue installation — when everything's configured - proceed with this option.
2. Configure Panel & Tracking Options — returns you to the previous step where you can change domains, IPs and ports.
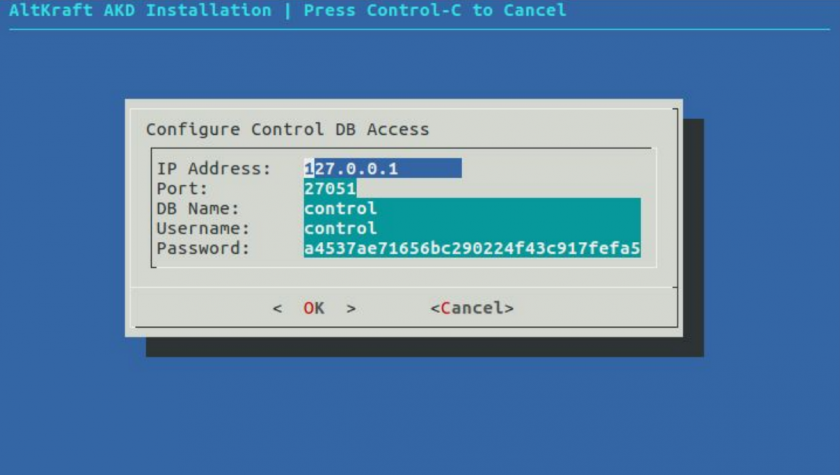
3. Configure Control DB – the main system database. Contains platform accounts, users, senders and settings. It is installed locally by default; this will fit you in most cases.
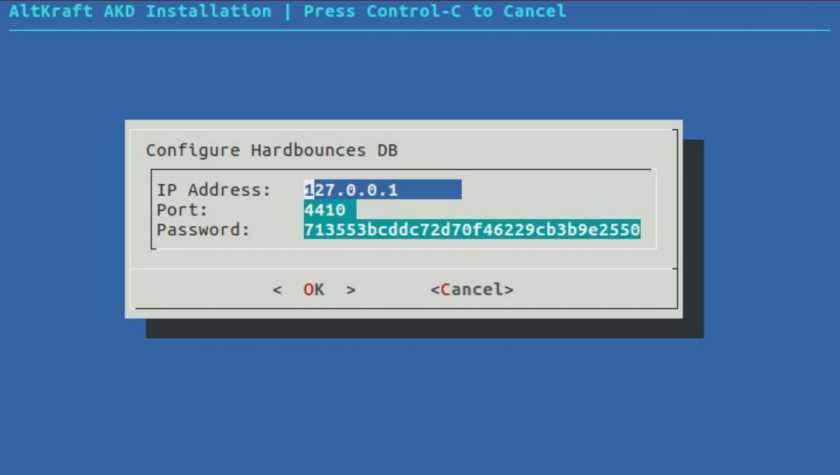
4. Configure Hardbounces DB – the database for invalid email addresses and unsubscribers. It is installed locally by default; this will fit you in most cases.
5. Configure AKMTA Stat DB — AKMTA sender statistics database. Can be installed locally, or on apublic IP address, or on any IP address accessible by the sending server.

6. Configure Notify DB — notifications database. It is installed locally by default; this will fit you in most cases.

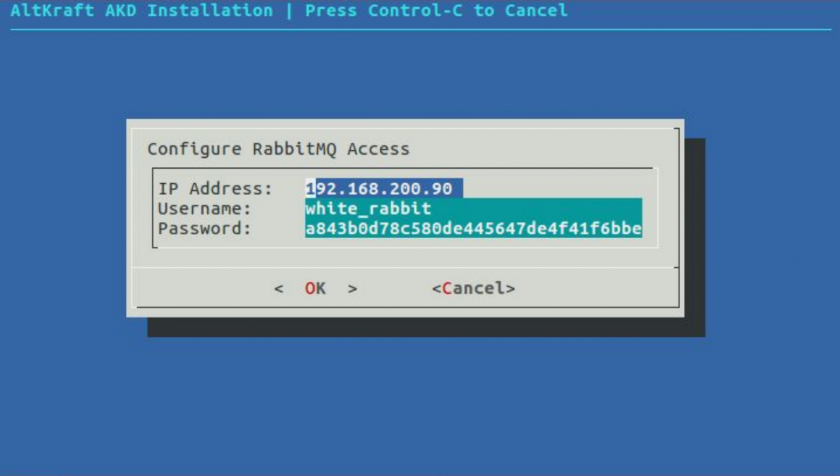
7. Configure RabbitMQ Access — message broker configuration. Local installation is recommended. Specify public IP, Username and Password. Must be accessible by sending server.
8. Configure Noreply Mailer — email notifications and reports settings.

When you continue installation Control Database access will be checked and if connection fails installer will suggest you to setup a new database or to resume to configuration settings.
The default path to databases directory is /data.We recommend to allocate the directories like this:
| Database | Server with 3 HDD |
|---|---|
| Control DB | 1st disk / array |
| HardBounces DB (hbsupp) | 1st disk / array |
| AKMTA Stat DB (mtastat) | 3rd disk / array |
| Data DB | 2nd disk / array |
| Actions DB | 3rd disk / array |
Then RabbitMQ message broker users and queues will be validated and added.
In case no SSDB database is found, it will be downloaded from the official git-repository, compiled and installed into /usr/local/ssdb` (by default).
After that a request to Control DB for existing database configurations. If nothing is found, the following components will be set up.
Account DB — subscribers databases and account entries.
Actions DB — subscribers' action history database.
Refer to the table above to allocate databases correctly.
In case no configuration for task processor (job_server) is found in Control DB, its token will be automatically generated and recorded.
During the last stage Altcraft Marketing Platform is launched along with Job server.
When installation is complete, installation log will be written to the terminal. By default it is saved at /var/log/akd_install.log and it is overwritten any installer launch. This log helps detect problems occurring during the process. Send it to our technical support if you are facing any problems.